
I have always considered myself a “self-taught” photographer (minus those few B&W darkroom classes I took in high-school). It’s been a long journey for me, and my transfer from film to digital has definitely had its challenges. For example, I vividly remember trying to figure out how to work my first digital SLR (a Nikon D2H) … I was on vacation and really using it for the first time, and was so frustrated that the exposure kept going all wacky on me. It turns out that it was on bracketing mode and I didn’t realize it! Hehe … it was only uphill from there.
When I started contributing to iStock, one of the first things I wanted to master the white-background effect. I did some research, and thanks to Strobist I was able to create my own little soft-box out of a cardboard box, see-through white paper and poster board (oh, and sunlight, of course). This is one of my photos I took with that cute little box.
Eventually I wanted to photograph people, so I invested in some background equipment, and also some AlienBees strobes. I honestly had no idea what I was doing! My setup was one light on the backdrop, located directly behind the subject, and two lights (each with soft-boxes) lighting the subject. (This was in a small room … about the size of a small bedroom.) I had some good luck and got some great shots (here’s one of them) but had very limited space in my little house in Hawaii. It’s been well over a year and a half since I last did any white-background images, so I thought I would do some updated ones with my usual models.
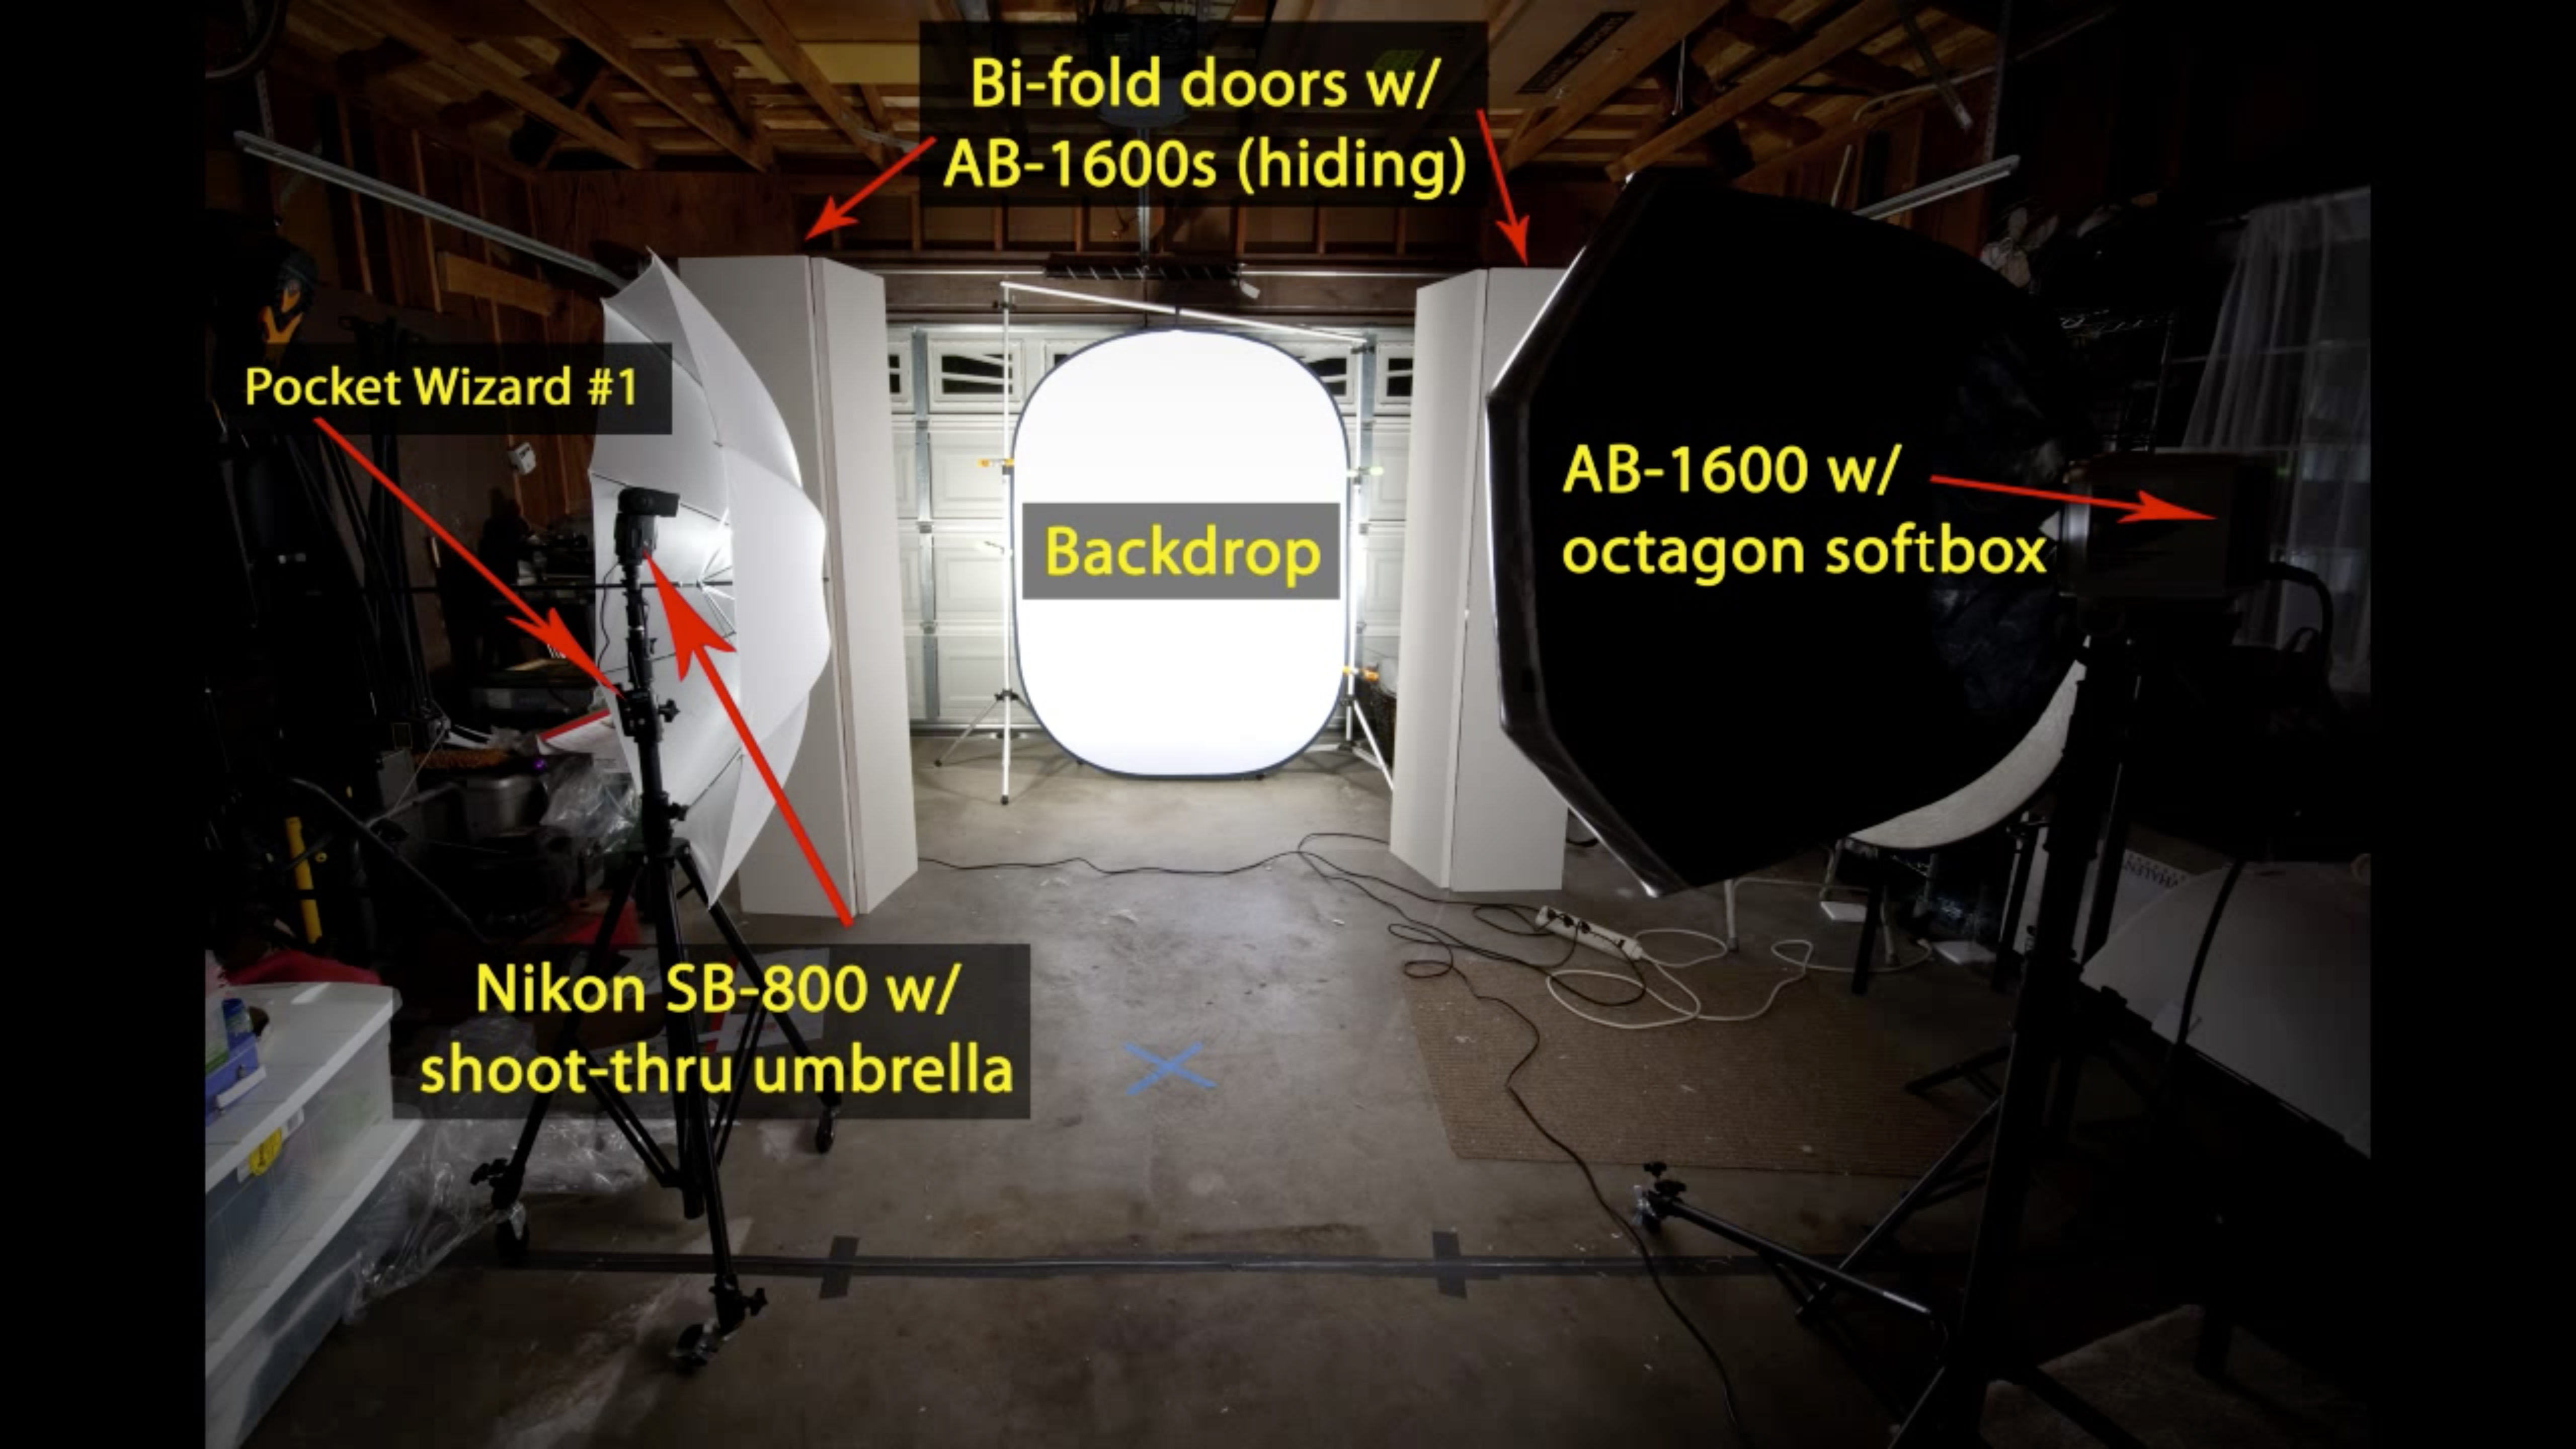
Now that I have an entire garage at my disposal, I was able to bring the subject further from the backdrop and light the background with two lights, blocking any spill with a few bi-fold closet doors I got at Home Depot for $34 each. I also used one of my Nikon speedlights as an additional light on the kids … here’s the photo of my complete setup. The above is a time-lapse of setting-up and a few finished images of my “studio” and photographing the kids. Here’s a list of the equipment used in that shoot:
- Camera: Nikon D200
- Lens: Nikon 24-70 f/2.8
- Lights: AlienBees 1600 (x3) – one w/ octagon softbox, two with field reflectors; one Nikon SB-800 w/ shoot-through umbrella
- Trigger: PocketWizards (x3) – one on SB-800, one on AB-1600 (the other two strobes were triggered optically), one on-camera
- Misc: Bi-fold closet doors (x2)
- Backdrop: 2-Sided Flex-out (black/white)
I believe that there is never an end to learning about photography, and so that’s why I put this little video together. It’s because of other wonderful artists out there who share their tidbits of information about photography with the world that has brought me to where I am today, so I want to do what I can to spread the love, too. So, with that said … please enjoy the video!
Watch the Video
I have always considered myself a “self-taught” photographer (minus those few B&W darkroom classes I took in high-school). It’s been a long journey for me, and my transfer from film to digital has definitely had its challenges. For example, I vividly remember trying to figure out how to work my first digital SLR (a Nikon D2H) … I was on vacation and really using it for the first time, and was so frustrated that the exposure kept going all wacky on me. It turns out that it was on bracketing mode and I didn’t realize it! Hehe … it was only uphill from there.
When I started contributing to iStock, one of the first things I wanted to master the white-background effect. I did some research, and thanks to Strobist I was able to create my own little soft-box out of a cardboard box, see-through white paper and poster board (oh, and sunlight, of course). This is one of my photos I took with that cute little box.
Eventually I wanted to photograph people, so I invested in some background equipment, and also some AlienBees strobes. I honestly had no idea what I was doing! My setup was one light on the backdrop, located directly behind the subject, and two lights (each with soft-boxes) lighting the subject. (This was in a small room … about the size of a small bedroom.) I had some good luck and got some great shots (here’s one of them) but had very limited space in my little house in Hawaii. It’s been well over a year and a half since I last did any white-background images, so I thought I would do some updated ones with my usual models.
Now that I have an entire garage at my disposal, I was able to bring the subject further from the backdrop and light the background with two lights, blocking any spill with a few bi-fold closet doors I got at Home Depot for $34 each. I also used one of my Nikon speedlights as an additional light on the kids … here’s the photo of my complete setup. The above is a time-lapse of setting-up and a few finished images of my “studio” and photographing the kids. Here’s a list of the equipment used in that shoot:
- Camera: Nikon D200
- Lens: Nikon 24-70 f/2.8
- Lights: AlienBees 1600 (x3) – one w/ octagon softbox, two with field reflectors; one Nikon SB-800 w/ shoot-through umbrella
- Trigger: PocketWizards (x3) – one on SB-800, one on AB-1600 (the other two strobes were triggered optically), one on-camera
- Misc: Bi-fold closet doors (x2)
- Backdrop: 2-Sided Flex-out (black/white)
I believe that there is never an end to learning about photography, and so that’s why I put this little video together. It’s because of other wonderful artists out there who share their tidbits of information about photography with the world that has brought me to where I am today, so I want to do what I can to spread the love, too. So, with that said … please enjoy the video!
Watch the Video

Nicole is a photographer, published author, and educator specializing in Lightroom, Photoshop, and photography. She is best known for her books on food photography but is widely versed in various photographic genres, including landscape, nature, stock, travel, and experimental imagery.


Excennent tutorial. I remember my first DSLR. I was on vacation too and I underexposed everything.
Can you actually make money on iStockphoto?
Thanks a ton for this.. I’m going to bookmark it!
@myphotoscout Yes, people actually can make money on iStock! It’s what I do full-time right now … not full-time pay yet, but maybe in a few years.
love the time lasp. You would never know it took that many lights. Nice tip on photoshop burning and dodge as well.
wow, that was fun!! I guess i can no longer use my messy garage as an excuse for not doing this kind of thing :)
Thanks for sharing. It was great to see the whole process of your shoots.
Wow! That sure was fun to watch….Thanks!
Thanks for sharing! I’m in the learning stages and this definately helps.
Nicole,
Sent you an @tell on twitter, but not sure you got it.
I love this and thank you for sharing. I love seeing how others are making use of their available space.
There’s an idea I am working on for a background holder for you if you are interested. I am making arrangements to mount it in my garage atm. Seeing in your video that your garage is open above it would be even easier for you to mount it.
Hi Joe … yep, I got it! (Sorry … hadn’t gotten around to replying to all the tweets yet.) Post a photo of it and @ me on Twitter, I’d love to see what you have set up. :)
VERY, very cool video :)
That was a fantastic video – very inspiring.
Great video Nicole!
Great video and wonderful that you included all the setup info for those of us well behind you on the learning track. I have an SB600 and an SB800 and was considering picking up an SB900. However, I think now I’ll try an AlienBee 1600 as my next piece of equipment. Thank you for sharing your work.
Hi Nicole,
Thats a great video and thanks for sharing. I would like to know about the name of that shooting table?
regards,
It’s a Manfrotto table, similar to this: http://www.manfrotto.com/still-life-table