
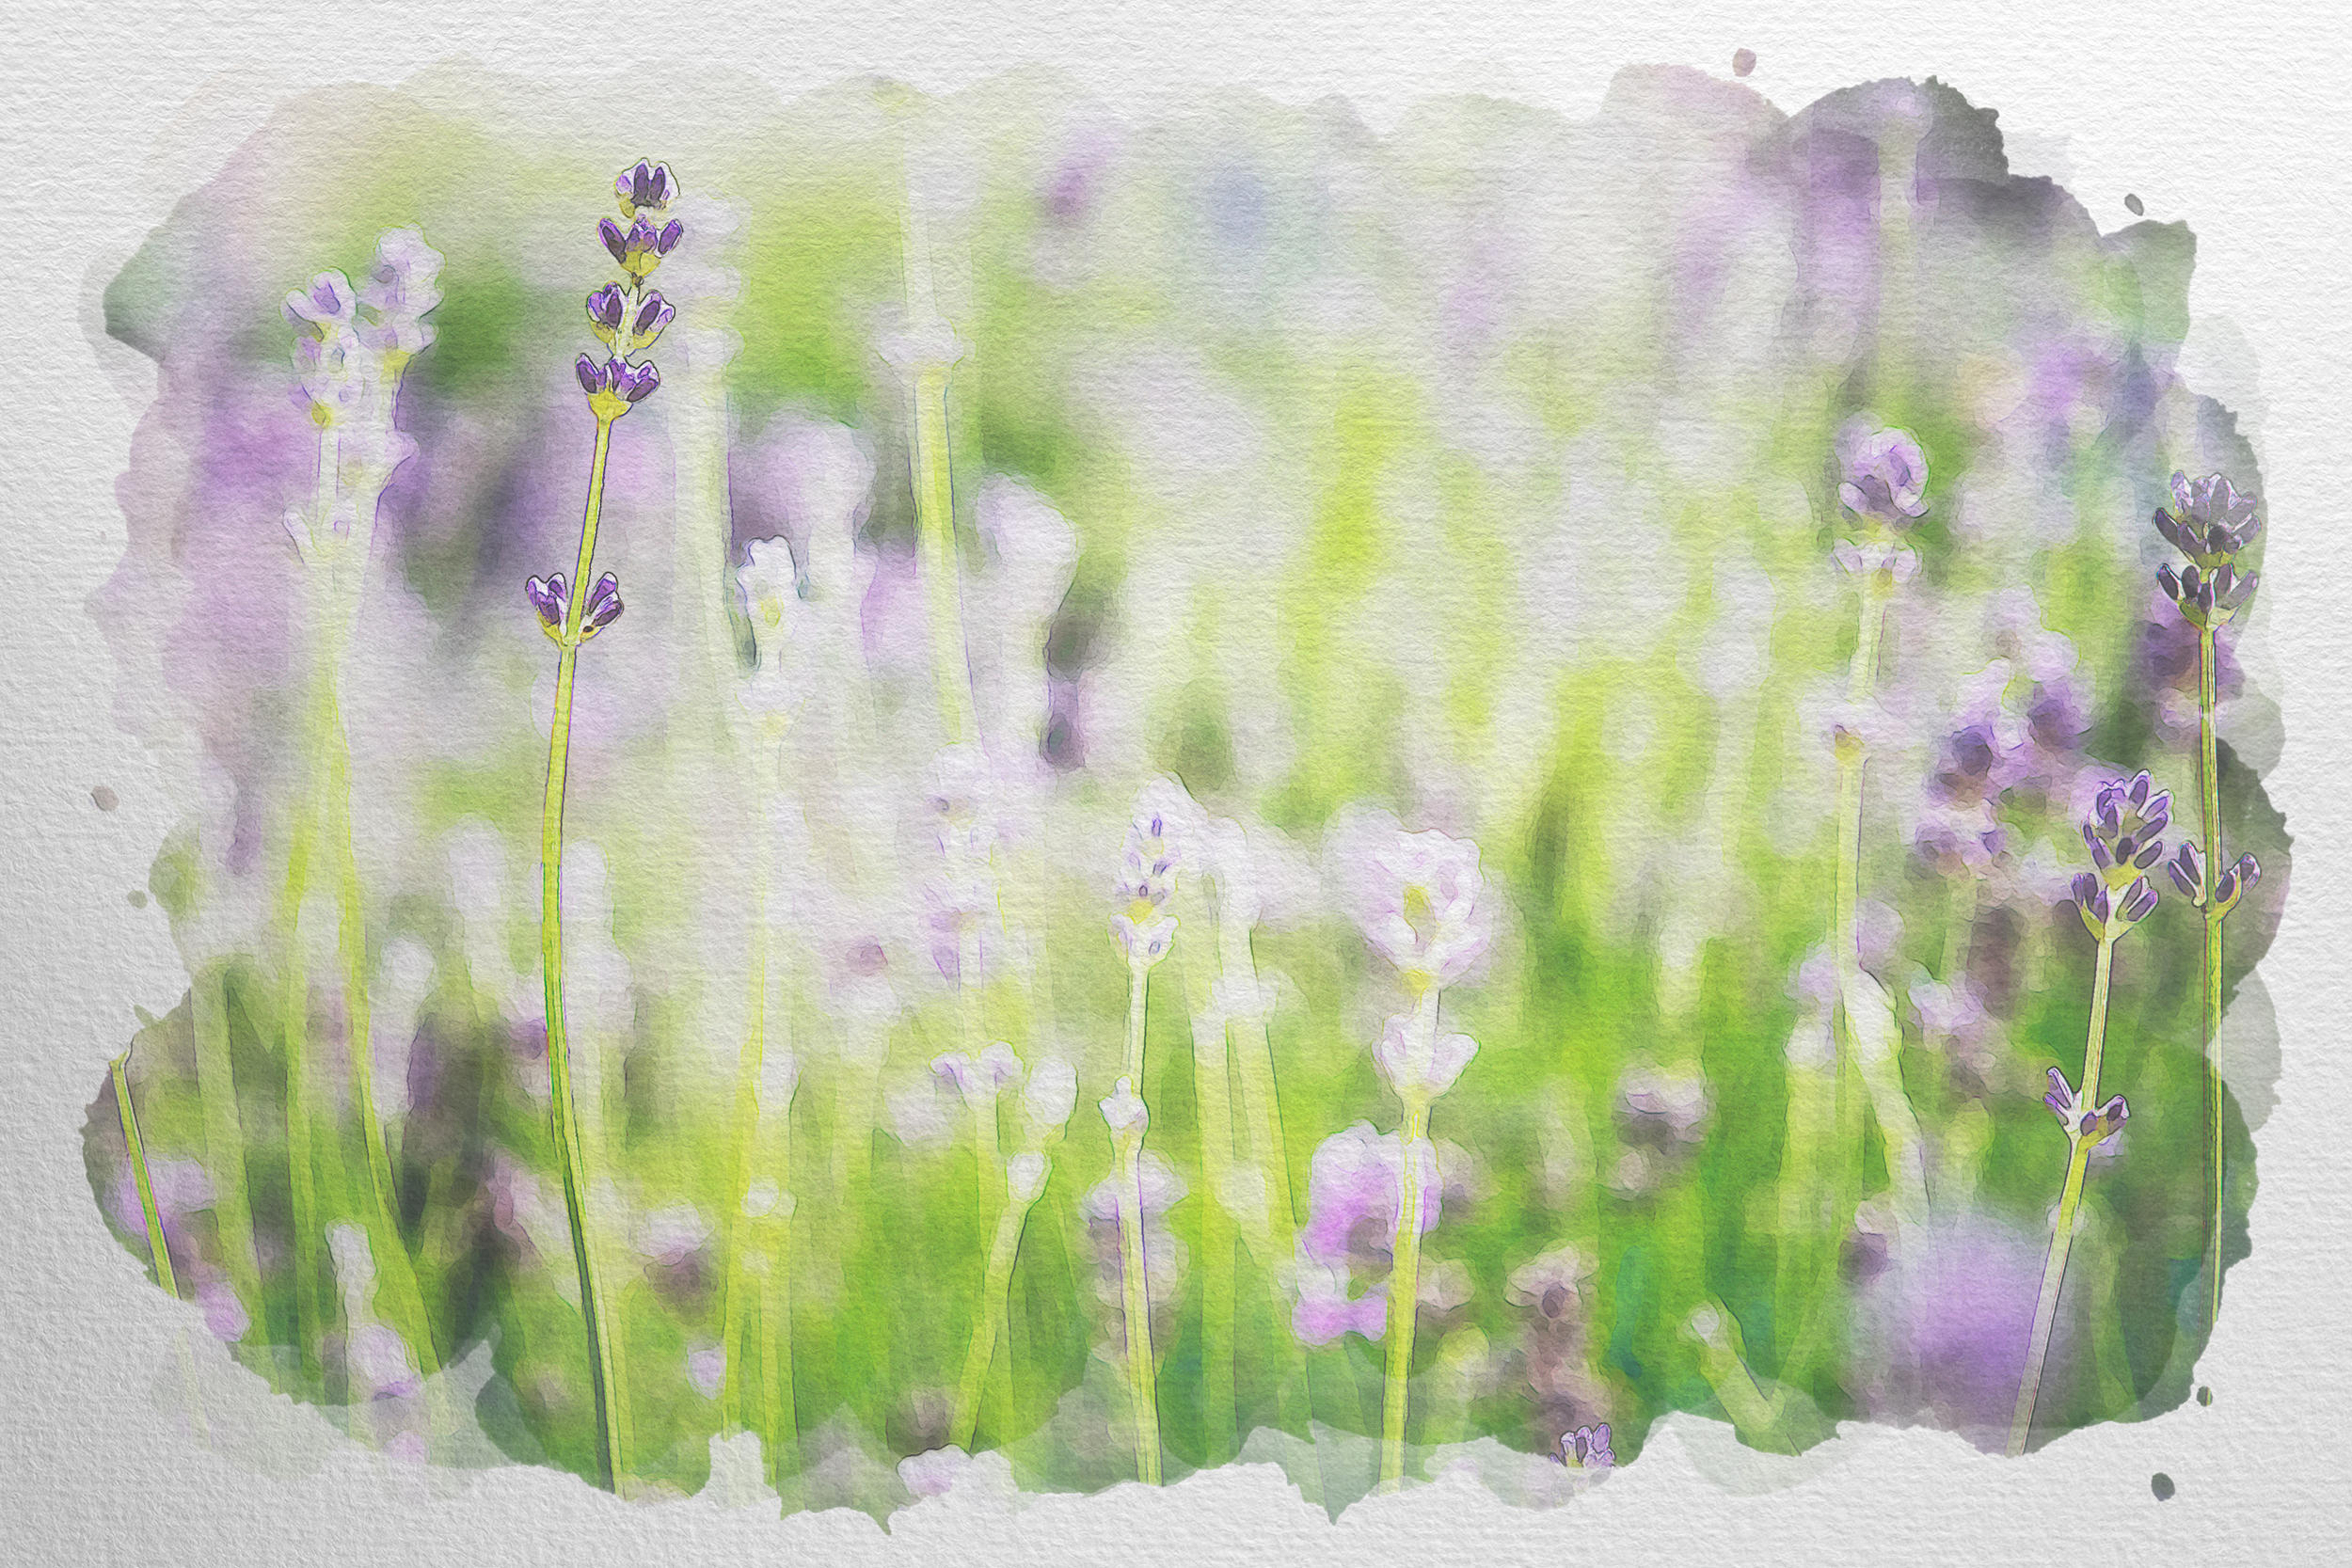
Watercolor is one of my favorite non-photography art mediums. It has texture, and blended colors, and it’s overall it’s just a beautiful form of art. And the best part is, it’s easy to create a watercolor effect in a photograph! Below I’ve put together a tutorial to show you how to create a watercolor effect on your own images using Photoshop CC.
Photoshop CC allows you to create endless types of styles and effects in your photos. This tutorial will walk you through the exact steps to convert any photograph into a watercolor painting. This technique works on all genres of images, including landscapes, flower images, travel photos, buildings, and more.
Click here to download a free watercolor paper overlay and learn more about the Nicolesy Watercolor Effects pack.
Table of Contents:
Step 01: Convert the layer to a Smart Object
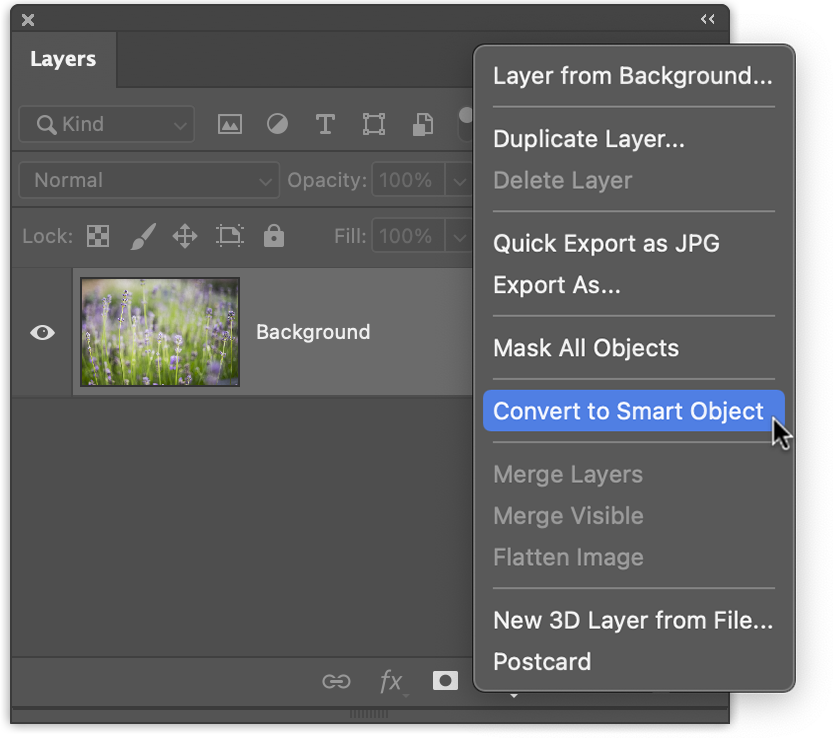
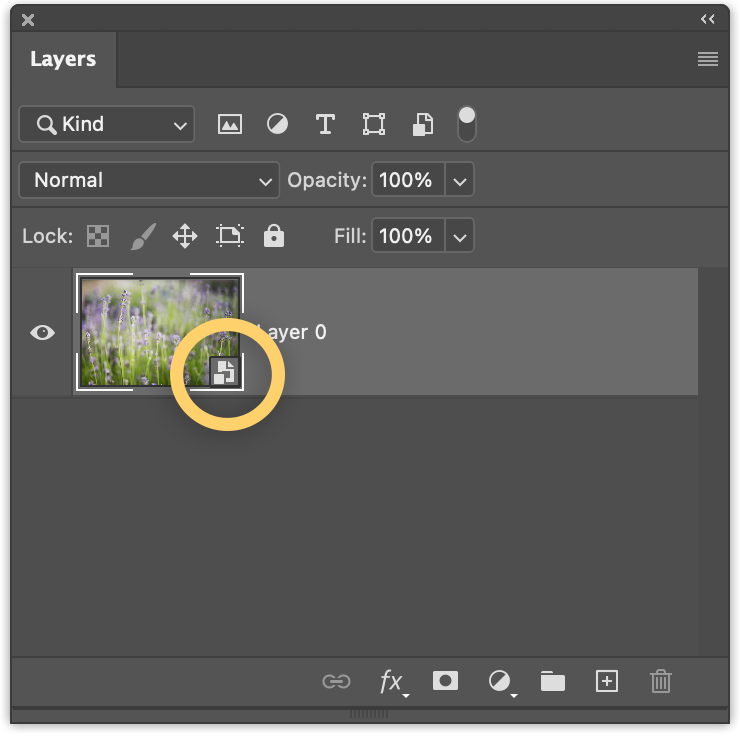
First, open a photo in Photoshop. Then, convert the image layer into a Smart Object. To do this, right-click over the layer (in the black space and NOT over the thumbnail or layer name) and select Convert to Smart Object. You’ll know it’s a Smart Object when there is a small icon in the lower-right corner of the thumbnail.
Converting the layer to a Smart Object gives you the ability to go back and re-edit any of the filters or adjustments you add to the photo.
Step 02: Add the Dry Brush filter
Go to Filter > Filter Gallery and add the Dry Brush filter (located in the “Artistic” section at the top). Then, adjust the following settings:
- Brush Size: 10
- Brush Detail: 10
- Texture: 1

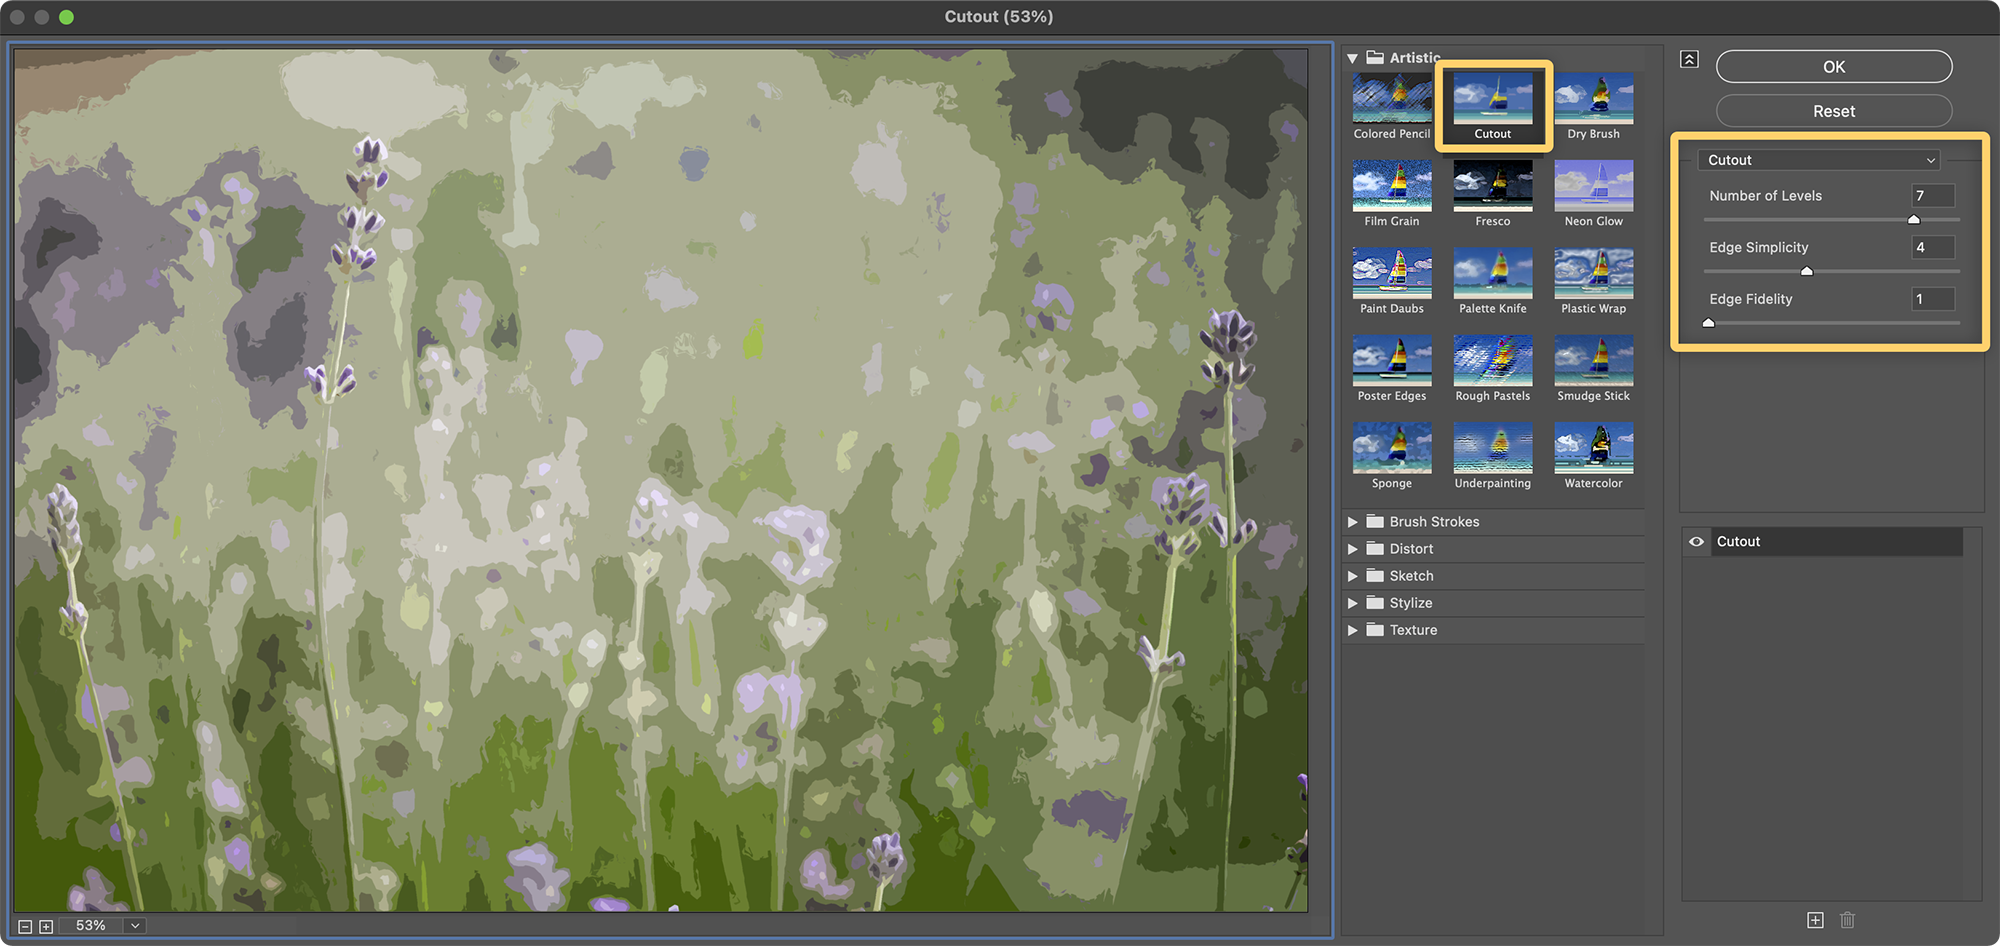
Step 03: Add the Cutout filter
Go to Filter > Filter Gallery and add the Cutout filter (located in the “Artistic” section at the top). Then, adjust the following settings:
- Number of Levels: 7
- Edge Simplicity: 4
- Edge Fidelity: 1
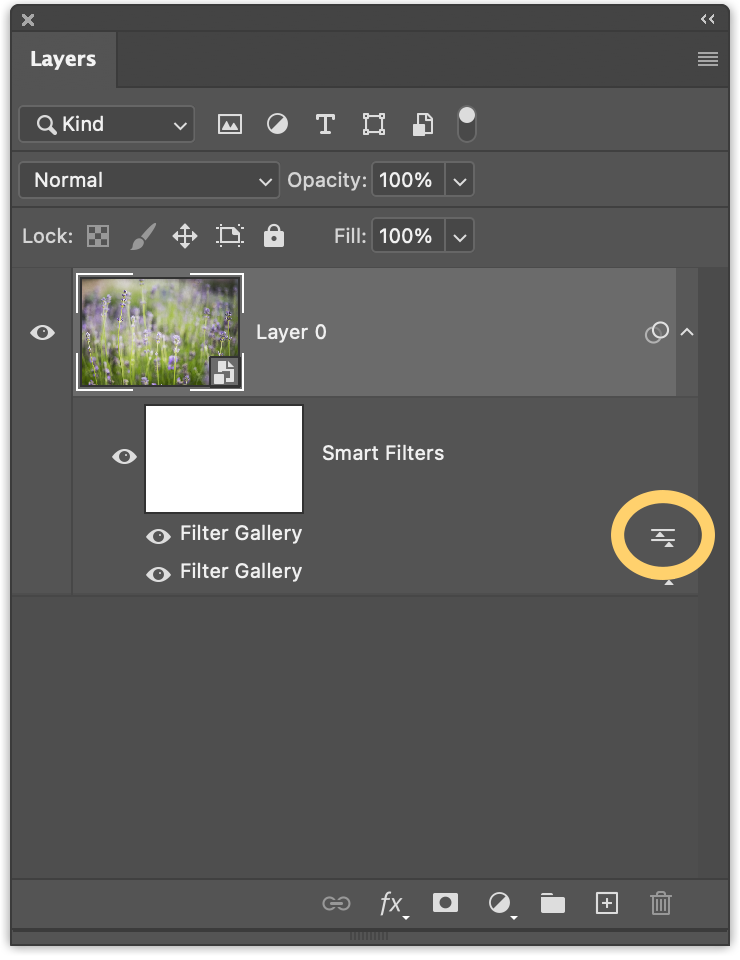
Now, double-click the small icon to the right of the top-most Filter Gallery filter in the Smart Filters in the Layers panel. This brings up the Blending Options for that effect.
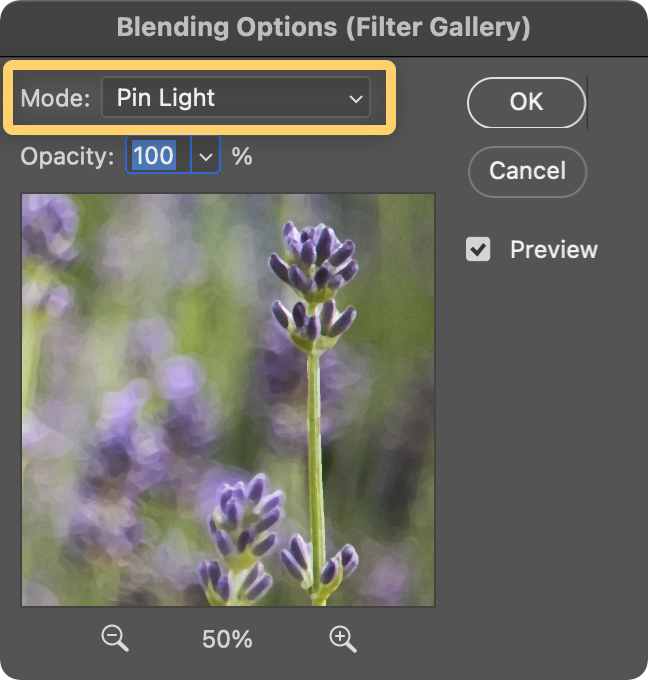
Change the Blend mode to Pin Light and click OK.
Step 04: Add the Smart Blur filter
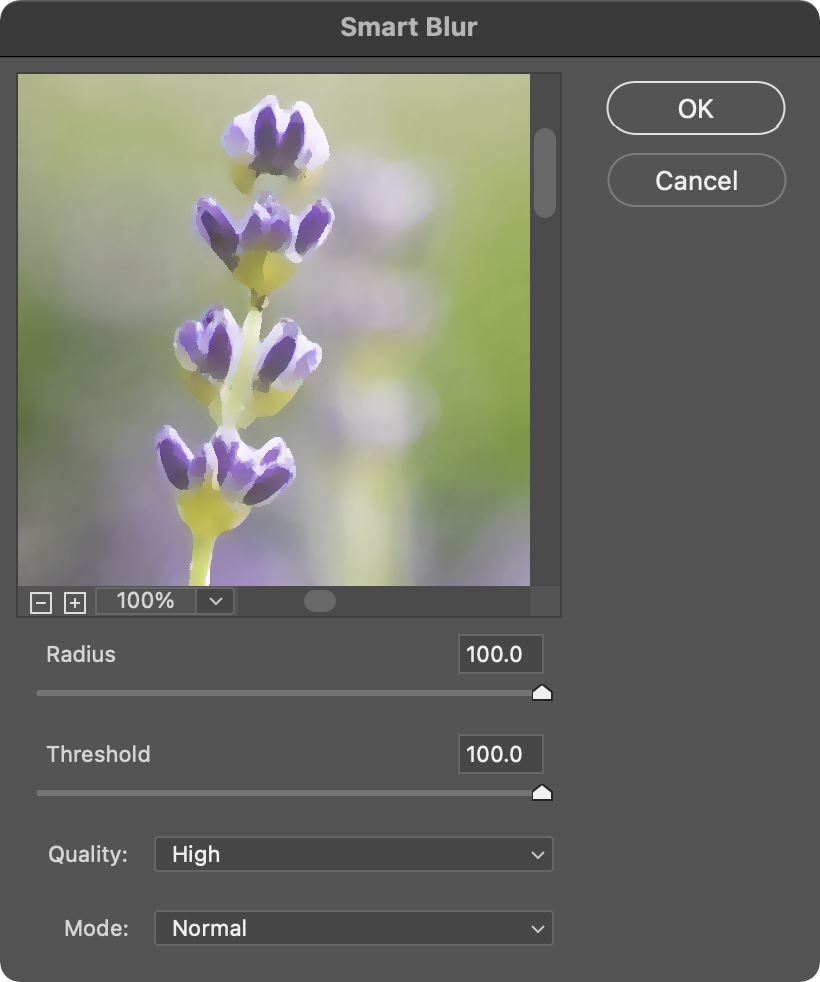
Go to Filter > Blur > Smart Blur and adjust the follow settings:
- Radius: 100.0
- Threshold: 100.0
- Quality: High
- Mode: Normal
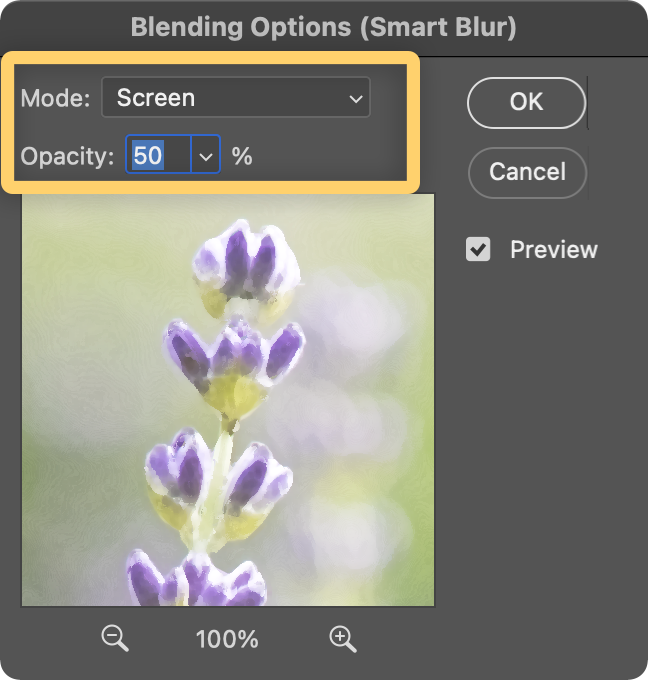
Now, double-click the small icon to the right of the Smart Blur filter in the Smart Filters in the Layers panel. This brings up the Blending Options for that effect.
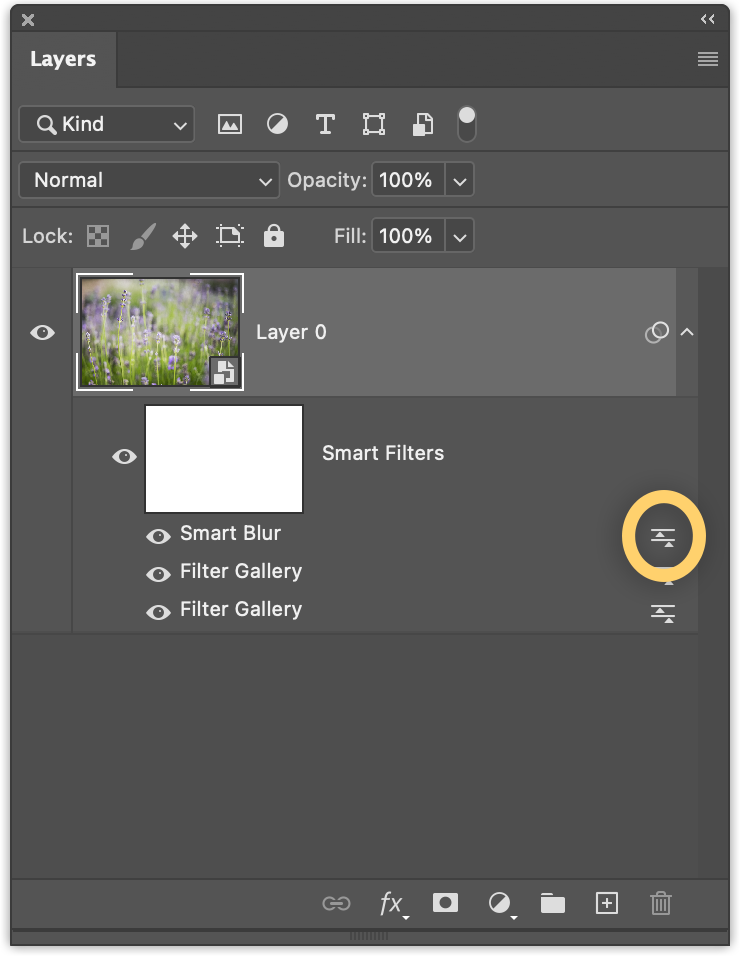
Change the Blend mode to Screen and the Opacity to 50% and click OK.
Step 05: Add the Find Edges filter
Go to Filter > Stylize > Find Edges.

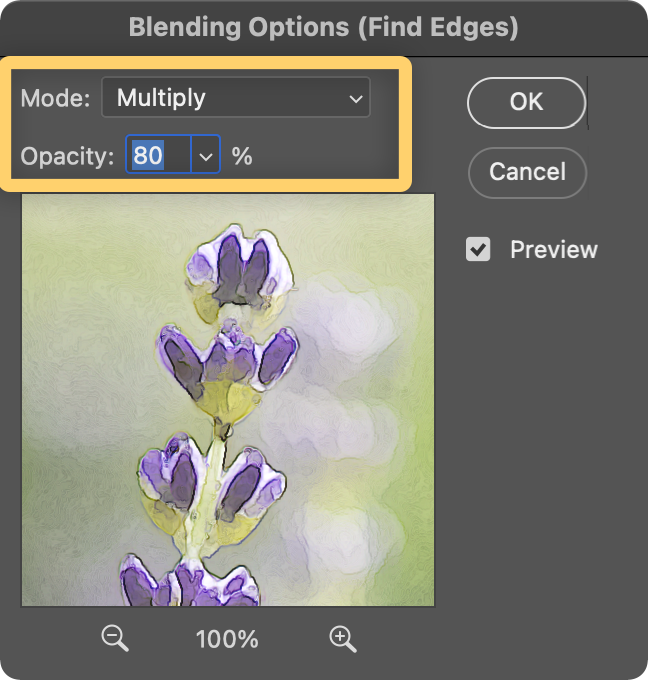
Double-click the small icon to the right of the Find Edges filter in the Smart Filters in the Layers panel. This brings up the Blending Options for that effect.

Change the Blend mode to Multiply and the Opacity to 80% and click OK.
Step 06: Add another Find Edges filter
Go to Filter > Stylize > Find Edges.

Double-click the small icon to the right of the Find Edges filter in the Smart Filters in the Layers panel. This brings up the Blending Options for that effect.
Change the Blend mode to Multiply and the Opacity to 25% and click OK.


Step 07: Add a Curves adjustment
Go to Image > Adjustments > Curves. Add a slight S-curve with a subtle matte effect:
- Click in the upper-right quadrant to create a new point and drag upwards. This brightens the image.
- Click in the lower-left quadrant to create a new point and drag slightly downwards. This adds contrast.
- Click the point on the lower-left corner of the curve graph and drag it up vertically along the left side of the graph. This adds a faded matte effect.

Step 08: Add a watercolor paper effect
First, you want to make sure that you have the Legacy patterns added to the Patterns panel. To do this, first, open the Patterns panel by going to Window > Patterns.
Then, click on the top-right menu drop down in this panel and choose the Legacy Patterns and More option. This will add the legacy paper patterns to your pattern list.

In the Layers panel, click the Create new fill or adjustment layer icon at the bottom of the Layers panel and choose Pattern.
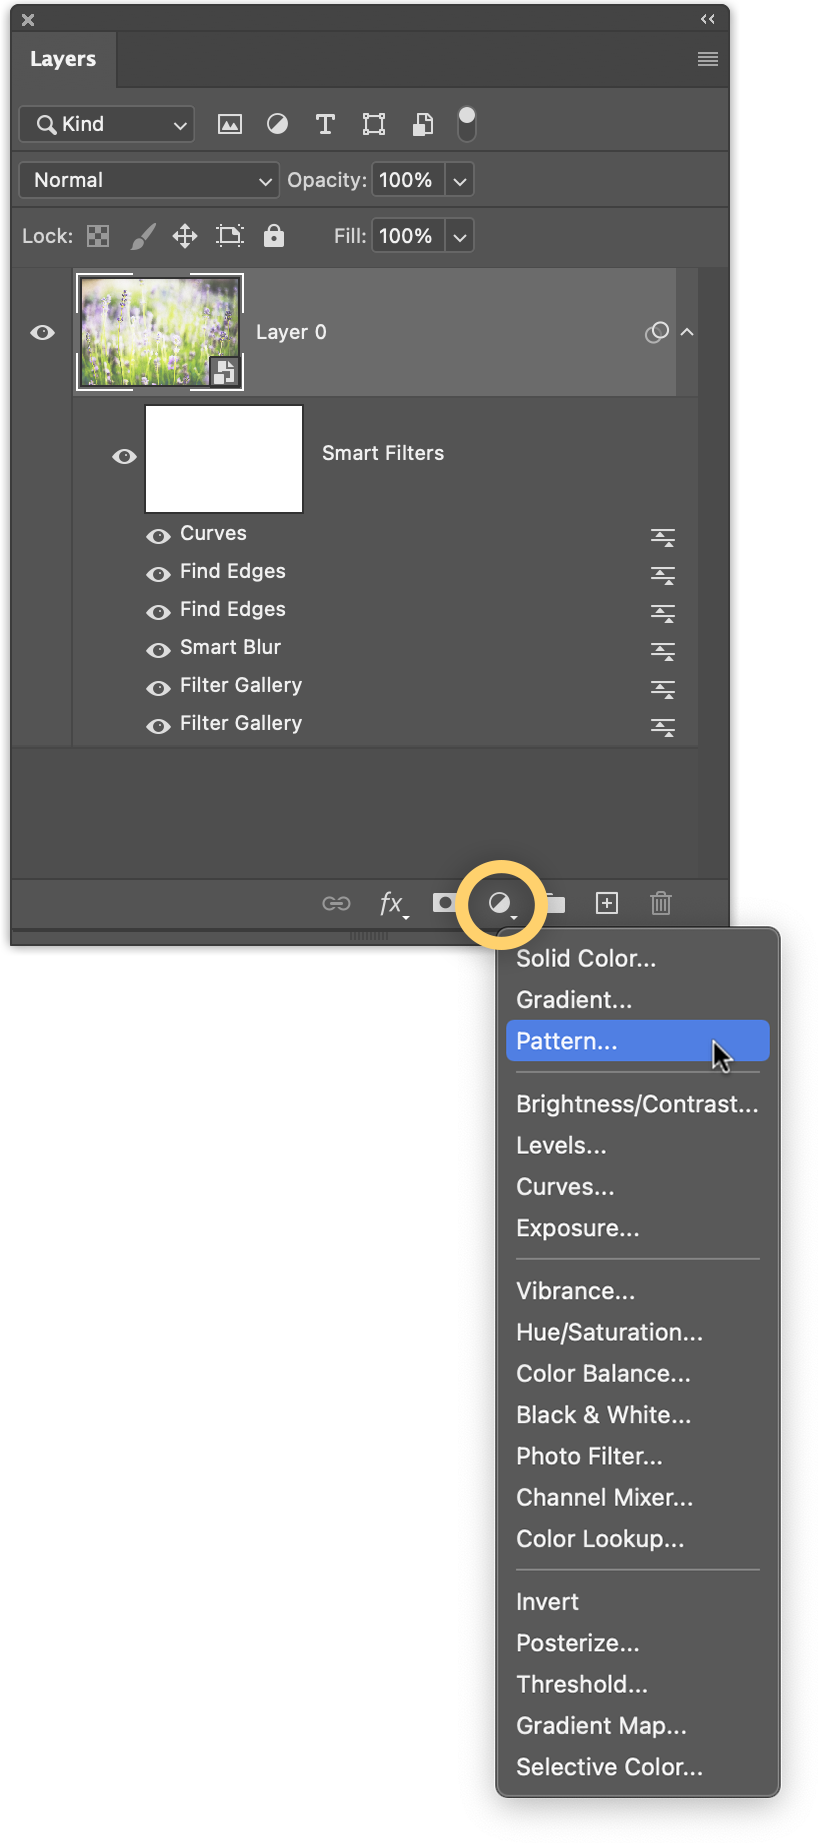
In the Pattern Fill drop-down, navigate to the Watercolor pattern. You’ll find it by going to Legacy Patterns and More > Legacy Patterns > Artist Surfaces > Watercolor. Then, click OK.

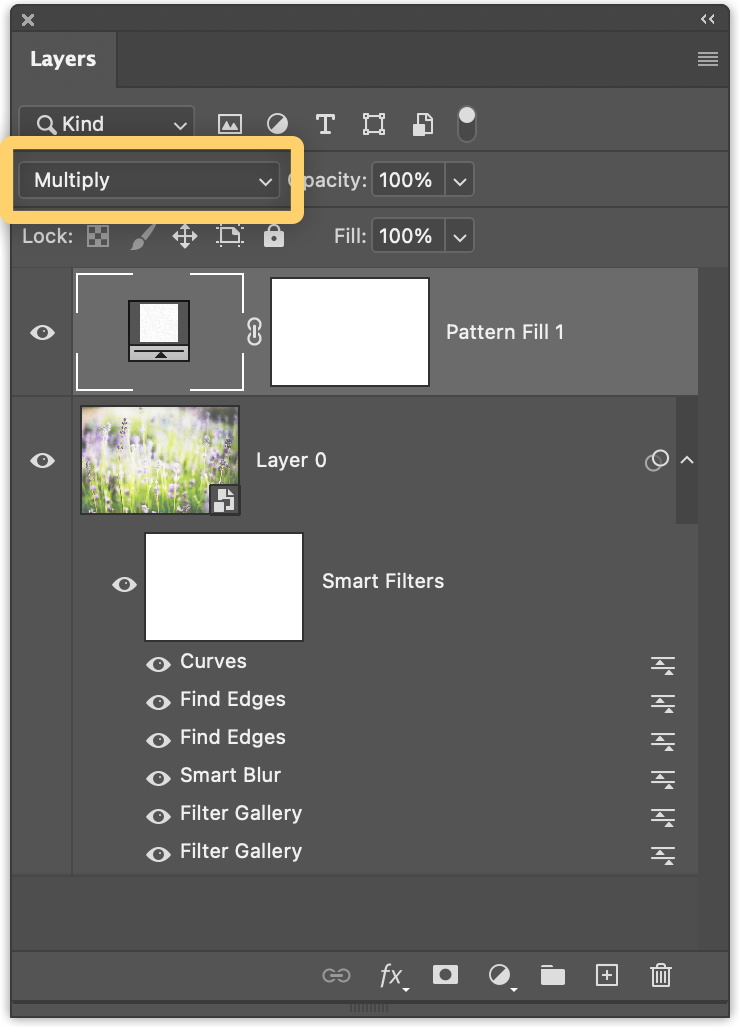
Now, with the new Pattern layer still selected in the Layers panel, change the blend mode to Multiply.
Step 9: Add brush strokes to finish the effect
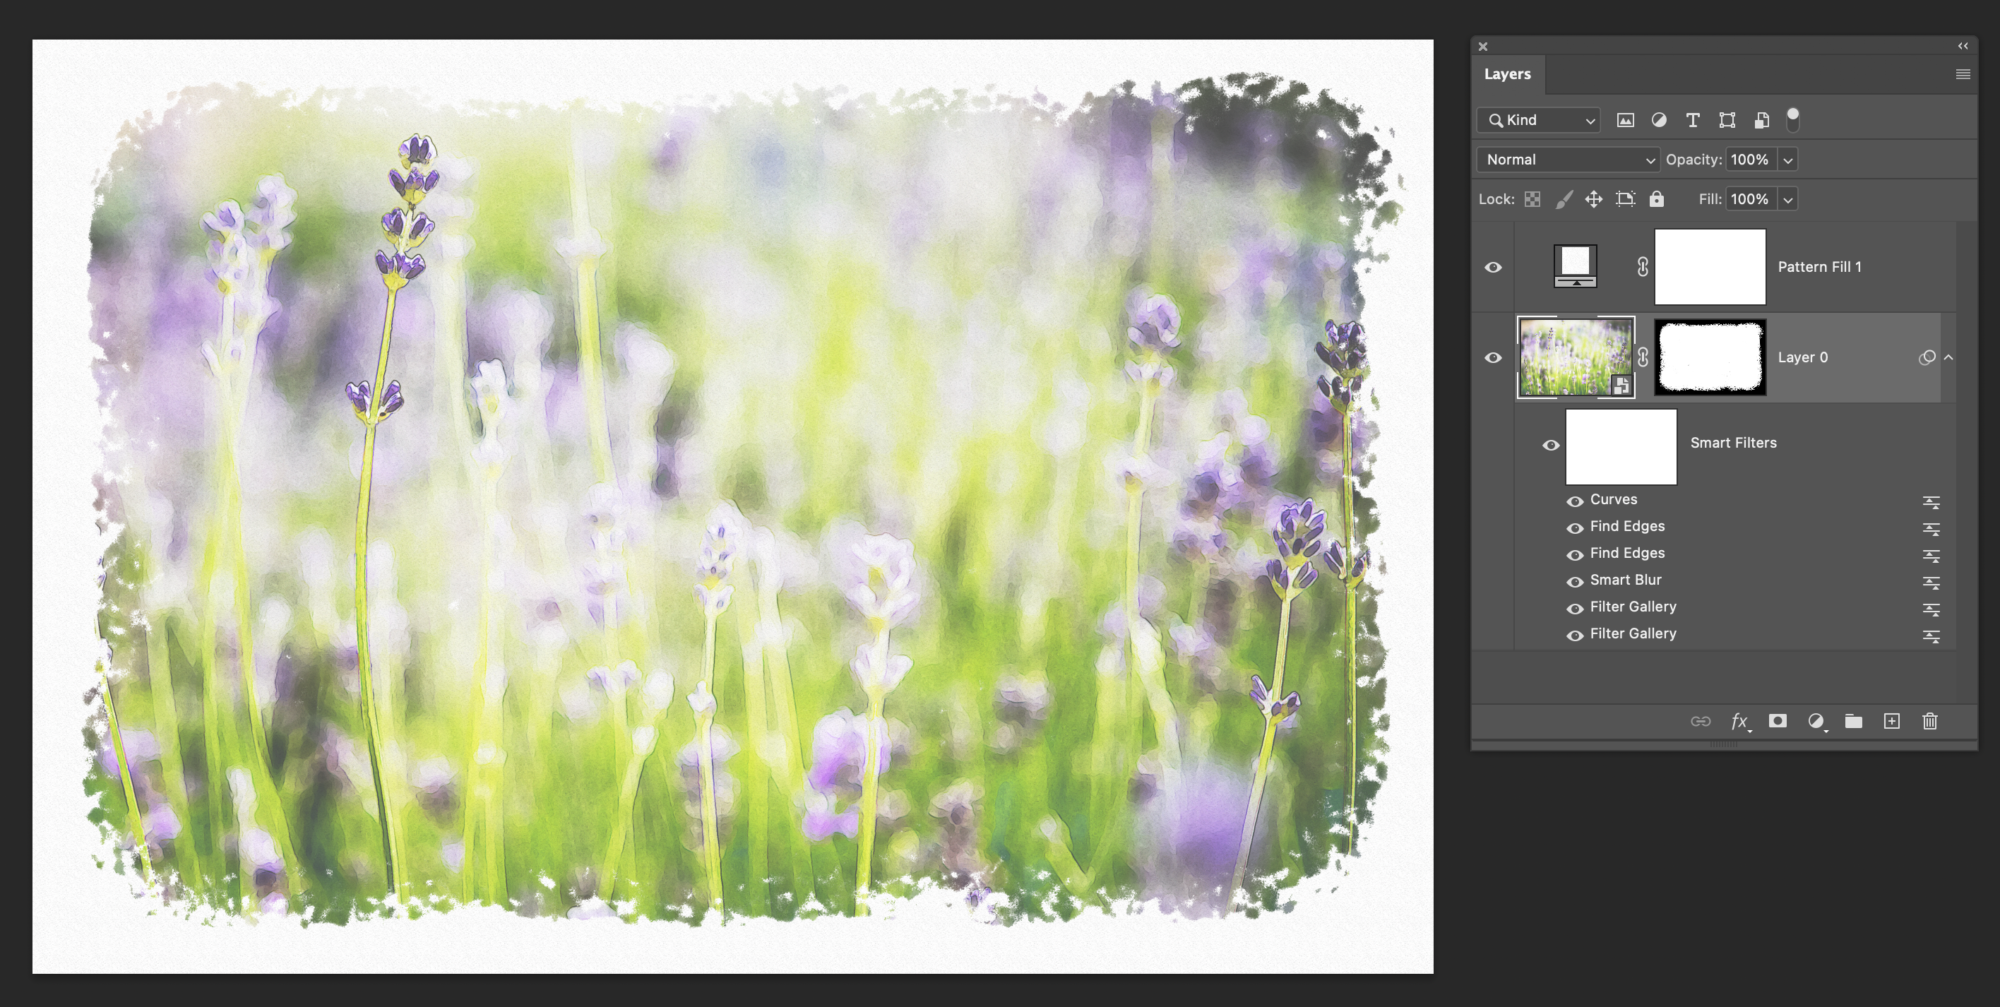
Begin by selecting the image layer in your Layers panel. Then, press and hold the Opt (Mac) or Alt (Win) key and click the Add Layer Mask icon. This adds an inverted (black) layer mask to the layer, hiding the image and all of its effects.

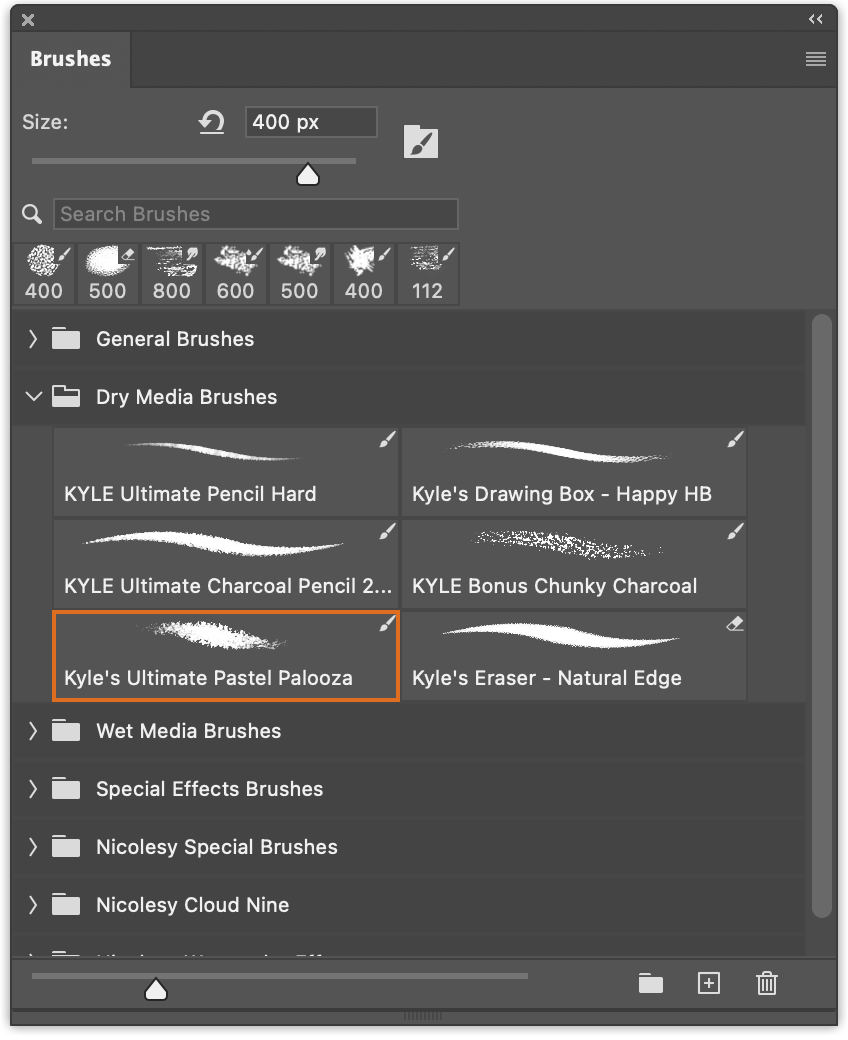
Next, open the Brushes panel (go to Window > Brushes). If you don’t have any watercolor brushes installed, I recommend using the brush titled Kyle’s Ultimate Pastel Palooza (in the Dry Media Brushes folder).
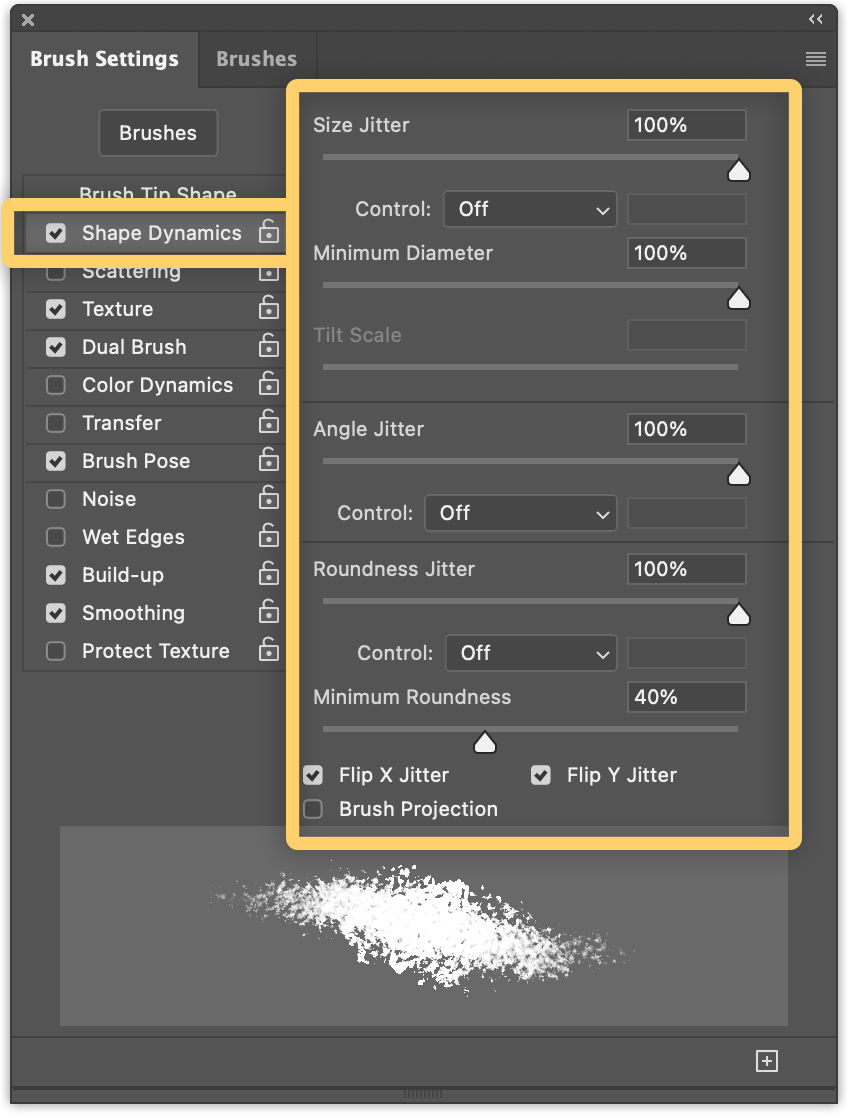
Pro tip: If you would like a more random watercolor edge, open the Brush Settings panel (go to Window > Brush settings) and change settings such as:
- Brush Tip Shape: Check the Flip X and Flip Y boxes
- Shape Dynamics: Size Jitter 100%, Minimum Diameter 100%, Angle Jitter 100%, Roundness Jitter 100%, Flip X Jitter, Flip Y Jitter

Make sure that the brush is set to a larger size (the exact size will depend on your overall image resolution). For this image (3967 px by 2645 px) I have the brush set to 400.
Then, set the foreground color to white and brush over the mask to reveal the watercolor image.
Or, if you have a watercolor brush set, such as the Nicolesy Watercolor Effects, you can create an even more realistic watercolor brush effect:
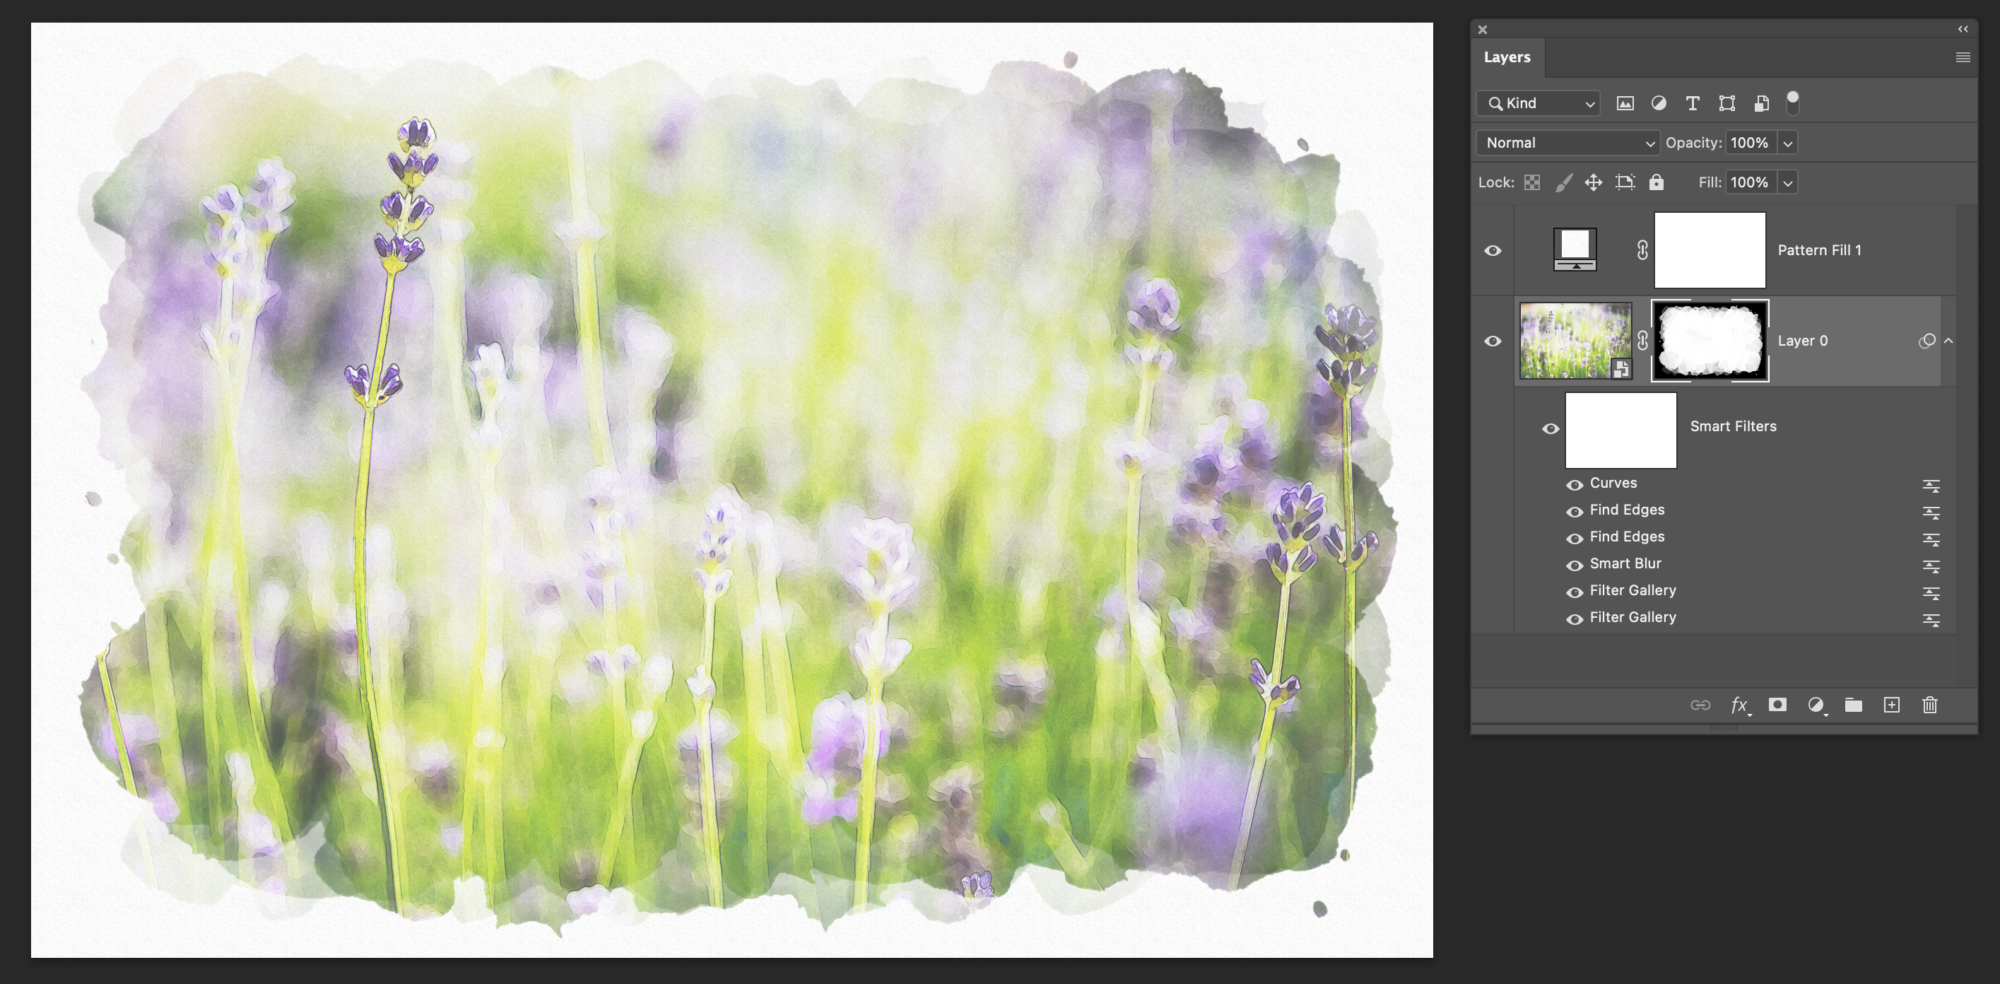


Use the slider to preview the before-and-after image with the watercolor paper overlay.

Nicolesy Watercolor Effects
If you’d like to create this effect automatically, you can also purchase my Watercolor Effects pack, which includes the following:
- Actions and Presets: Automatically add a watercolor effect in Photoshop, Photoshop Elements, Affinity Photo, Luminar AI, and ON1 Photo RAW.
- 15 Watercolor Brushes pack: 15 watercolor brushes to stylize the watercolor effect and give it a realistic look (works in Photoshop, Photoshop Elements, Affinity Photo, and ON1 Photo RAW).
- 30 Watercolor Overlays: Add real painted watercolor edges to your images with 40 overlays.
- 6 Watercolor Papers plus Photoshop patterns: 6 background papers to use with your watercolor images. Includes both JPEG files and a Photoshop pattern file.


Watercolor is one of my favorite non-photography art mediums. It has texture, and blended colors, and it’s overall it’s just a beautiful form of art. And the best part is, it’s easy to create a watercolor effect in a photograph! Below I’ve put together a tutorial to show you how to create a watercolor effect on your own images using Photoshop CC.
Photoshop CC allows you to create endless types of styles and effects in your photos. This tutorial will walk you through the exact steps to convert any photograph into a watercolor painting. This technique works on all genres of images, including landscapes, flower images, travel photos, buildings, and more.
Click here to download a free watercolor paper overlay and learn more about the Nicolesy Watercolor Effects pack.
Table of Contents:
Step 01: Convert the layer to a Smart Object
First, open a photo in Photoshop. Then, convert the image layer into a Smart Object. To do this, right-click over the layer (in the black space and NOT over the thumbnail or layer name) and select Convert to Smart Object. You’ll know it’s a Smart Object when there is a small icon in the lower-right corner of the thumbnail.
Converting the layer to a Smart Object gives you the ability to go back and re-edit any of the filters or adjustments you add to the photo.
Step 02: Add the Dry Brush filter
Go to Filter > Filter Gallery and add the Dry Brush filter (located in the “Artistic” section at the top). Then, adjust the following settings:
- Brush Size: 10
- Brush Detail: 10
- Texture: 1
Step 03: Add the Cutout filter
Go to Filter > Filter Gallery and add the Cutout filter (located in the “Artistic” section at the top). Then, adjust the following settings:
- Number of Levels: 7
- Edge Simplicity: 4
- Edge Fidelity: 1
Now, double-click the small icon to the right of the top-most Filter Gallery filter in the Smart Filters in the Layers panel. This brings up the Blending Options for that effect.
Change the Blend mode to Pin Light and click OK.
Step 04: Add the Smart Blur filter
Go to Filter > Blur > Smart Blur and adjust the follow settings:
- Radius: 100.0
- Threshold: 100.0
- Quality: High
- Mode: Normal
Now, double-click the small icon to the right of the Smart Blur filter in the Smart Filters in the Layers panel. This brings up the Blending Options for that effect.
Change the Blend mode to Screen and the Opacity to 50% and click OK.
Step 05: Add the Find Edges filter
Go to Filter > Stylize > Find Edges.
Double-click the small icon to the right of the Find Edges filter in the Smart Filters in the Layers panel. This brings up the Blending Options for that effect.
Change the Blend mode to Multiply and the Opacity to 80% and click OK.
Step 06: Add another Find Edges filter
Go to Filter > Stylize > Find Edges.
Double-click the small icon to the right of the Find Edges filter in the Smart Filters in the Layers panel. This brings up the Blending Options for that effect.
Change the Blend mode to Multiply and the Opacity to 25% and click OK.
Step 07: Add a Curves adjustment
Go to Image > Adjustments > Curves. Add a slight S-curve with a subtle matte effect:
- Click in the upper-right quadrant to create a new point and drag upwards. This brightens the image.
- Click in the lower-left quadrant to create a new point and drag slightly downwards. This adds contrast.
- Click the point on the lower-left corner of the curve graph and drag it up vertically along the left side of the graph. This adds a faded matte effect.
Step 08: Add a watercolor paper effect
First, you want to make sure that you have the Legacy patterns added to the Patterns panel. To do this, first, open the Patterns panel by going to Window > Patterns.
Then, click on the top-right menu drop down in this panel and choose the Legacy Patterns and More option. This will add the legacy paper patterns to your pattern list.
In the Layers panel, click the Create new fill or adjustment layer icon at the bottom of the Layers panel and choose Pattern.
In the Pattern Fill drop-down, navigate to the Watercolor pattern. You’ll find it by going to Legacy Patterns and More > Legacy Patterns > Artist Surfaces > Watercolor. Then, click OK.
Now, with the new Pattern layer still selected in the Layers panel, change the blend mode to Multiply.
Step 9: Add brush strokes to finish the effect
Begin by selecting the image layer in your Layers panel. Then, press and hold the Opt (Mac) or Alt (Win) key and click the Add Layer Mask icon. This adds an inverted (black) layer mask to the layer, hiding the image and all of its effects.
Next, open the Brushes panel (go to Window > Brushes). If you don’t have any watercolor brushes installed, I recommend using the brush titled Kyle’s Ultimate Pastel Palooza (in the Dry Media Brushes folder).
Pro tip: If you would like a more random watercolor edge, open the Brush Settings panel (go to Window > Brush settings) and change settings such as:
- Brush Tip Shape: Check the Flip X and Flip Y boxes
- Shape Dynamics: Size Jitter 100%, Minimum Diameter 100%, Angle Jitter 100%, Roundness Jitter 100%, Flip X Jitter, Flip Y Jitter
Make sure that the brush is set to a larger size (the exact size will depend on your overall image resolution). For this image (3967 px by 2645 px) I have the brush set to 400.
Then, set the foreground color to white and brush over the mask to reveal the watercolor image.
Or, if you have a watercolor brush set, such as the Nicolesy Watercolor Effects, you can create an even more realistic watercolor brush effect:
Use the slider to preview the before-and-after image with the watercolor paper overlay.
Nicolesy Watercolor Effects
If you’d like to create this effect automatically, you can also purchase my Watercolor Effects pack, which includes the following:
- Actions and Presets: Automatically add a watercolor effect in Photoshop, Photoshop Elements, Affinity Photo, Luminar AI, and ON1 Photo RAW.
- 15 Watercolor Brushes pack: 15 watercolor brushes to stylize the watercolor effect and give it a realistic look (works in Photoshop, Photoshop Elements, Affinity Photo, and ON1 Photo RAW).
- 30 Watercolor Overlays: Add real painted watercolor edges to your images with 40 overlays.
- 6 Watercolor Papers plus Photoshop patterns: 6 background papers to use with your watercolor images. Includes both JPEG files and a Photoshop pattern file.

Nicole is a photographer, published author, and educator specializing in Lightroom, Photoshop, and photography. She is best known for her books on food photography but is widely versed in various photographic genres, including landscape, nature, stock, travel, and experimental imagery.


You are very kind; this will undoubtedly be useful! I had just purchased some brushes and paper textures like the ones I wanted, so I did that.
Your Blog is Awesome. Thanks for sharing this kind of blog.