

Snapchat is picking up in popularity, especially for brands and entrepreneurs. It’s a unique platform that requires authenticity and real-time posting, and its “Stories” are what many of us are flocking to.
Unless you are a celebrity, it can be challenging to discover people to follow or find people you already know without knowing the specific username you’re searching for. And, not everyone has the username you’re expecting (a.k.a., if you are trying to find me you’ll need to add me as the username nicolesyphoto … someone took “nicolesy”). :(
Snapcodes are a visual “barcode” for your profile on Snapchat. Users can scan the code using the Snapchat app on their phone to find that user’s profile. For many of us, we like to share our Snapcodes online, but it’s a lot more fun to do so when they have a little bit of style and represent our brands while doing so. The good news is that it’s super easy to do using Photoshop! Here’s how:
Step 1: Download Your Snapcode
The first step is to get a nice, high-resolution version of your Snapcode. You do this by logging into your account using a laptop or desktop machine (NOT through your Snapchat app):
Click here: https://accounts.snapchat.com/accounts/login
Once you are logged in, click on the “My Snapcode” option on your account page. There you will have the option to download your Snapcode (or generate a new one, if you desire).
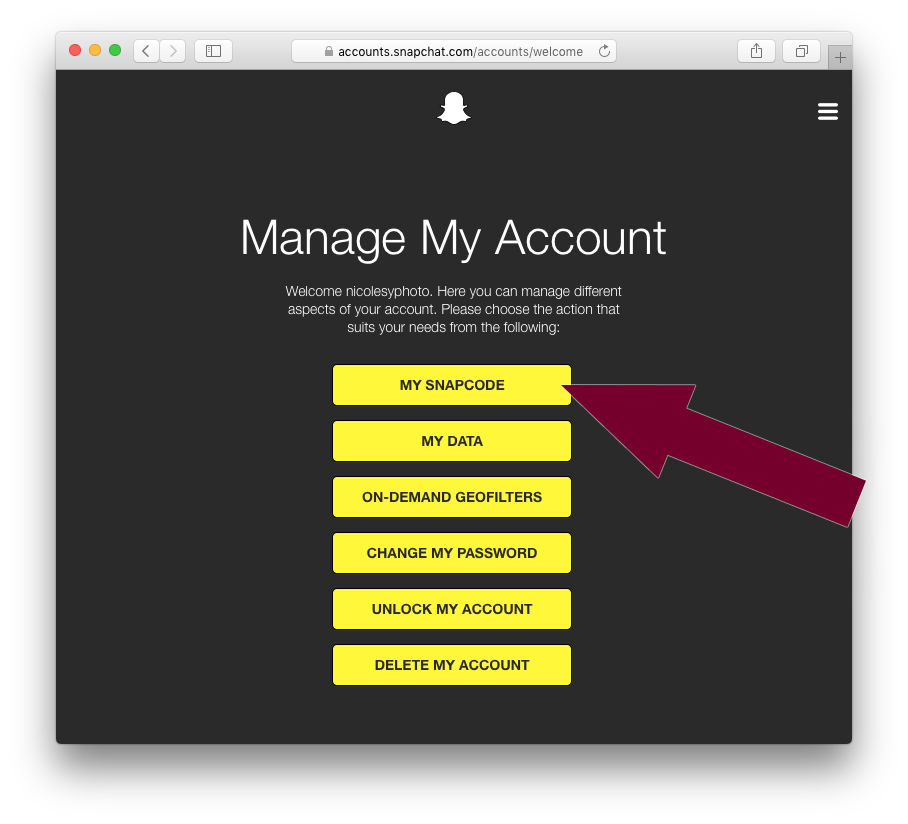

Once downloaded, the file will be a .zip file. To unzip it, double-click the file (or, if you’re using a PC and that doesn’t work, right-click and select “extract all”). You will now have access to the snapcode.png file.

Step 2: Change the Color
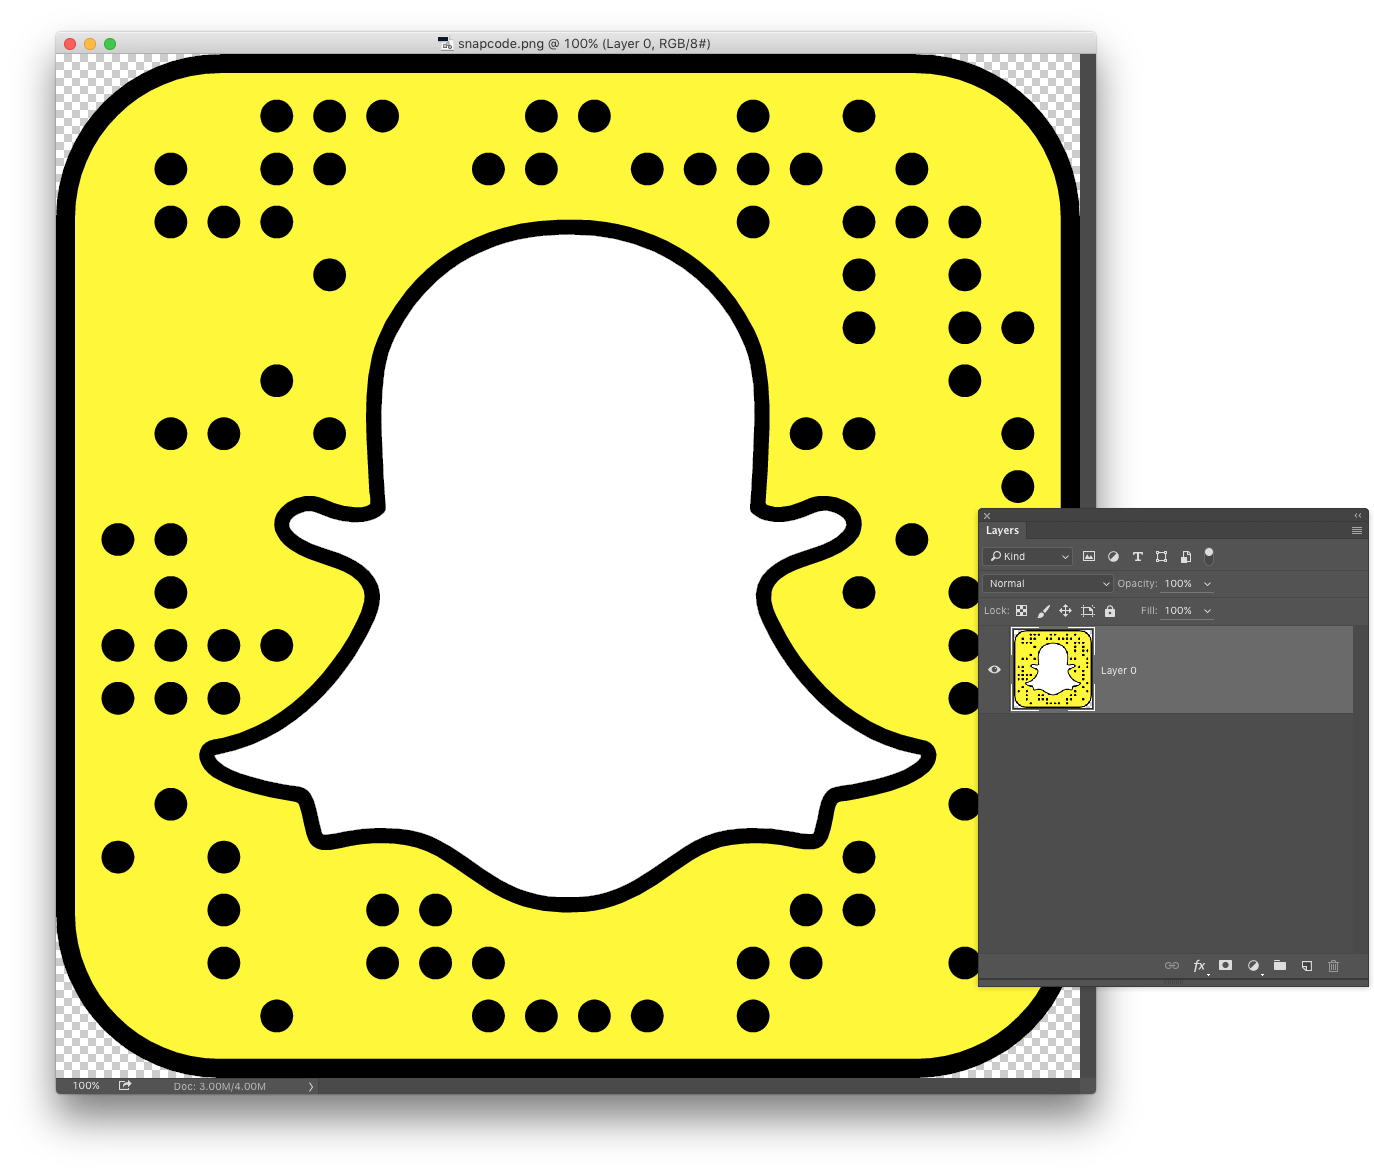
One great way to customize your Snapcode is by changing the color. You’ll start by opening the file into Photoshop. This technique will work on many of the previous versions, although some of the specifics may vary slightly, depending on the version. This tutorial is shown using Photoshop CC 2015.
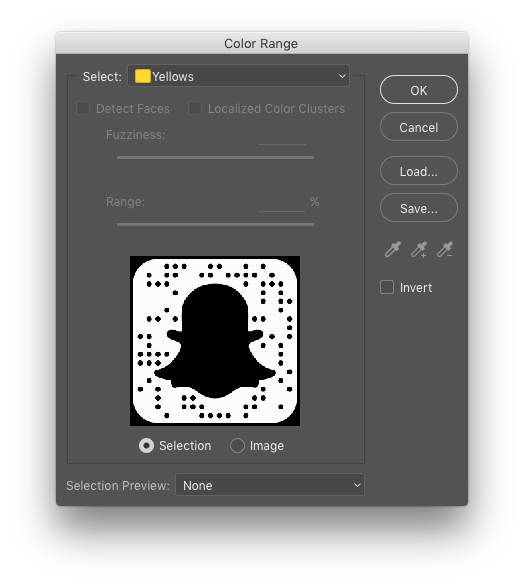
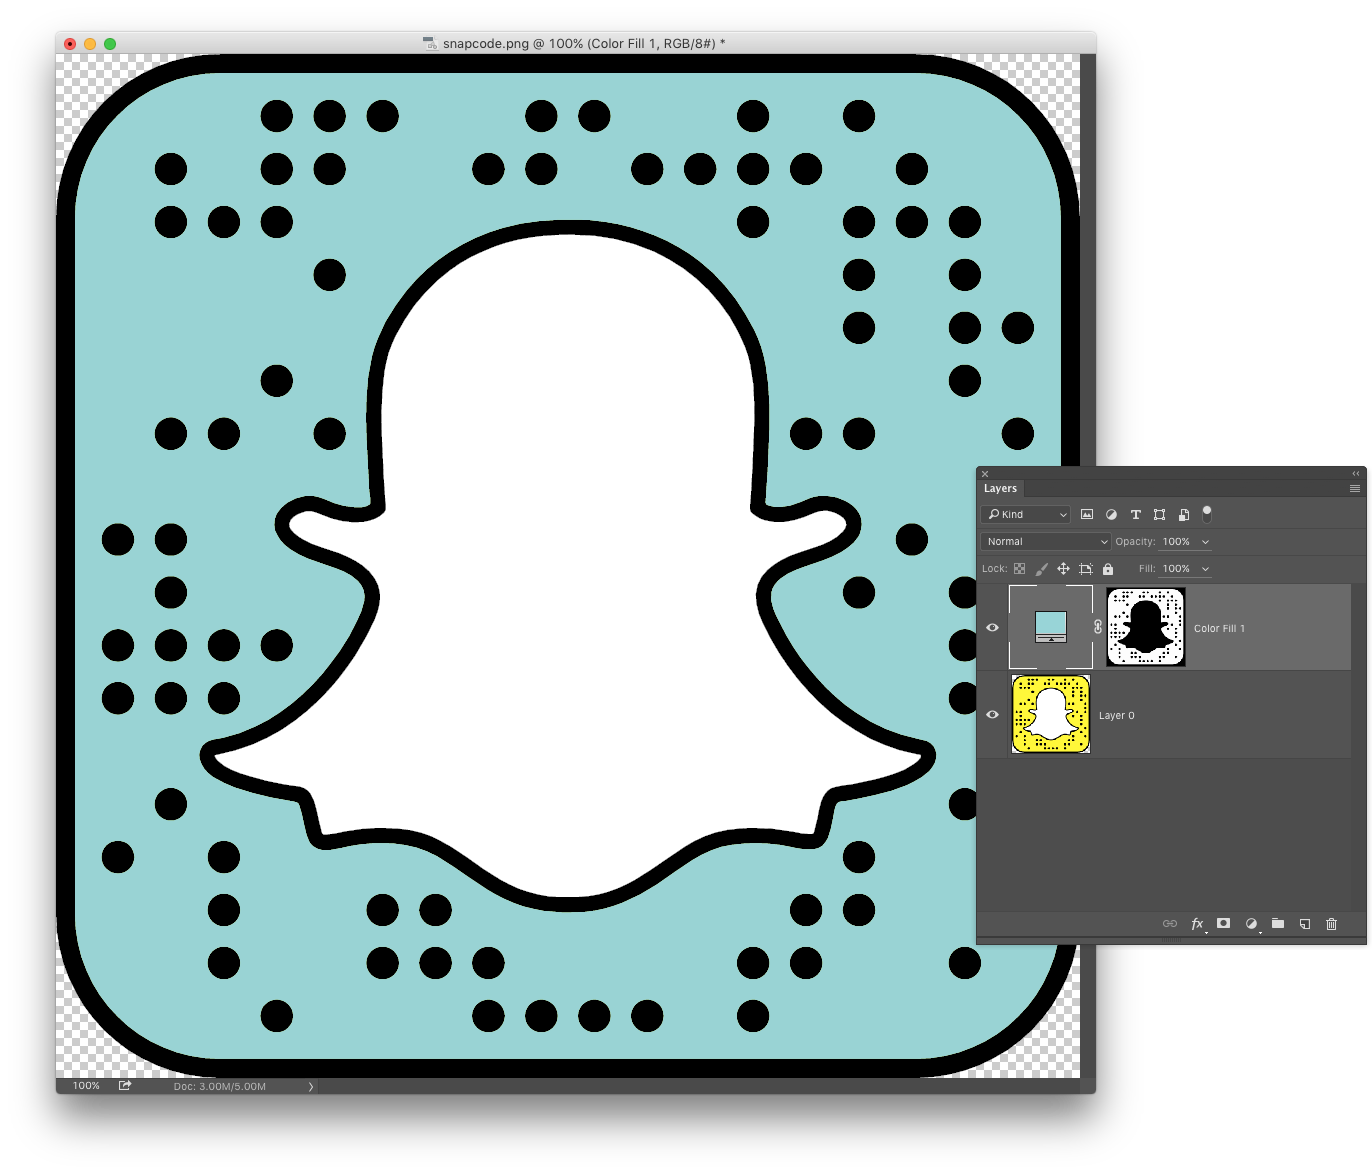
In Photoshop, access the menu and go to Select > Color Range. In the window that pops up,choose the “Yellows” option from the “Select” drop-down at the top to select only the yellow portion of the Snapcode image. When you are finished, click OK. There will be “marching ants” around the interior yellow portion of the image, indicating that you have made a selection.
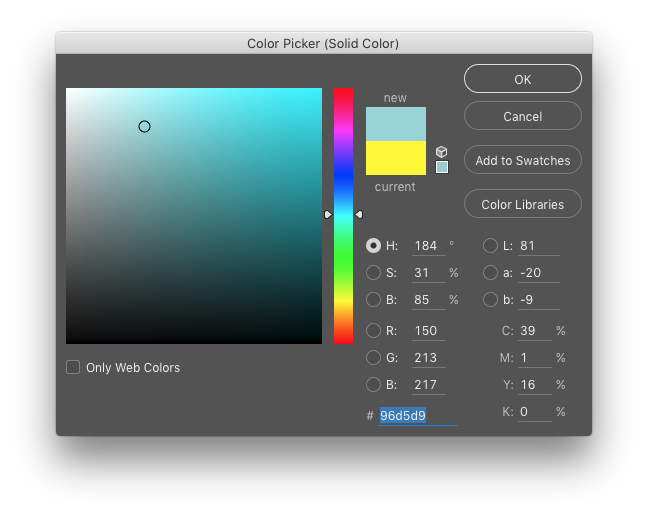
Next, go to Layer > New Fill Layer > Solid Color. (Note: You can also access this feature using the “Create new fill or adjustment layer” icon at the bottom of the Layers panel.) A window will pop up asking you to name the layer; just leave it as-is and click OK. A color-picker window will appear, so choose any color and click OK. If you don’t know what color to use, don’t worry, you can always change this later by double-clicking the color fill icon in the Layers panel.

This will automatically mask out the yellow and replace it with the color of your choice. To change this color at any time, just double-click on the color swatch in the Layers panel and the color picker window will appear.
Step 3: Add a New Photo to the Ghost
Now it’s time to add your photo. In the Layers Panel, click on the bottom layer to make sure it’s highlighted (the original Snapcode image). Then, in the Toolbar, select the Magic Wand tool.
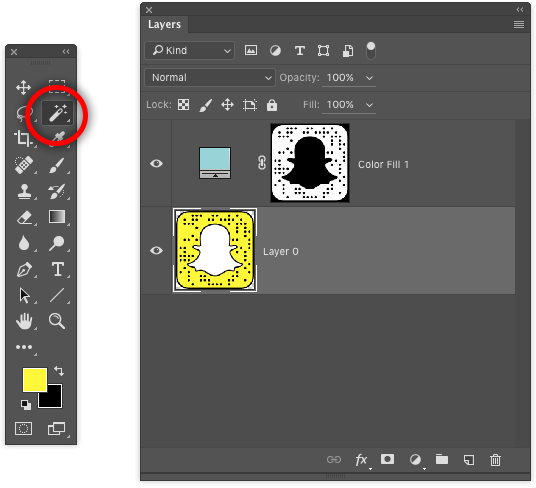
With the Magic Wand, click once inside of the white ghost to select it. You will know it is selected when you see the “marching ants” along the ghost’s border.
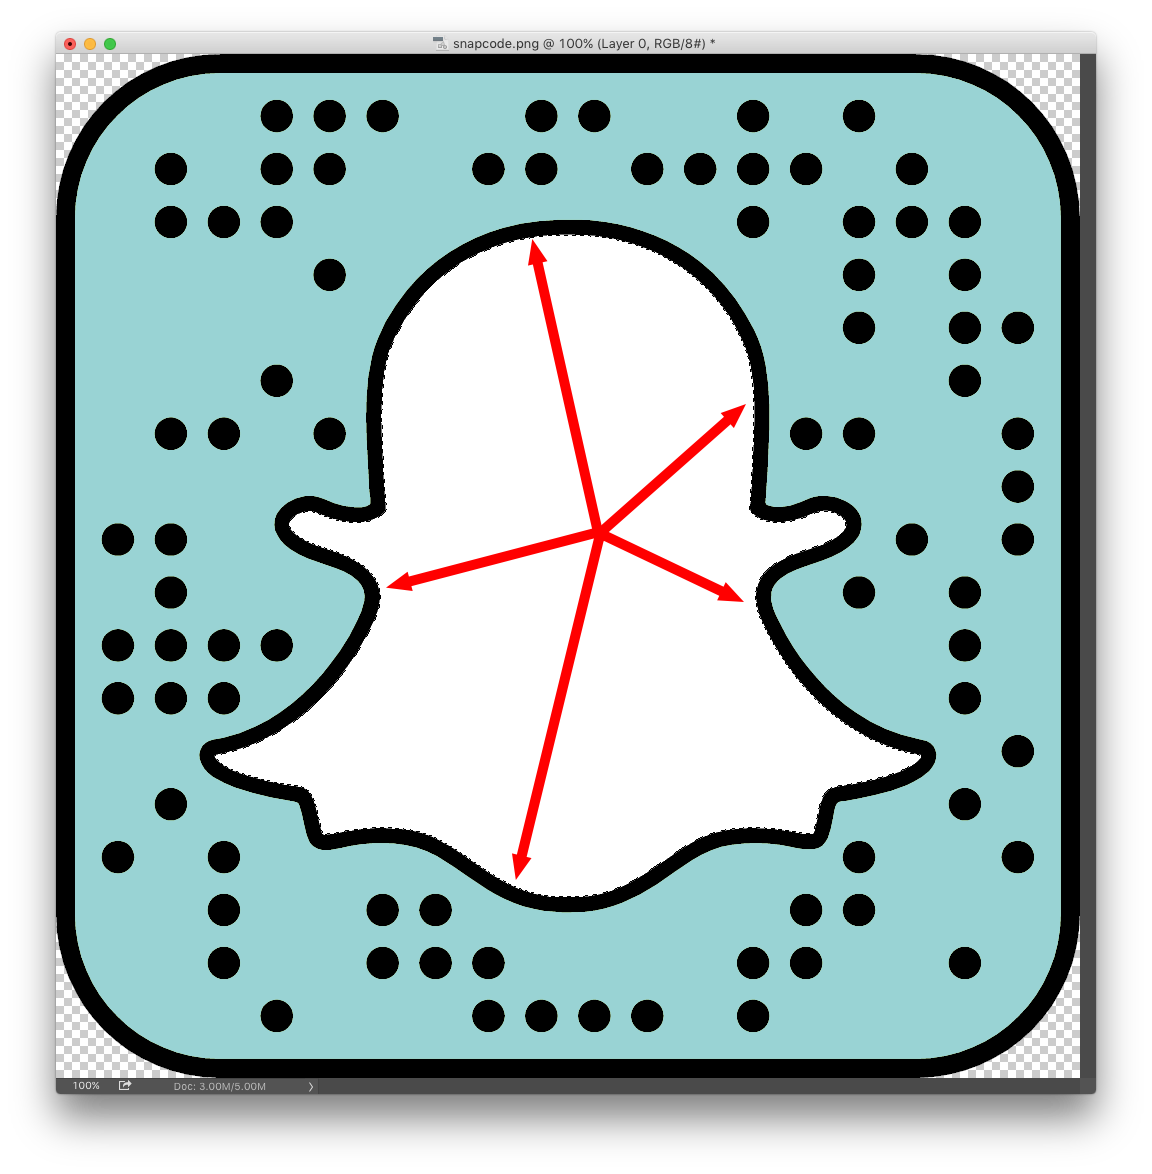
Next, in the Layers Panel, press and hold the Opt key (PC: Alt) while clicking once on the “Add Layer Mask” icon. This will mask out the white ghost and make the area transparent. Alternately, you can press the Delete key to delete this white space and permanently remove it.

Now it’s time to add your profile photo! The quickest way to do this is to locate an image in a folder on your hard-drive and then drag/drop the image over the Snapcode inside of Photoshop. Once your image is placed, you’ll need to rearrange the layers so that the profile photo is at the very bottom. To do this, just drag it inside of the Layers panel. Then, resize and relocate the photo until it fits well behind the ghost area. To transform a layer in Photoshop, use the keyboard shortcut Cmd+T (PC: Ctrl+T), then reshape as-needed and press Return/Enter when done.
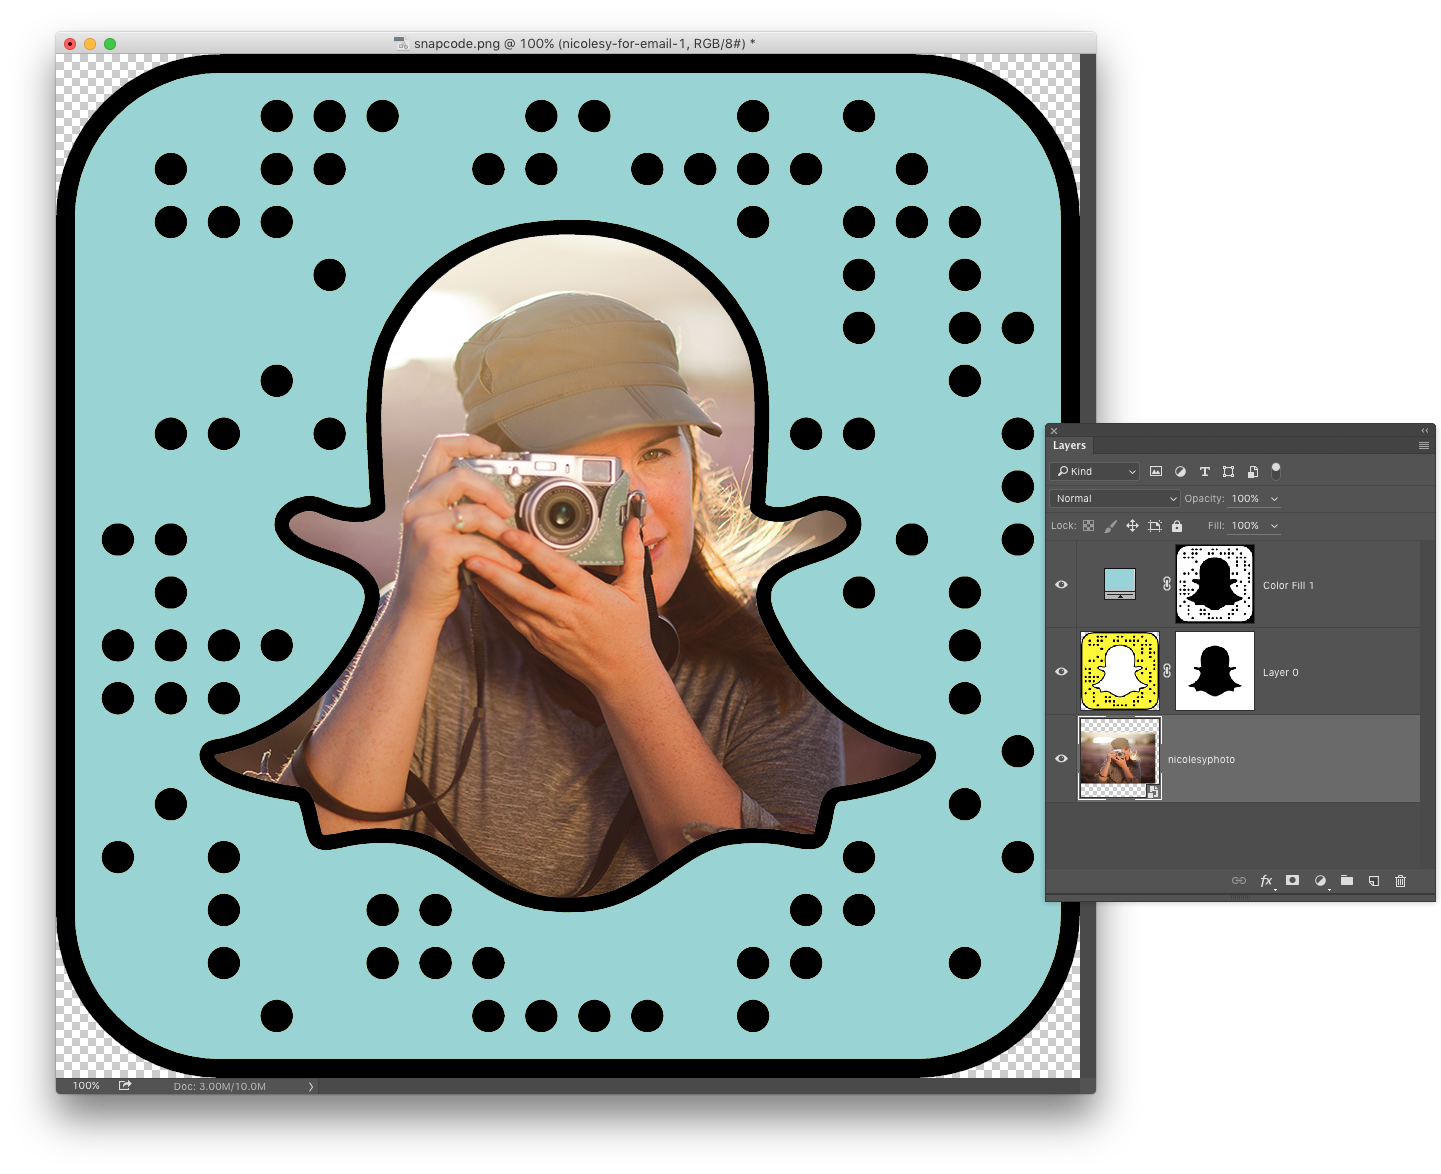
And, if you would like, you can also add your username as well. I did this with a simple text layer, and added a basic drop shadow to the text to help it stand out:

Now you have a customized Snapcode! Share this on your website, Facebook page, or use it as your profile image across other social networks to let your friends find you on Snapchat.
Snapchat is picking up in popularity, especially for brands and entrepreneurs. It’s a unique platform that requires authenticity and real-time posting, and its “Stories” are what many of us are flocking to.
Unless you are a celebrity, it can be challenging to discover people to follow or find people you already know without knowing the specific username you’re searching for. And, not everyone has the username you’re expecting (a.k.a., if you are trying to find me you’ll need to add me as the username nicolesyphoto … someone took “nicolesy”). :(
Snapcodes are a visual “barcode” for your profile on Snapchat. Users can scan the code using the Snapchat app on their phone to find that user’s profile. For many of us, we like to share our Snapcodes online, but it’s a lot more fun to do so when they have a little bit of style and represent our brands while doing so. The good news is that it’s super easy to do using Photoshop! Here’s how:
Step 1: Download Your Snapcode
The first step is to get a nice, high-resolution version of your Snapcode. You do this by logging into your account using a laptop or desktop machine (NOT through your Snapchat app):
Click here: https://accounts.snapchat.com/accounts/login
Once you are logged in, click on the “My Snapcode” option on your account page. There you will have the option to download your Snapcode (or generate a new one, if you desire).
Once downloaded, the file will be a .zip file. To unzip it, double-click the file (or, if you’re using a PC and that doesn’t work, right-click and select “extract all”). You will now have access to the snapcode.png file.
Step 2: Change the Color
One great way to customize your Snapcode is by changing the color. You’ll start by opening the file into Photoshop. This technique will work on many of the previous versions, although some of the specifics may vary slightly, depending on the version. This tutorial is shown using Photoshop CC 2015.
In Photoshop, access the menu and go to Select > Color Range. In the window that pops up,choose the “Yellows” option from the “Select” drop-down at the top to select only the yellow portion of the Snapcode image. When you are finished, click OK. There will be “marching ants” around the interior yellow portion of the image, indicating that you have made a selection.
Next, go to Layer > New Fill Layer > Solid Color. (Note: You can also access this feature using the “Create new fill or adjustment layer” icon at the bottom of the Layers panel.) A window will pop up asking you to name the layer; just leave it as-is and click OK. A color-picker window will appear, so choose any color and click OK. If you don’t know what color to use, don’t worry, you can always change this later by double-clicking the color fill icon in the Layers panel.
This will automatically mask out the yellow and replace it with the color of your choice. To change this color at any time, just double-click on the color swatch in the Layers panel and the color picker window will appear.
Step 3: Add a New Photo to the Ghost
Now it’s time to add your photo. In the Layers Panel, click on the bottom layer to make sure it’s highlighted (the original Snapcode image). Then, in the Toolbar, select the Magic Wand tool.
With the Magic Wand, click once inside of the white ghost to select it. You will know it is selected when you see the “marching ants” along the ghost’s border.
Next, in the Layers Panel, press and hold the Opt key (PC: Alt) while clicking once on the “Add Layer Mask” icon. This will mask out the white ghost and make the area transparent. Alternately, you can press the Delete key to delete this white space and permanently remove it.
Now it’s time to add your profile photo! The quickest way to do this is to locate an image in a folder on your hard-drive and then drag/drop the image over the Snapcode inside of Photoshop. Once your image is placed, you’ll need to rearrange the layers so that the profile photo is at the very bottom. To do this, just drag it inside of the Layers panel. Then, resize and relocate the photo until it fits well behind the ghost area. To transform a layer in Photoshop, use the keyboard shortcut Cmd+T (PC: Ctrl+T), then reshape as-needed and press Return/Enter when done.
And, if you would like, you can also add your username as well. I did this with a simple text layer, and added a basic drop shadow to the text to help it stand out:
Now you have a customized Snapcode! Share this on your website, Facebook page, or use it as your profile image across other social networks to let your friends find you on Snapchat.

Nicole is a photographer, published author, and educator specializing in Lightroom, Photoshop, and photography. She is best known for her books on food photography but is widely versed in various photographic genres, including landscape, nature, stock, travel, and experimental imagery.


That was a great tip, thanks Nicole!
Check out ghostcodecards.com/products/free-snapcode-customization if you want an easy way to get your Snapcode customized!
Very helpful! I used this and changed my snapcode to a beautiful pink :) Thanks for the tutorial!