
Ever since moving to the Pacific Northwest, I definitely have had my fair share of photographing waterfalls. In fact, I became infatuated with landscape photography after realizing that I could, in fact, photograph something that was moving and make it amazingly beautiful! The main thing that pulled me in was blurring water; I was able to transform splashing, fast-moving water into a cotton-candy wonderland.
Creating photographs like these is relatively simple, you just need a few pieces of basic equipment to make it happen. Basically, to create the misty, cotton-candy water effect, you need a very long exposure. Sometimes the light is too bright for the camera to leave the shutter open long enough, so you need to block the light that is coming through the lens so that you can prolong the exposure time and use a slower shutter speed. The best way to do this is with a Neutral Density (ND) filter.
What is a Neutral Density Filter?
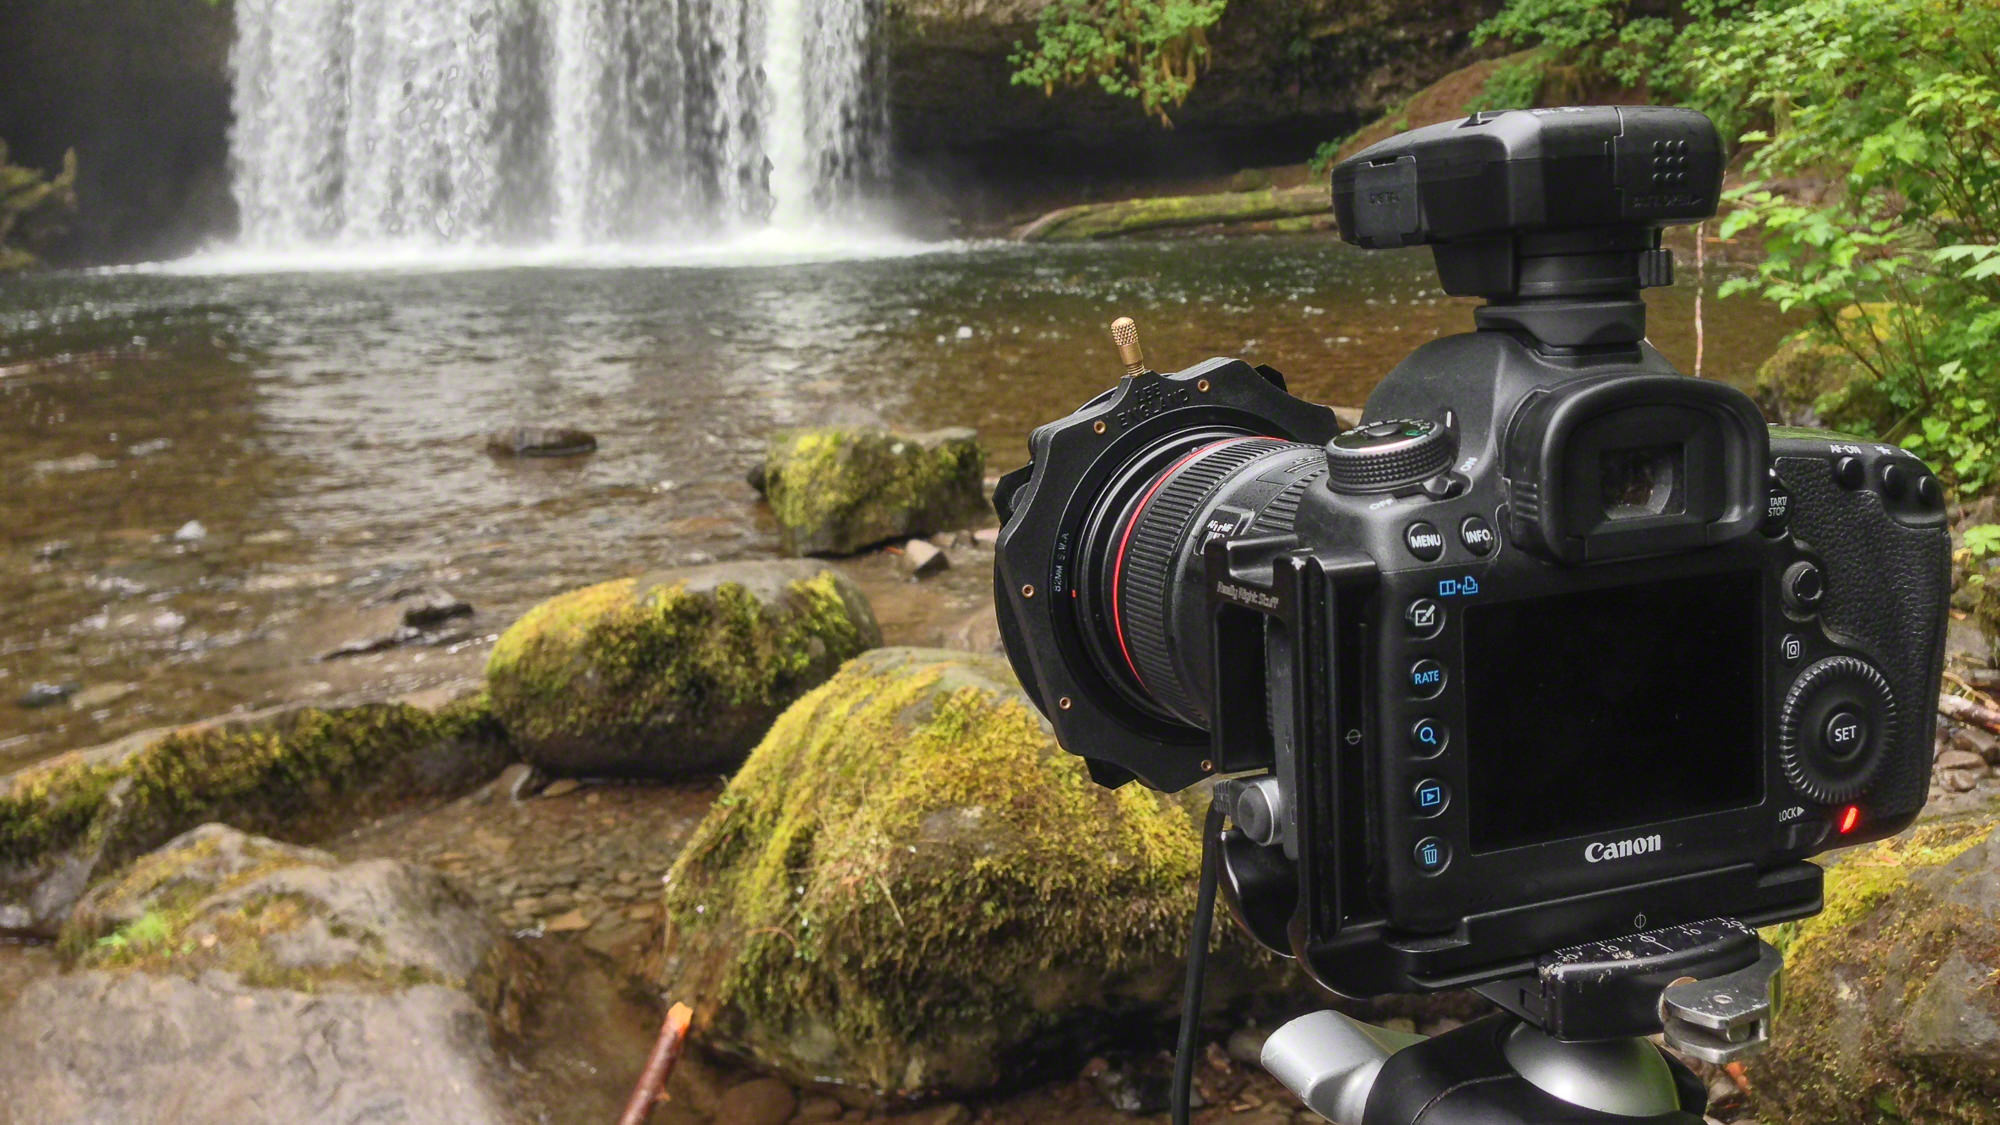
This is my basic setup when photographing waterfalls: Canon 5D Mark III, 24-70mm lens, Lee Filter Holder, and ND filter. (© Nicole S. Young — nicolesy.com)
An ND filter is a dark piece of glass in a neutral color that blocks the light coming into your lens. They come in various “stops”, and block light according to the intensity of the filter. Sometimes you can create long-exposures of water without them, but the scene would require a dark, overcast day with very little (to no) sunshine. And on the days when it is bright, ND filters are the key to long exposures.
What scenes work best with long-exposures?
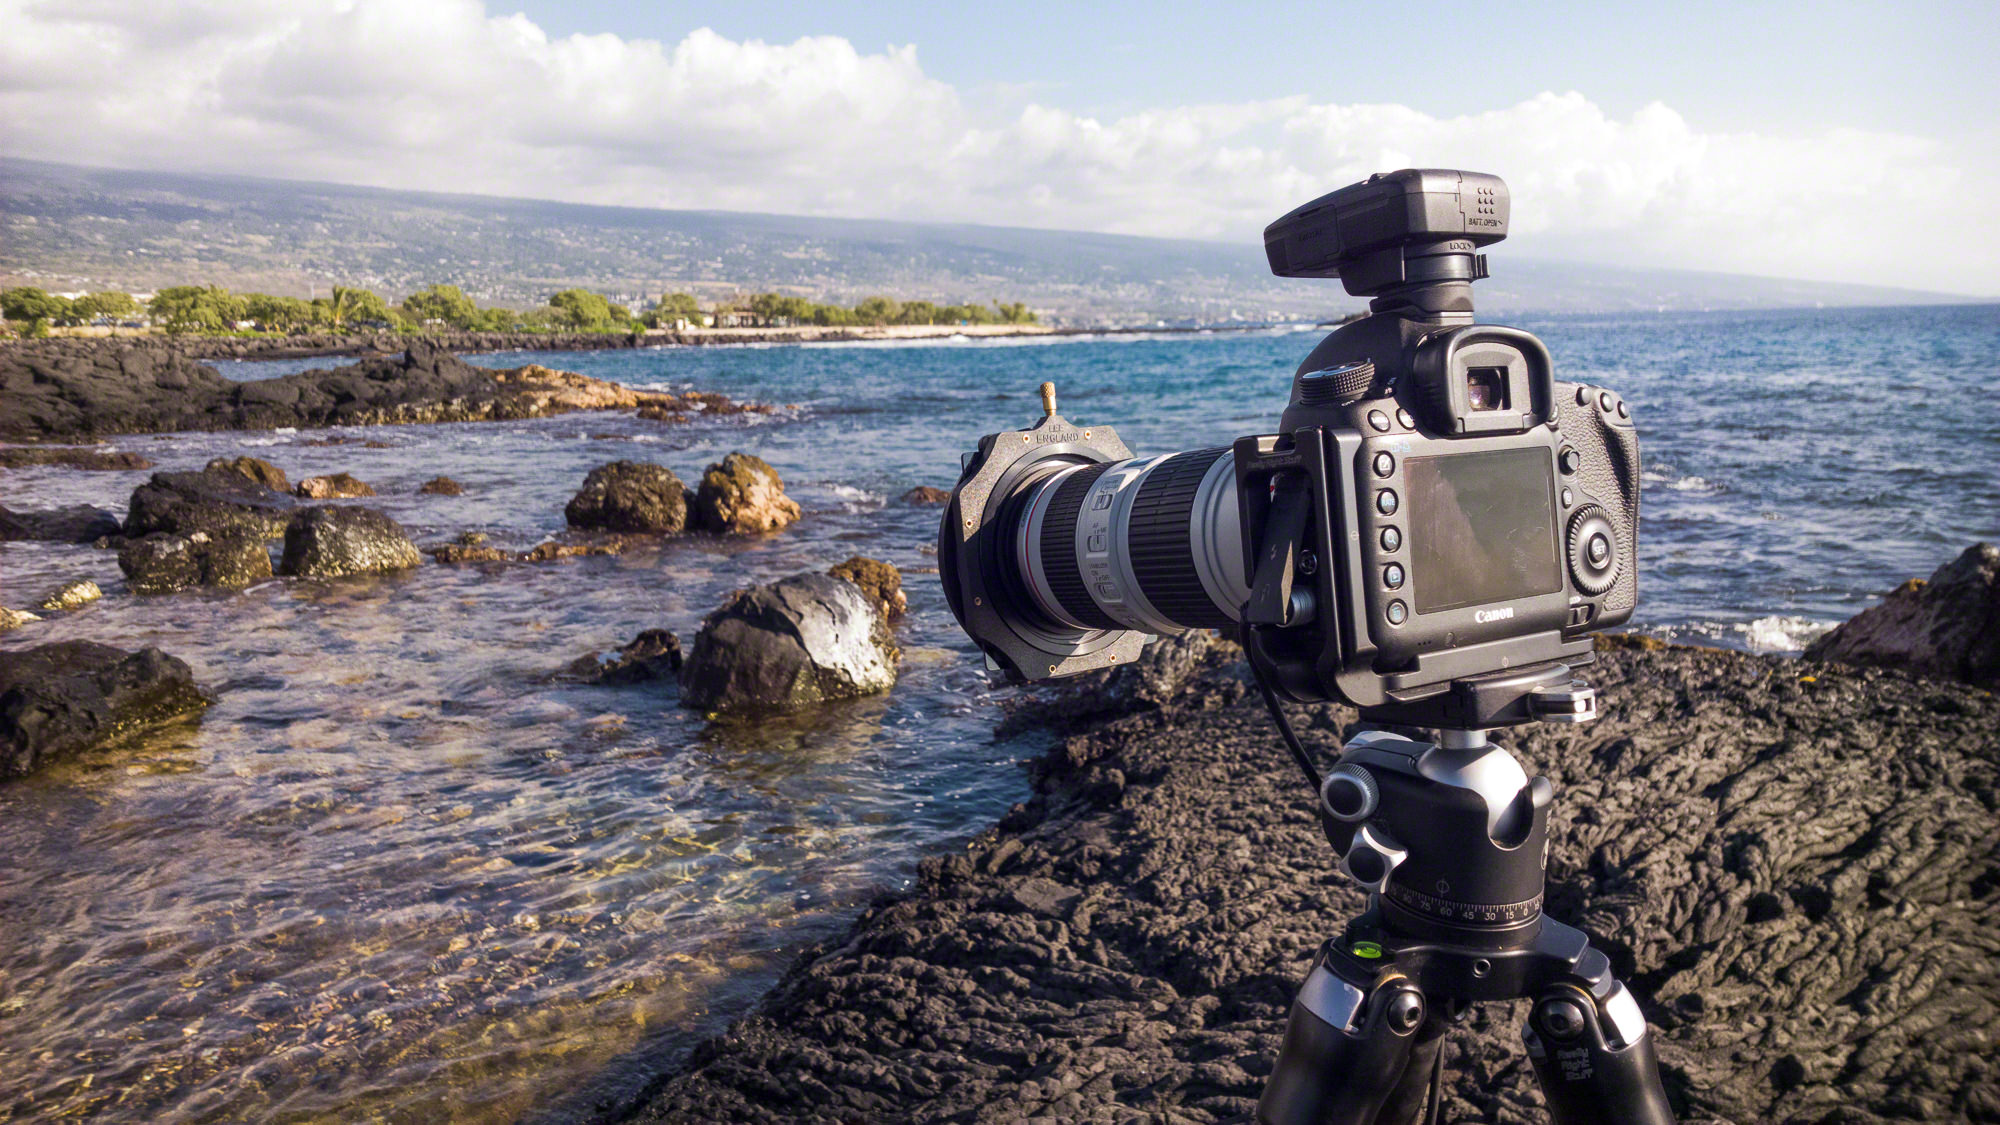
Gear: Canon 5D Mark III, 70-200mm lens, Lee Filter Holder, and ND filter. Also, the object on the top of my camera is a GPS unit. (© Nicole S. Young — nicolesy.com)
The most important thing you will need to get a good long-exposure is something that is moving. Oftentimes this will be water, or even clouds. But you can experiment with the filters and photograph moving people, or cars during the day, and more.What gear do I need for long-exposures?
Regardless of the type of long-exposure photography you are wanting to create, there is some essential gear to ensure success with your photographs:
- Sturdy tripod
- Cable-release
- Camera you can set to BULB
- Neutral Density filters (for blurring water, clouds, etc.)
- A timer or long-exposure app
Which ND Filter setup should I buy?
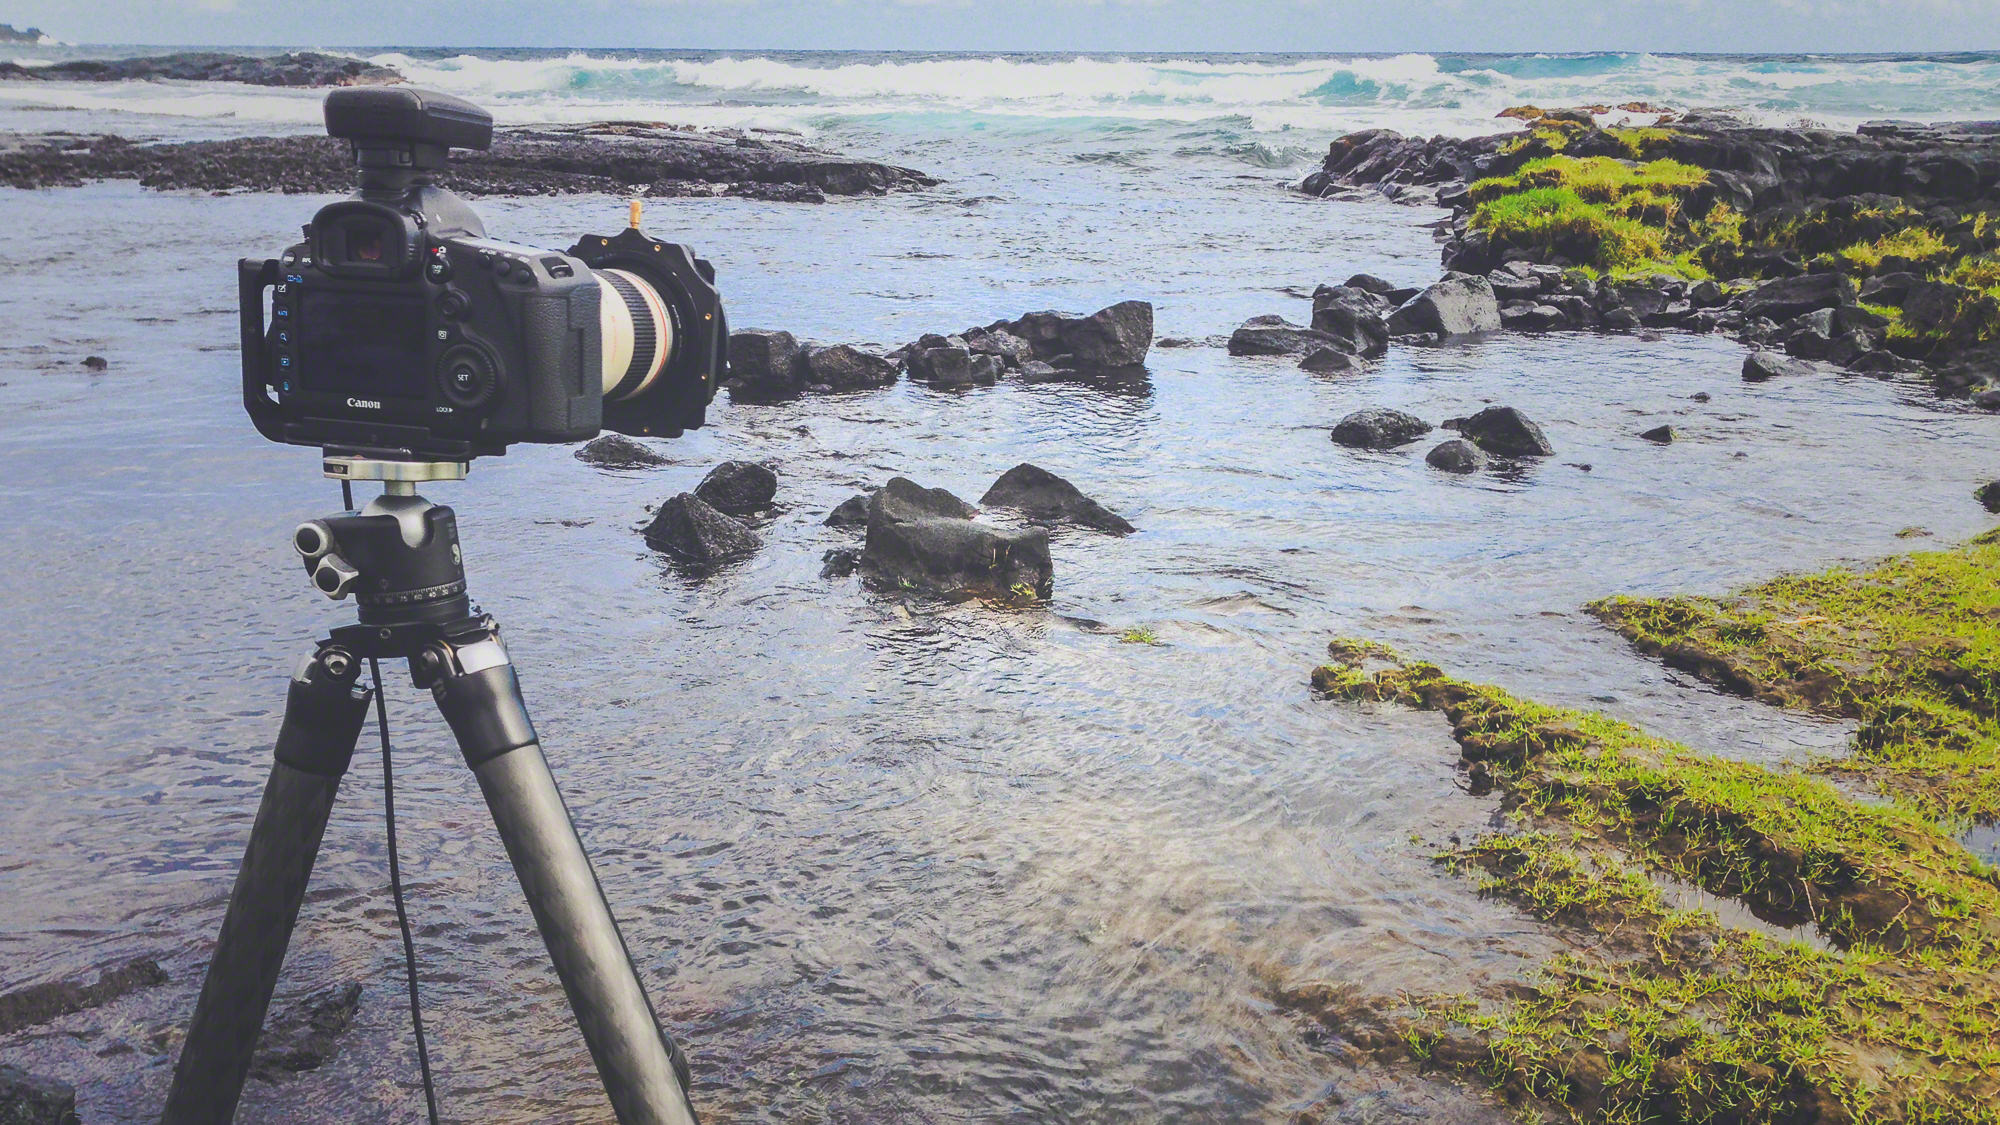
Gear: Canon 5D Mark III, 70-200mm lens, Lee Filter Holder, and ND filter. Also, the object on the top of my camera is a GPS unit. (© Nicole S. Young — nicolesy.com)
There are two main types of ND filters: Circular and Square/Rectangle (100mm). Each of them has pros and cons, and so I have listed a little bit about them, along with some things to consider when deciding which one you should use with your photography:
Circular Filters
The first type is the CIRCULAR filter. These screw on to the front of your lens, just like any other filter. They come in different size filter rings to fit individual lenses, and come in various ranges of stops. If you are just starting out with long-exposure photography, you’ll probably want to start with one of these and see how you like it before investing in a full 100mm square/rectangle filter system.
PROS:
- Less expensive on an individual basis
- Easier to use and carry (less setup required)
CONS:
- Only good for one type of lens size (you would need to purchase more than one of the same filter if you have different sized filter rings on your lenses)
- Stacking filters can result in lens vignetting (darkening around the edges of your image)
Square or Rectangle Filters (100mm):
Square and rectangular filters are good for photographers who create long-exposures regularly and want to have one filter for all lens sizes. These filters require a filter holder and adapter rings to allow placement on any size lens. This is the type of ND filter setup I use and would recommend to anyone who is serious about long-exposure photography.
What you will need for this setup:
- Filter holder (Formatt Hitech and Lee are two good brands to look into)
- Adapter/step-down rings (these allow you to connect the filter holder to the lens, and come in different sizes)
- 100mm Filters
PROS:
- One filter fits all lenses (requires a universal filter holder)
- Easier to stack filters, including the addition of a circular polarizer on the front
- More options for filter types, including graduated ND filters (clear on top, ND on the bottom)
CONS:
- Needs additional equipment (Filter holder/kit)
- Larger, so they take up more space in your bag
How to calculate a long exposure manually

Gear: Canon 5D Mark III, 24-70mm lens, Lee Filter Holder, and ND filter. Also, the object on the top of my camera is a GPS unit. (© Nicole S. Young — nicolesy.com)
When I use ND filters, sometimes the exposure time exceeds 30 seconds. Because most cameras cannot calculate an exposure time beyond 30 seconds, then you will need a way to do the math and determine your long exposure time. You can do it manually if you like; it’s really not too complicated. Here’s how:
- First, get a base exposure of your image without the filter. Set your camera to the aperture you want, and then use Aperture Priority or Manual Mode and take a photo. Let’s say, for demonstration purposes, your exposure is 1 second.
- Next, put your filter in the front of your lens. (For this example, we will be using a 6-stop ND filter.) Keep your aperture the same, and meter ONLY for the shutter speed.
- At this point, your camera will probably be flashing the 30-seconds in the display. That is telling you that the exposure will be underexposed at that setting. So, switch your camera to BULB (you’ll also need a cable release) and calculate the exposure.
- Here’s how you do the math. You take the original exposure time (1 second), and double it SIX TIMES, as you are using a 6-stop filter. It will look like this:
Start at 1 sec –> 2 sec –> 4 sec –> 8 sec –> 16 sec –> 32 sec –> 1 min 4 seconds
- Then, press the shutter button (using the cable release), and hold the shutter open for 1 minute 4 seconds. You should have a nice, blurry-water effect in your photo!
Using Smartphone Apps to calculate long-exposures
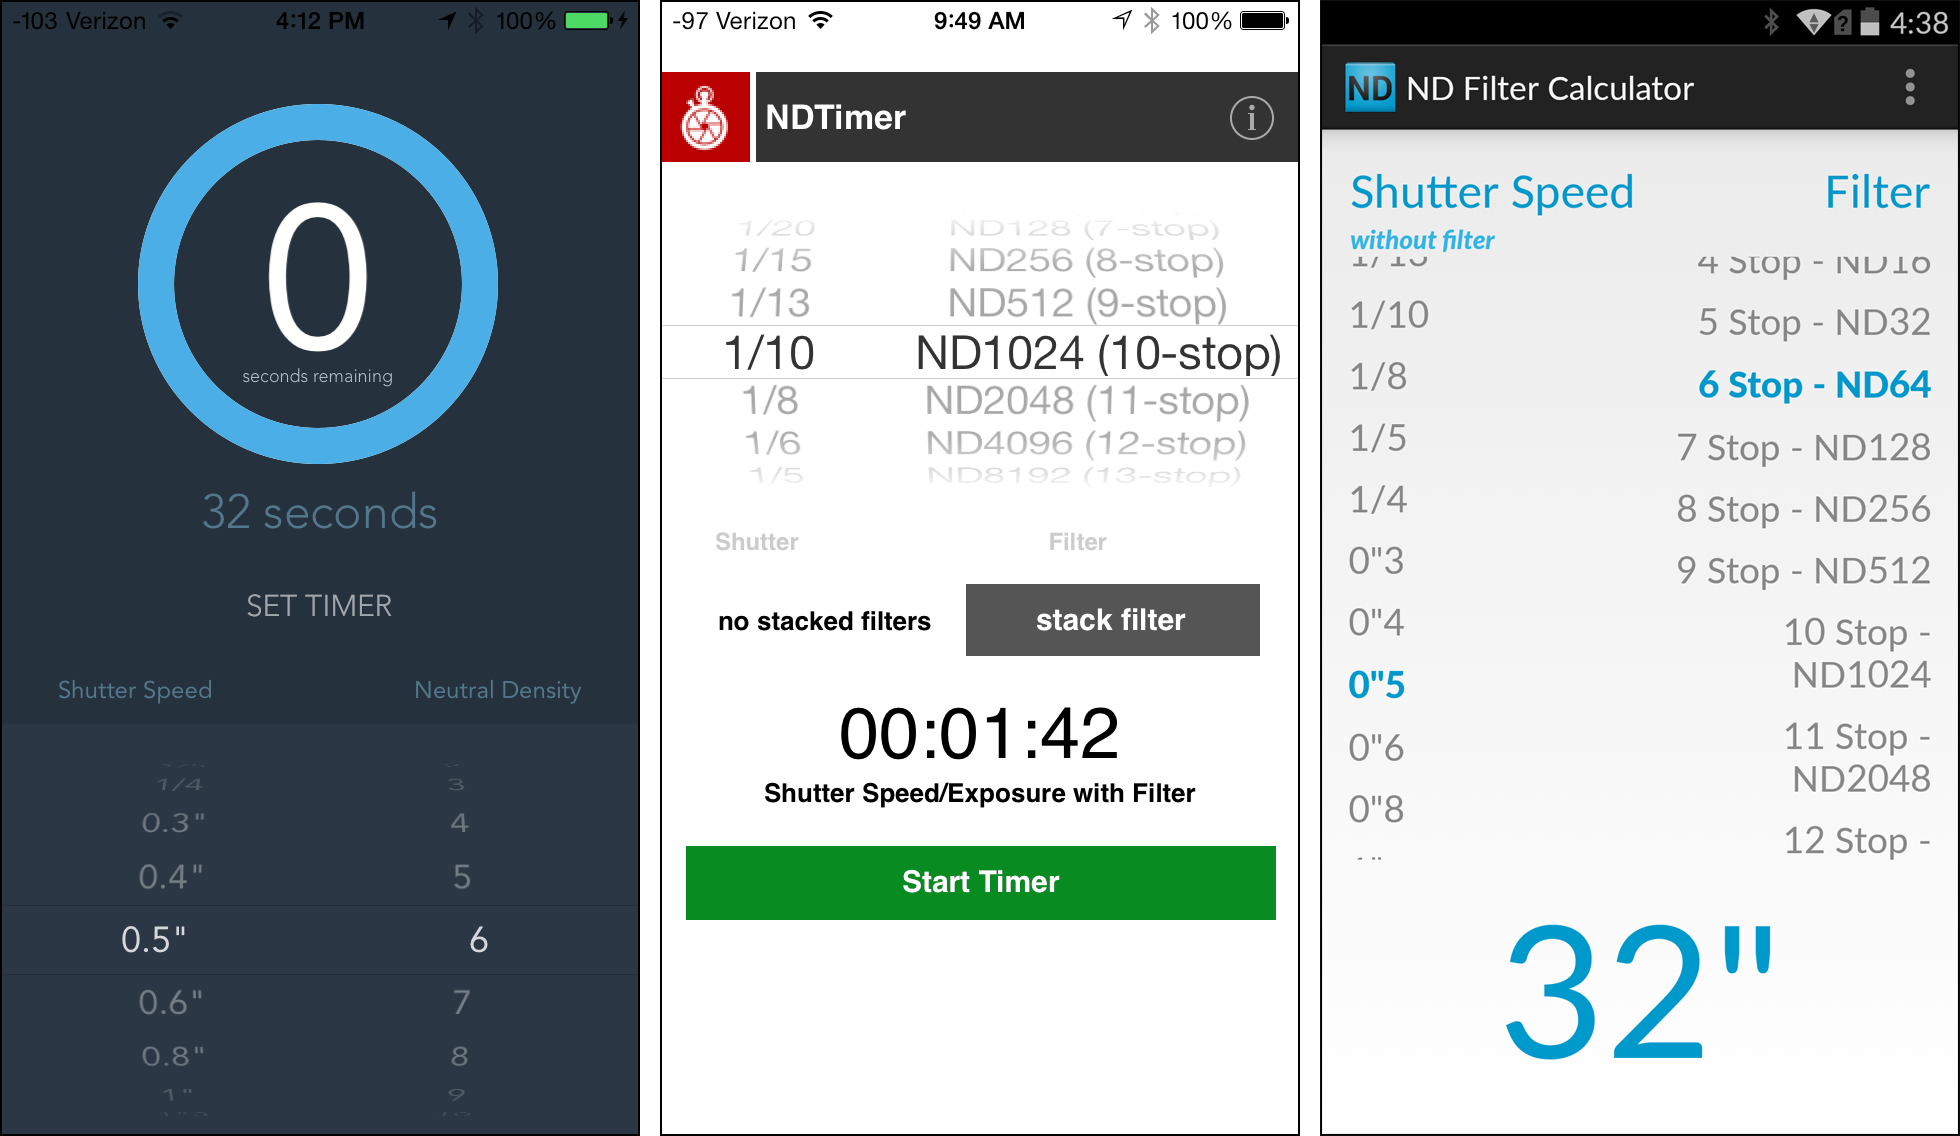
Left to Right: Slower Shutter, ND Timer, and ND Filter Calculator
If you don’t want to do math every-time you create a long-exposure, try using my preferred method of a smart-phone app. There are some pretty good apps on the market that make it really easy to calculate exposures, and I use them almost every-time I photograph running water.
Here are some of long-exposure apps you can check out:
Slower Shutter (iOS, $0.99)
ND Timer (iOS, $0.99)
ND Filter Calculator (Android, Free )
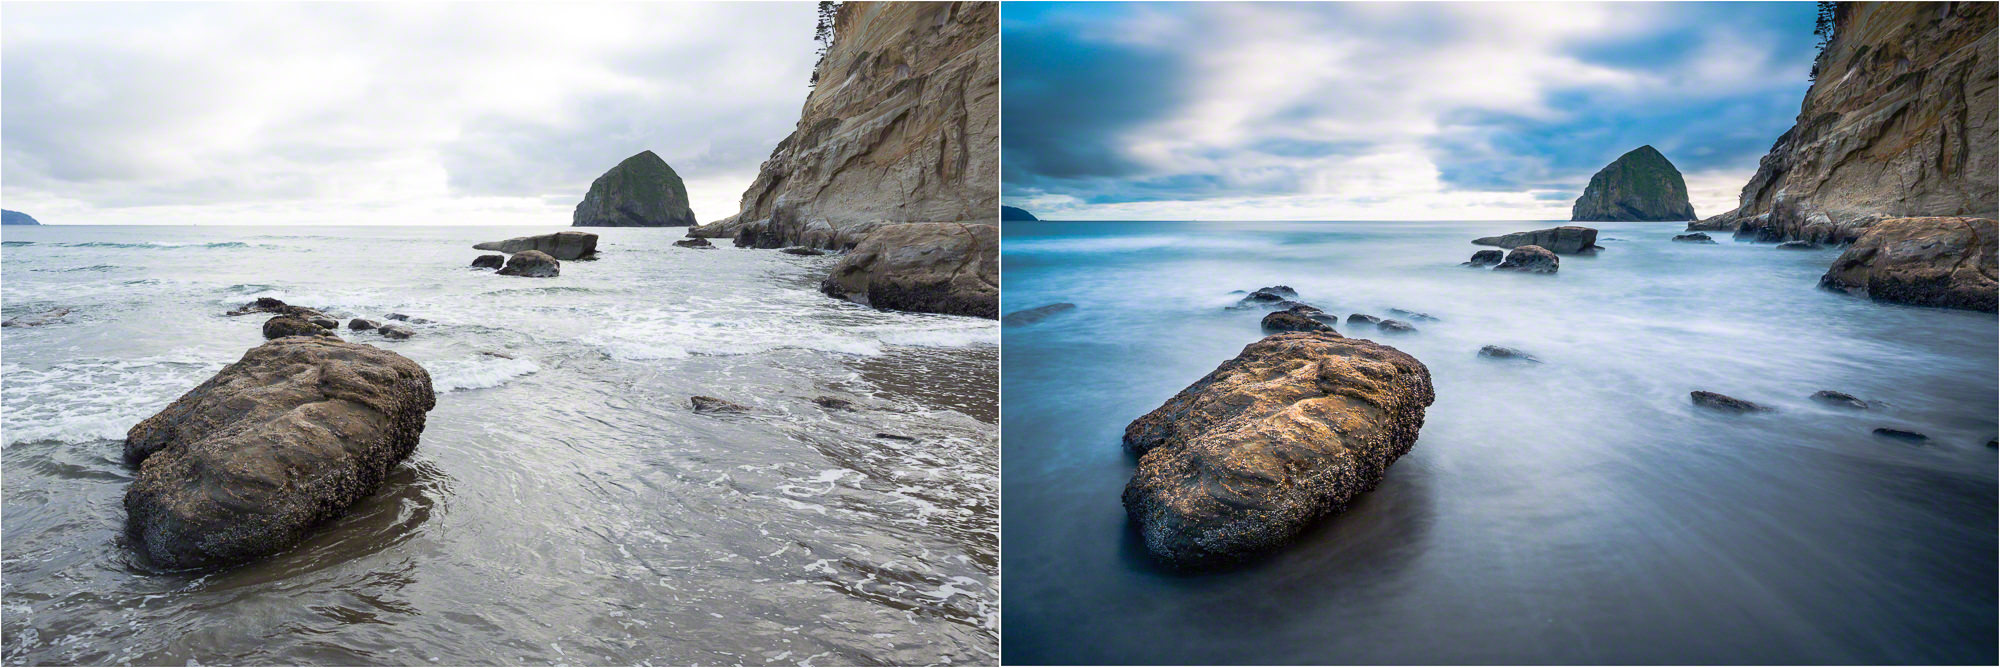
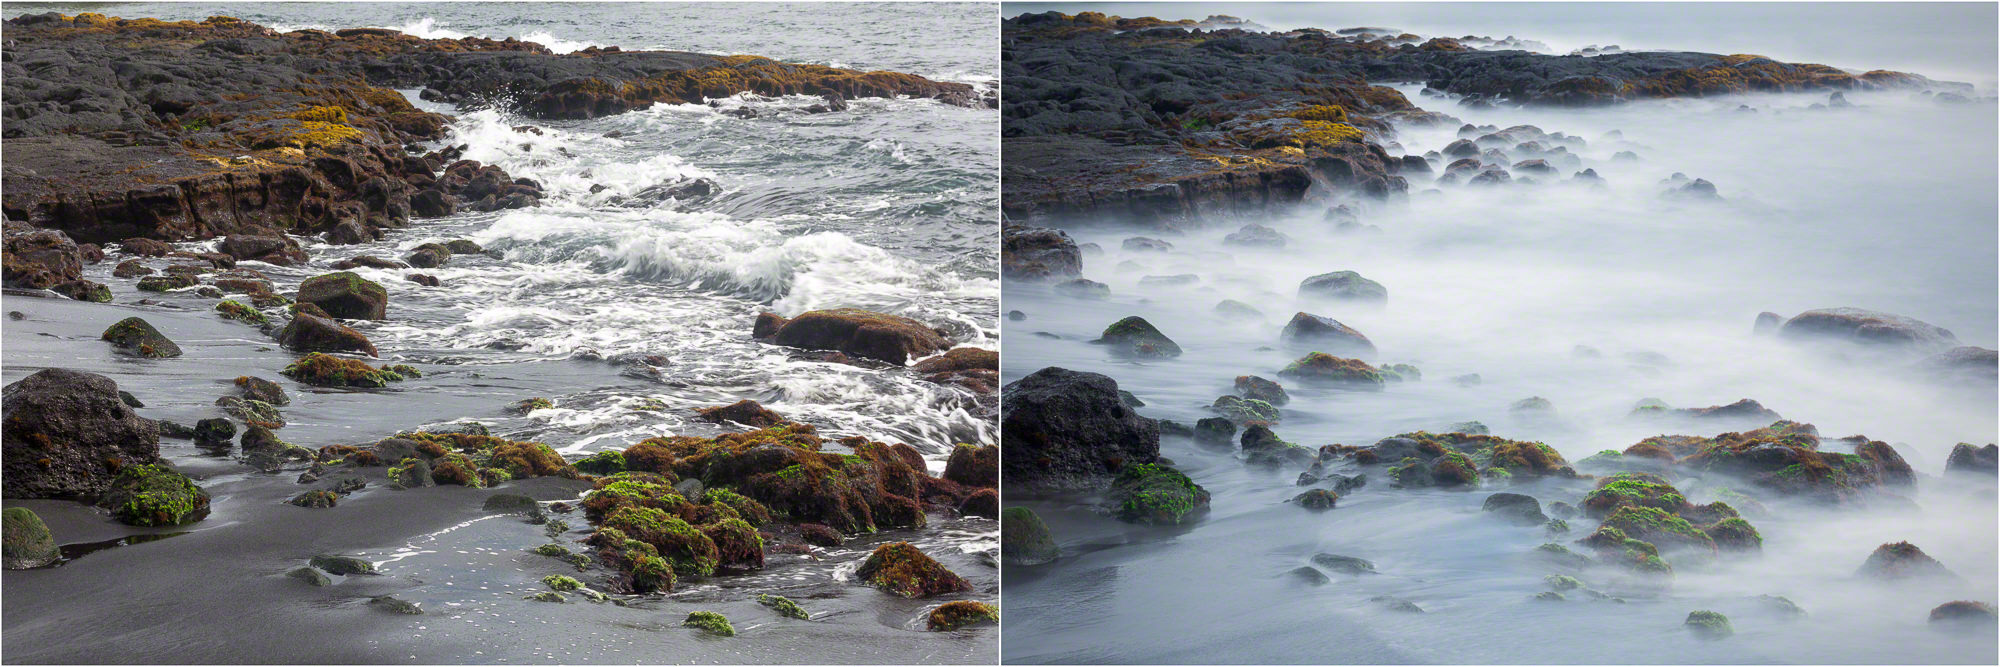
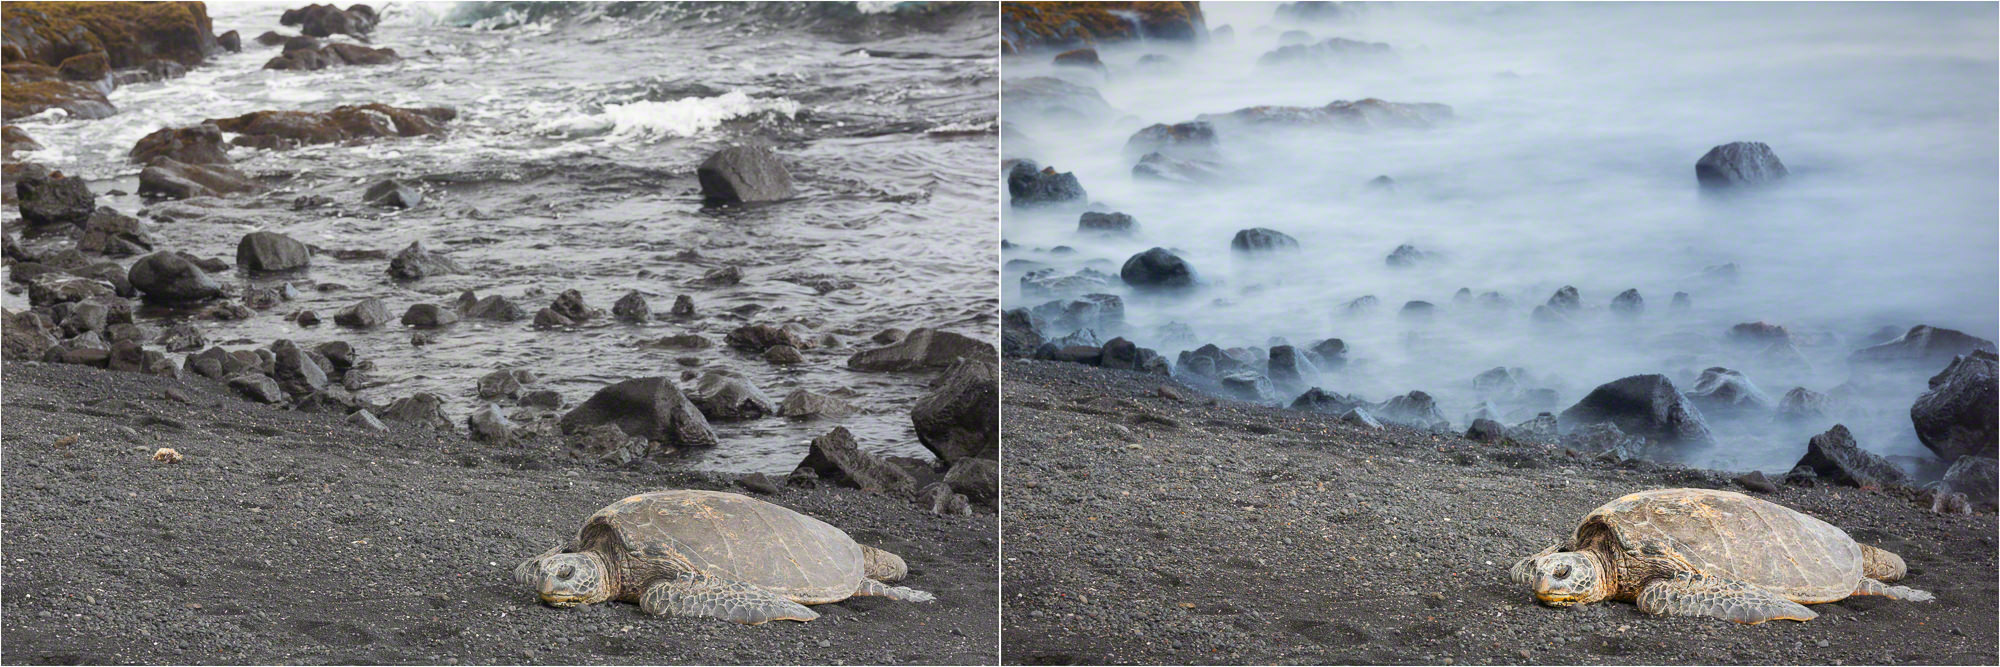
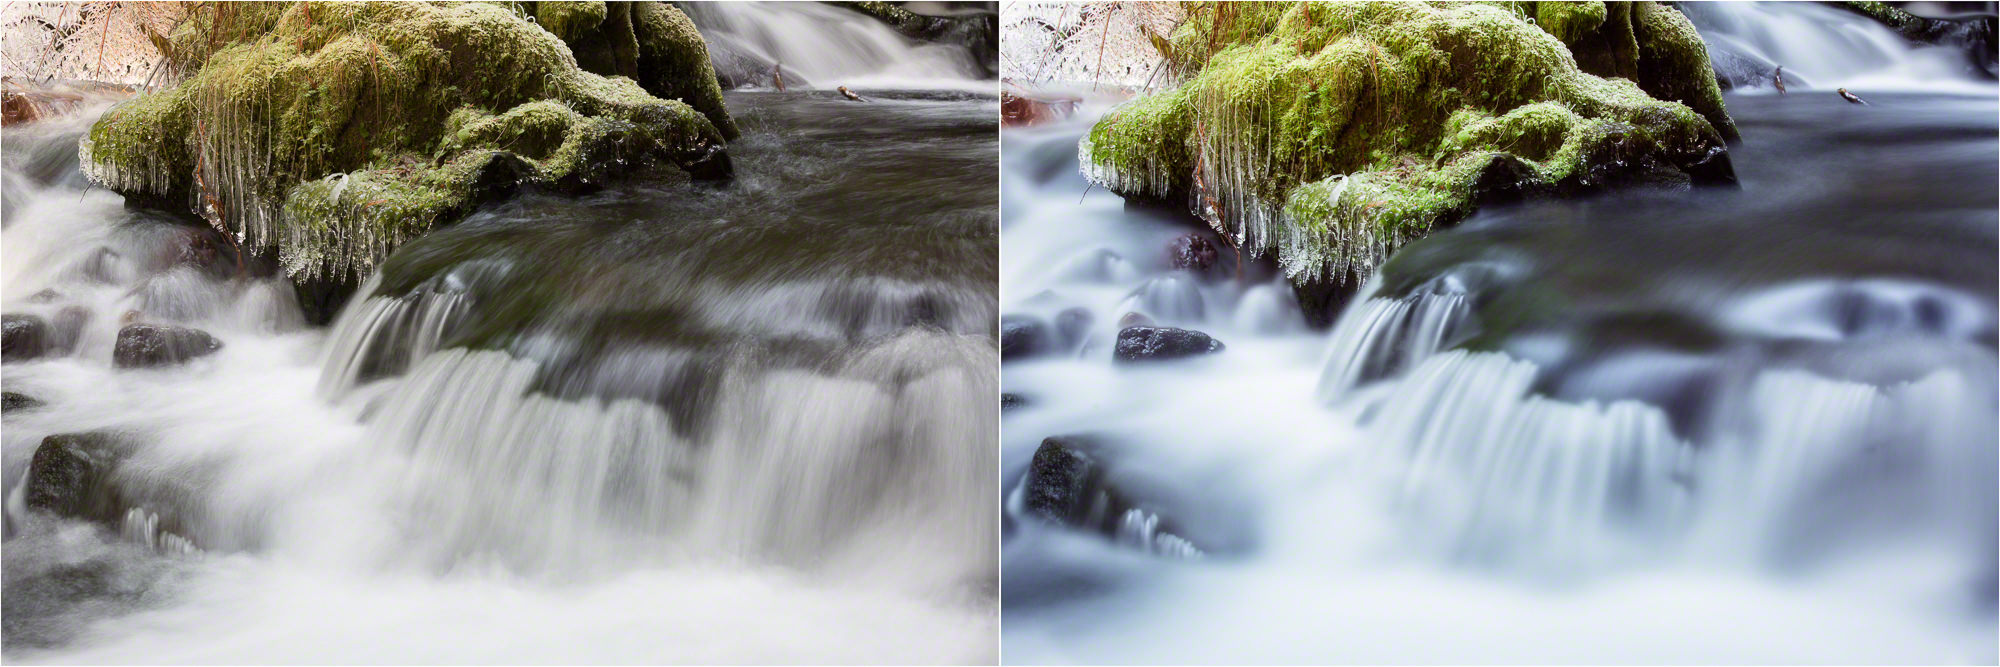
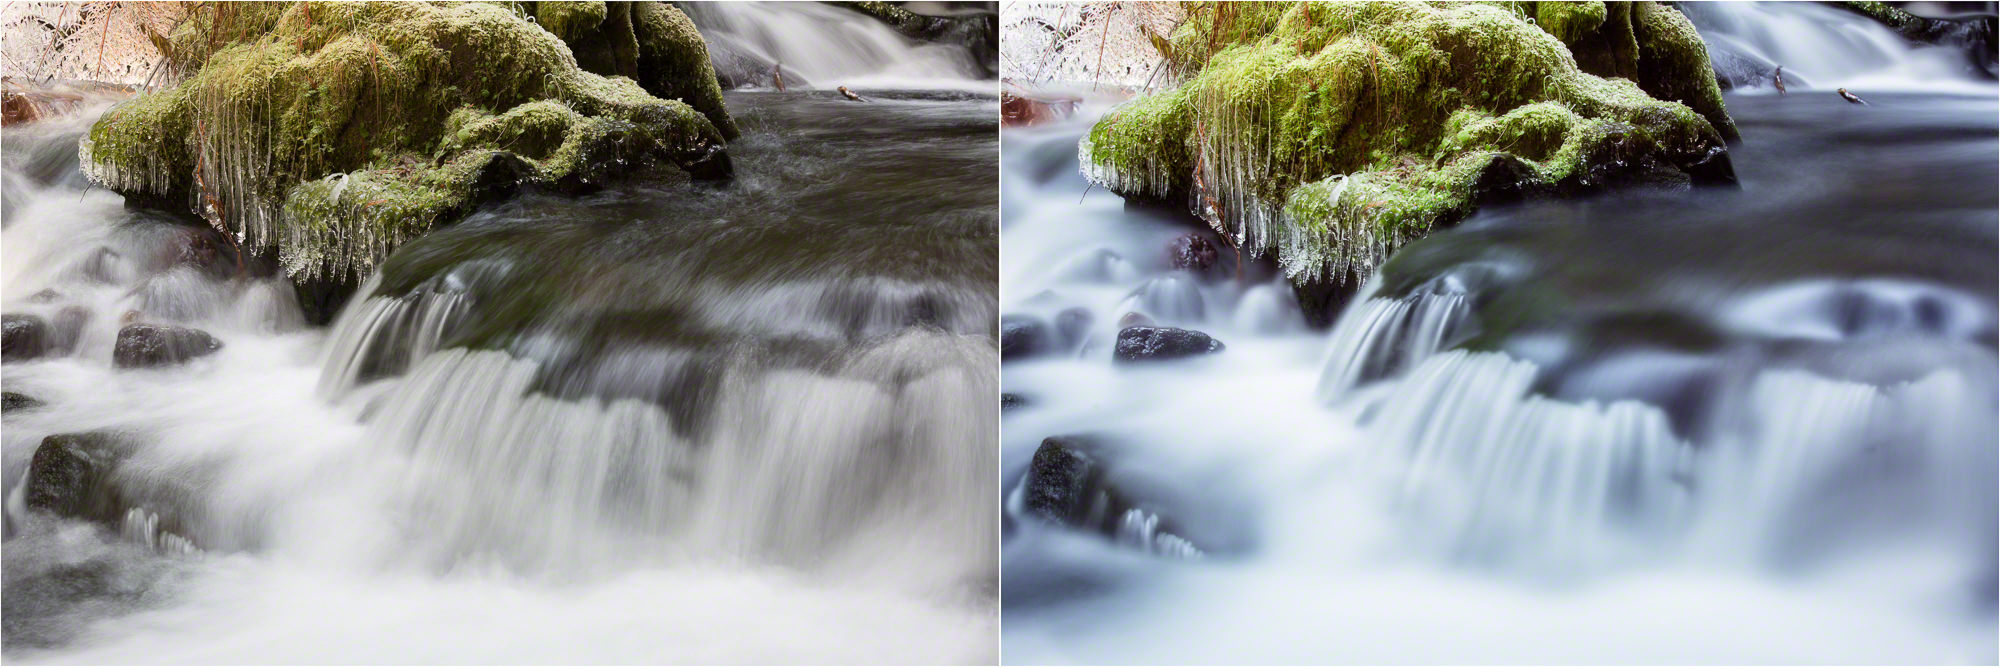
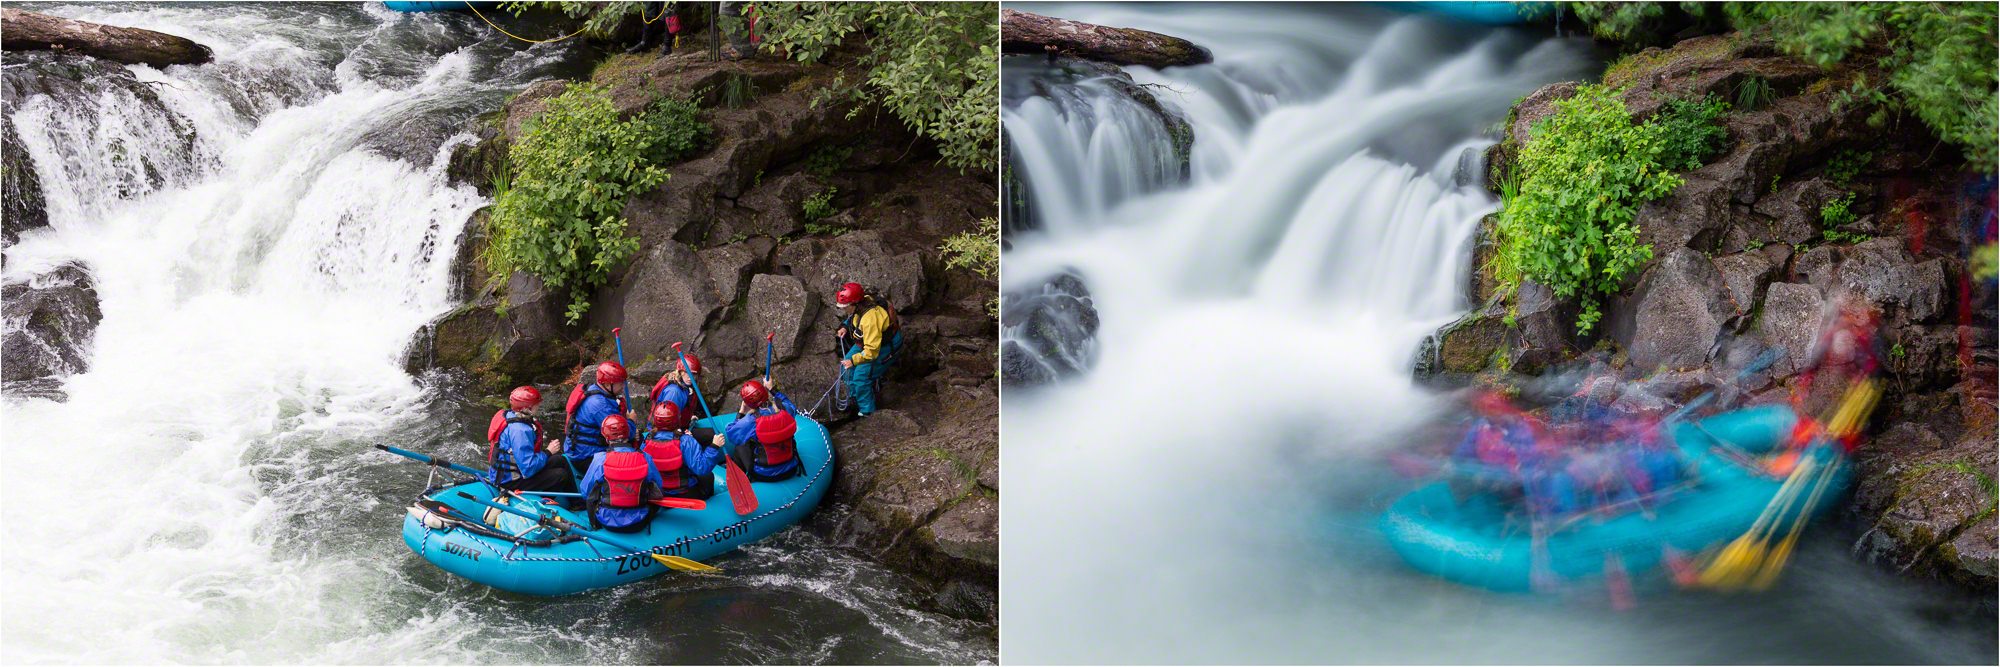
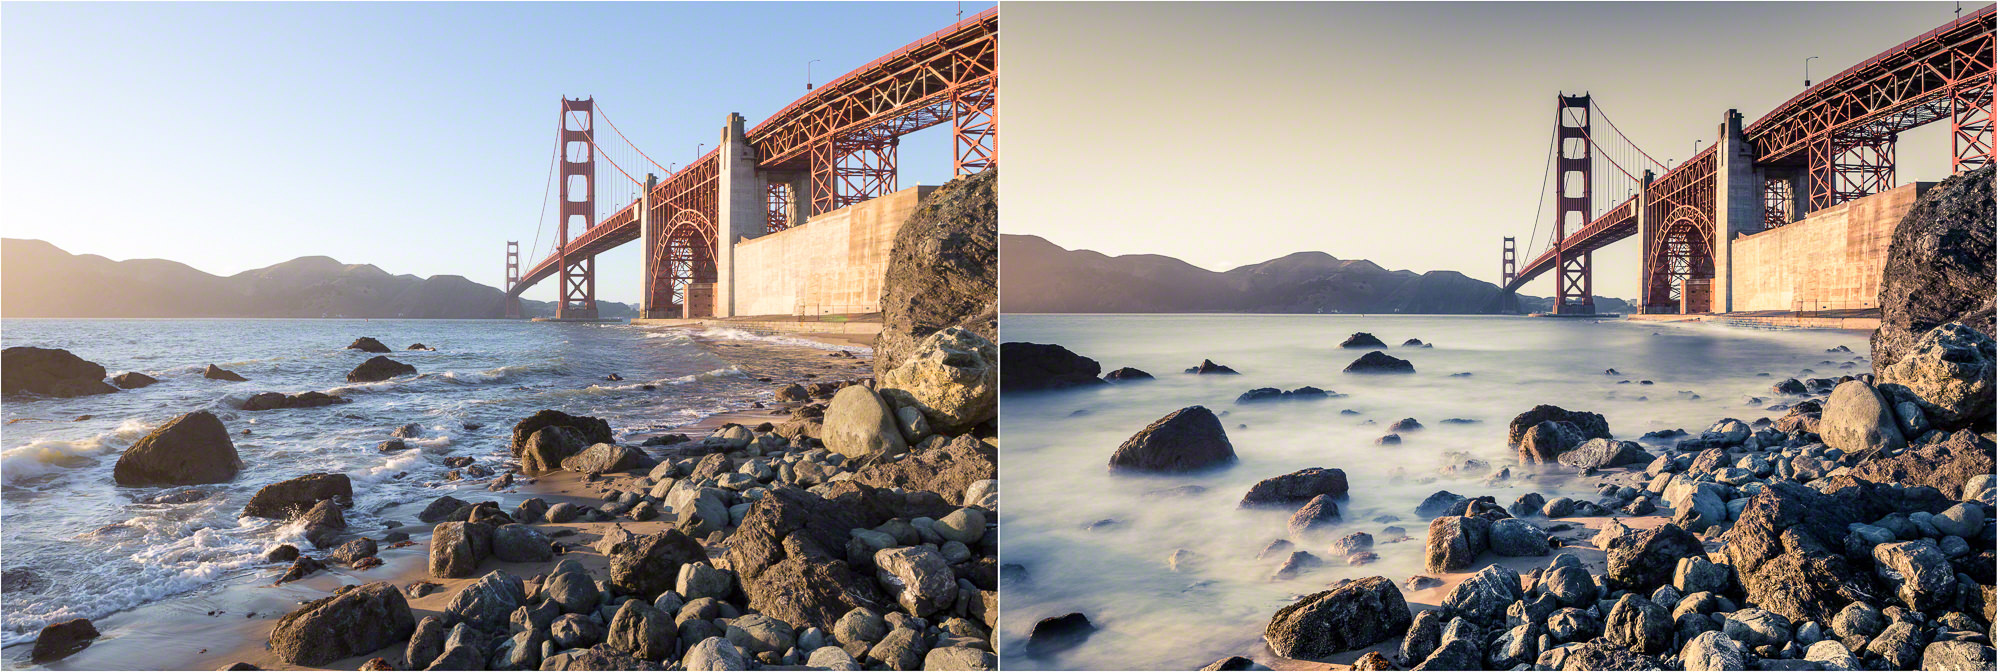
Here is a gallery of some before-and-after long-exposure images to show what types of effects you can get with ND filters. Note that the “before” images are unprocessed and straight out of camera, while the long-exposure photos are mostly full-processed.
-

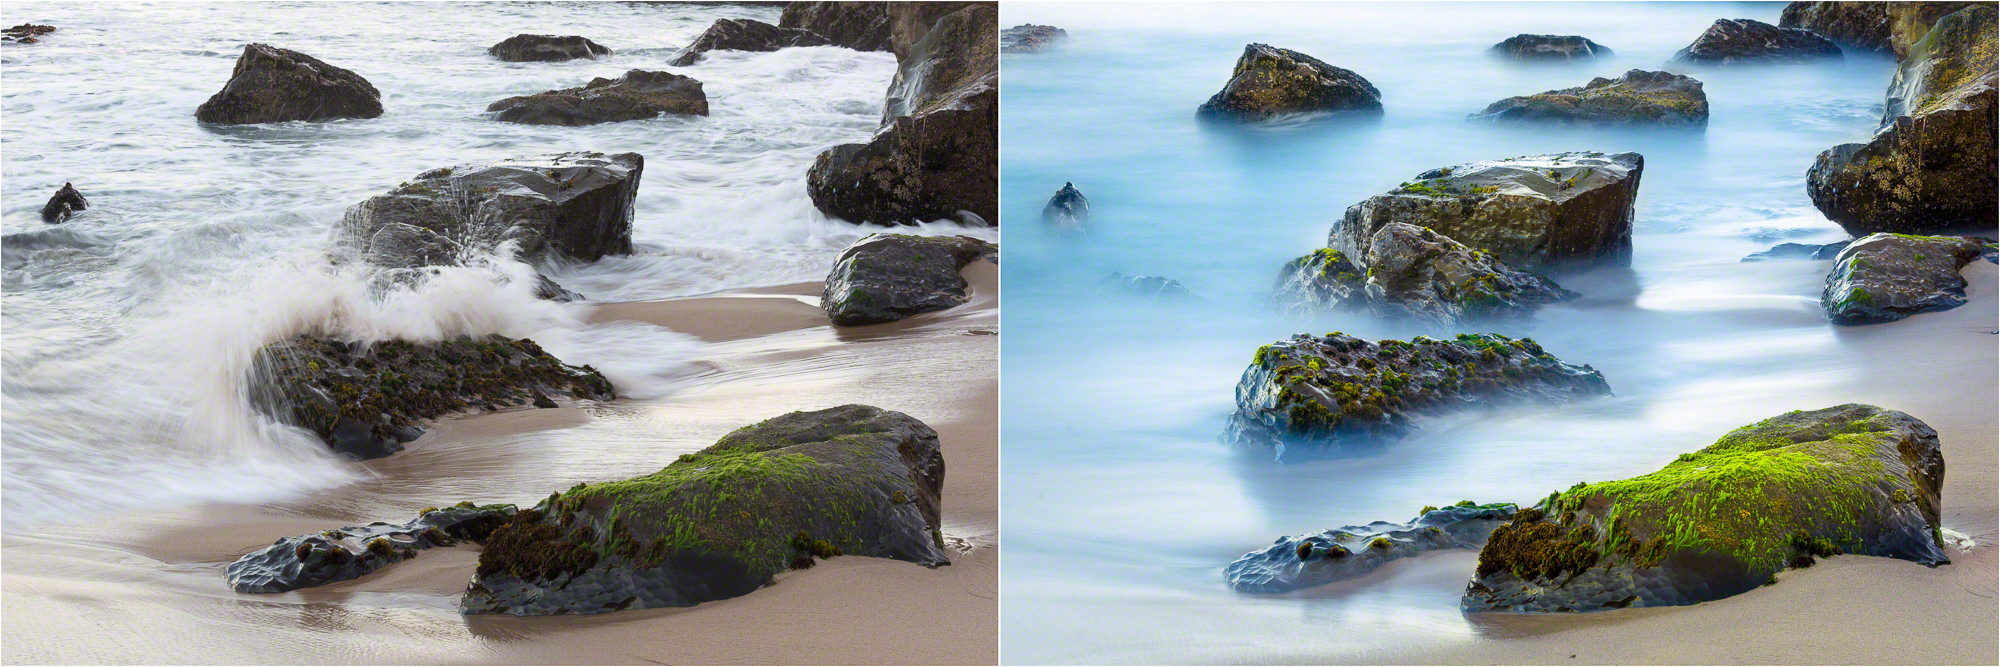
- (Left) 1/45 sec; (Right) 30 sec — © Nicole S. Young (nicolesy.com)
-

- (Left) 1/45 sec; (Right) 30 sec — © Nicole S. Young (nicolesy.com)
-
- (Left) 1/60 sec; (Right) 20 sec — © Nicole S. Young (nicolesy.com)

-
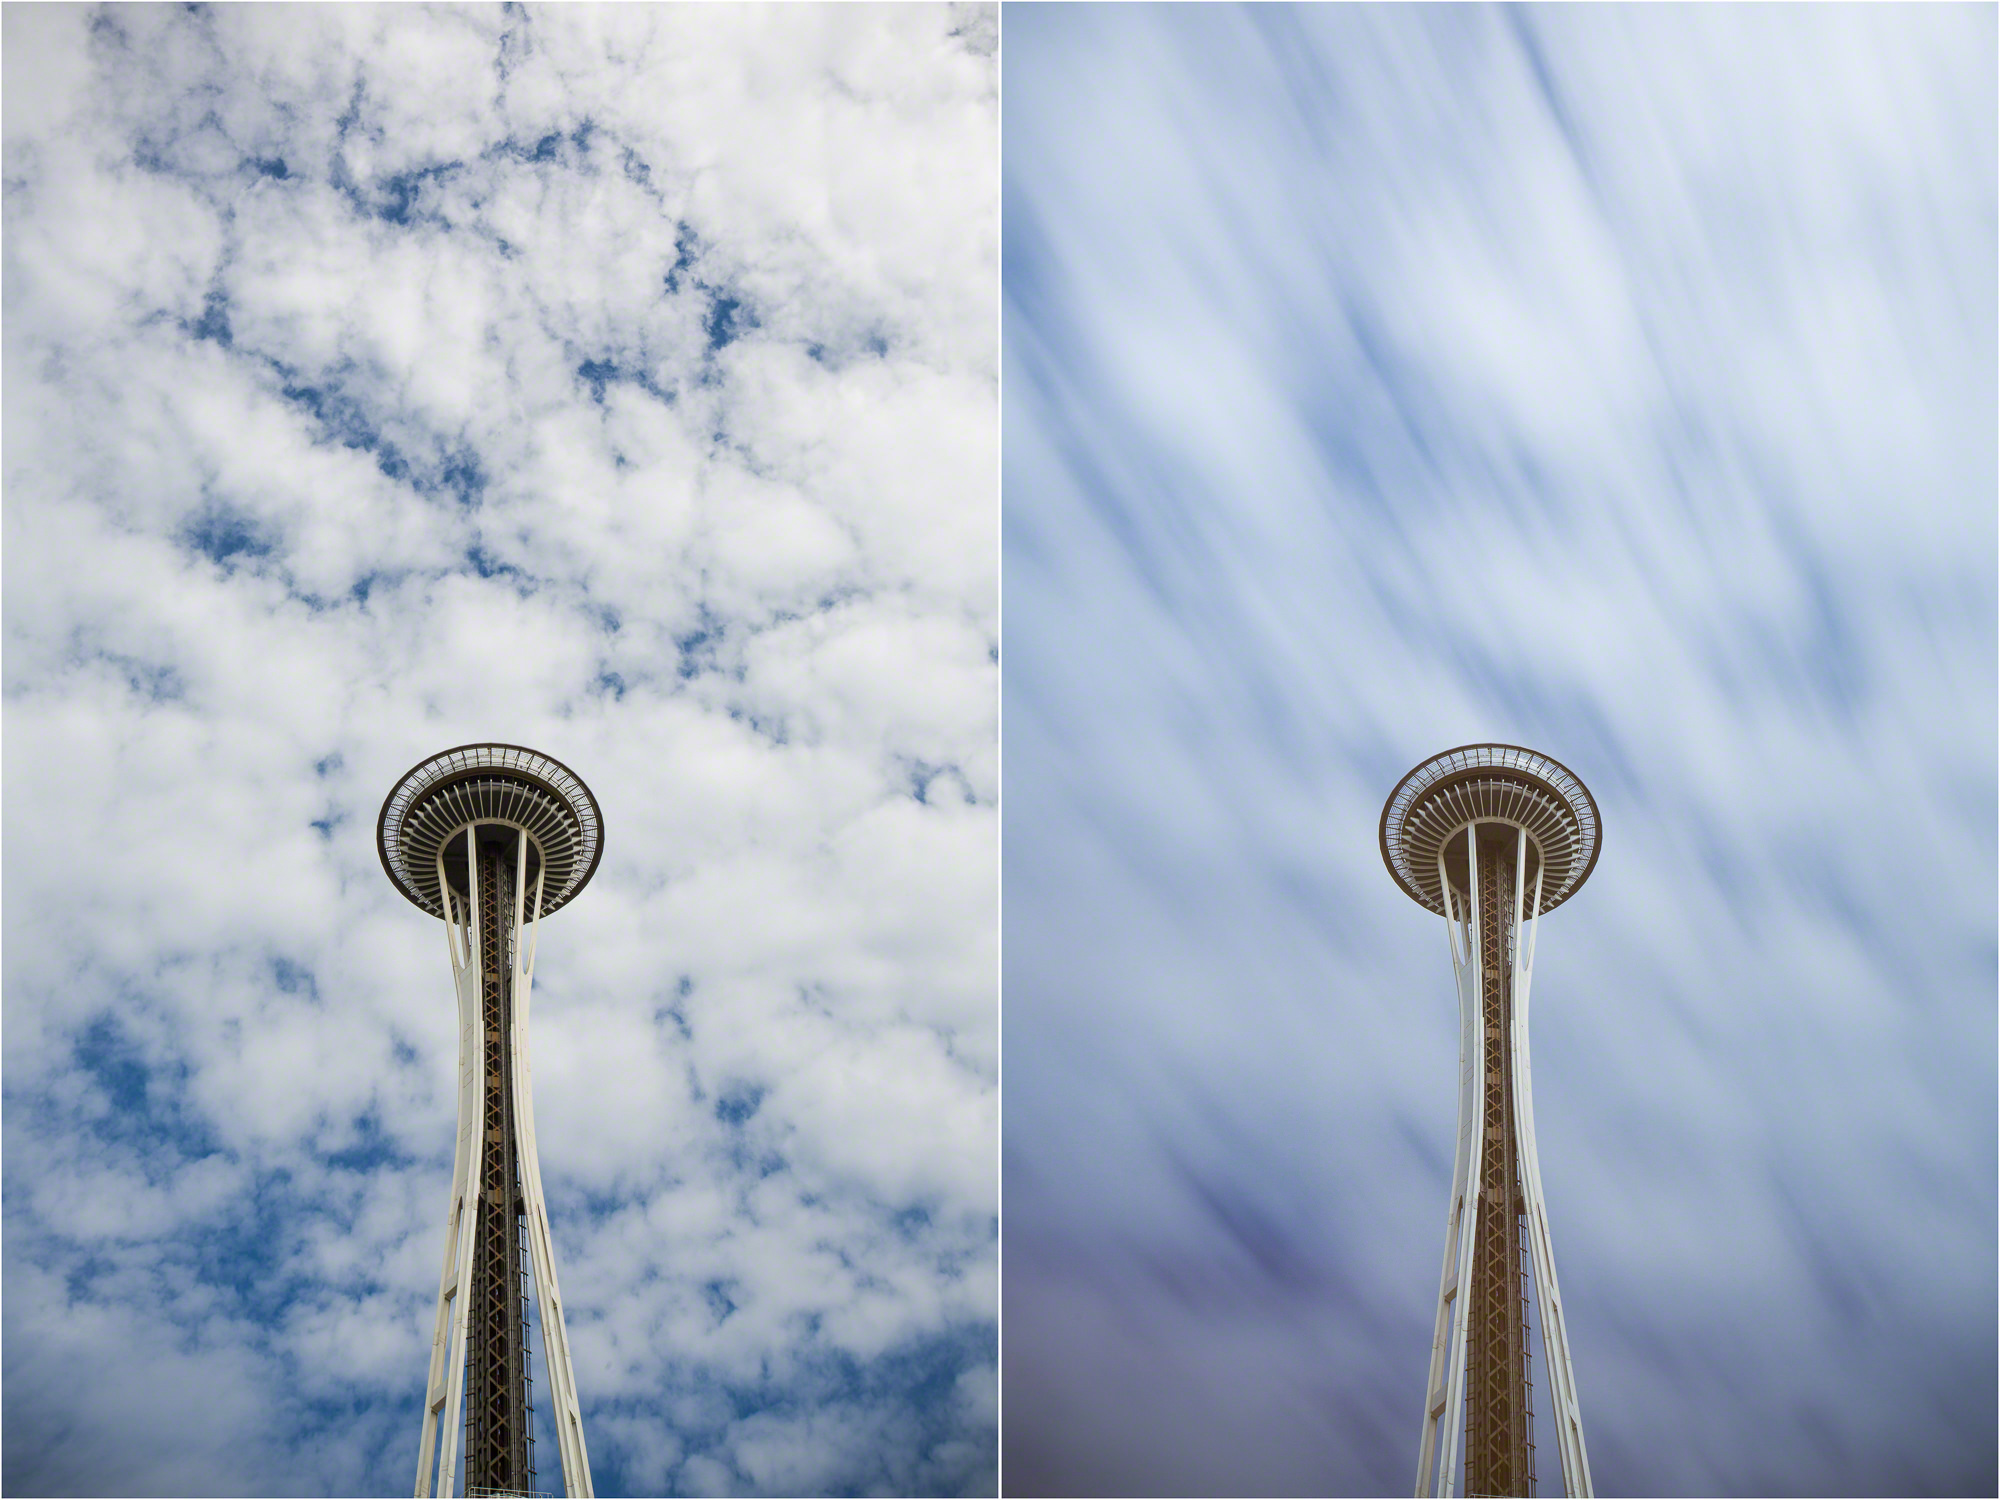
- (Left) 1/10 sec; (Right) 6 sec — © Nicole S. Young (nicolesy.com)

-

- (Left) 1/8 sec; (Right) 40 sec — © Nicole S. Young (nicolesy.com)
-
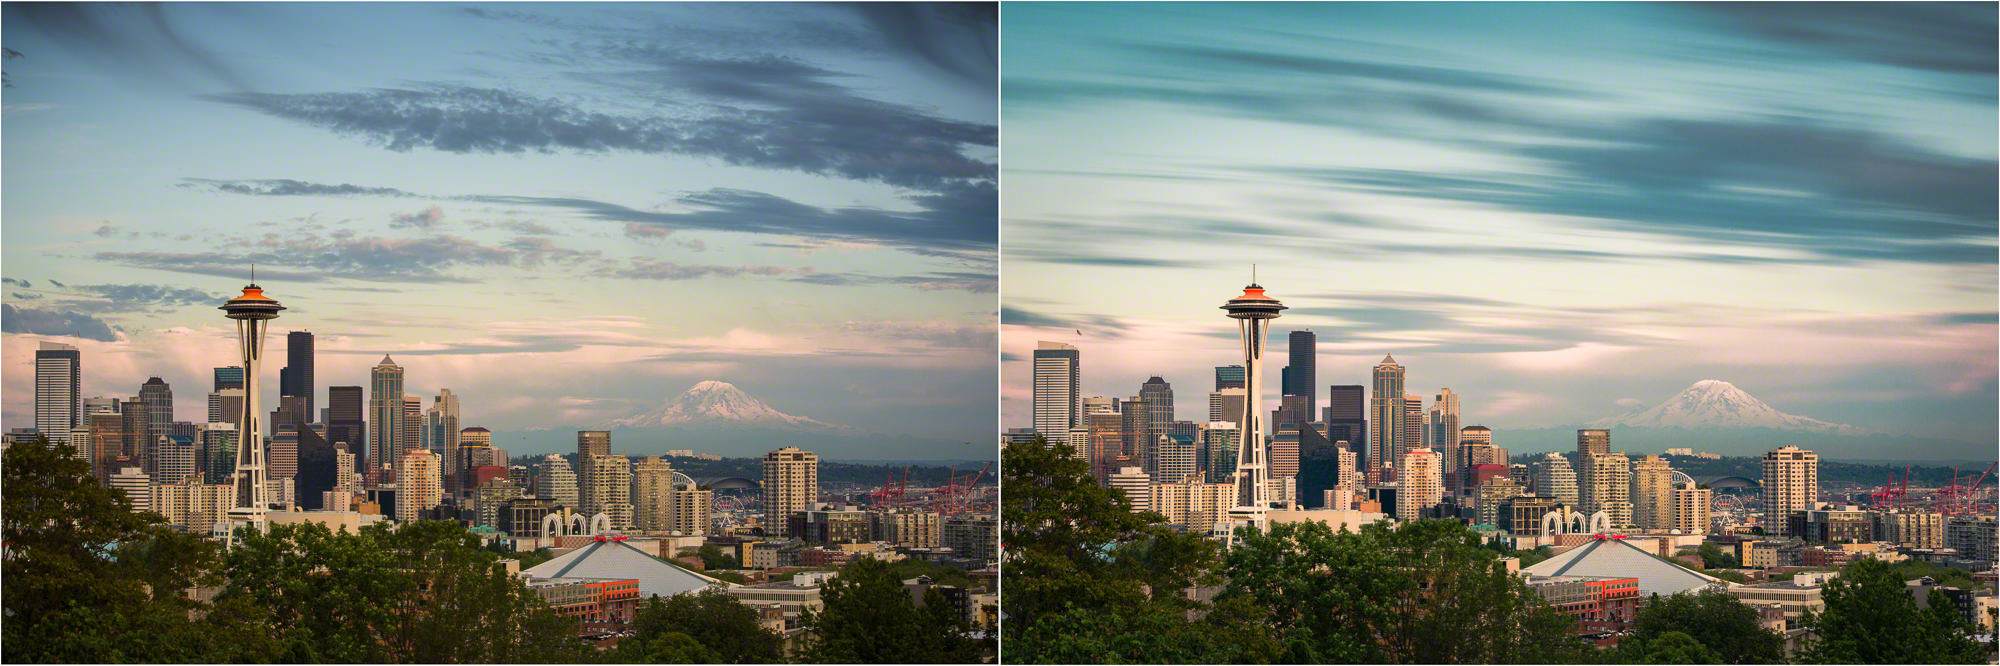
- (Left) 1/45 sec; (Right) 133 sec — © Nicole S. Young (nicolesy.com)
-
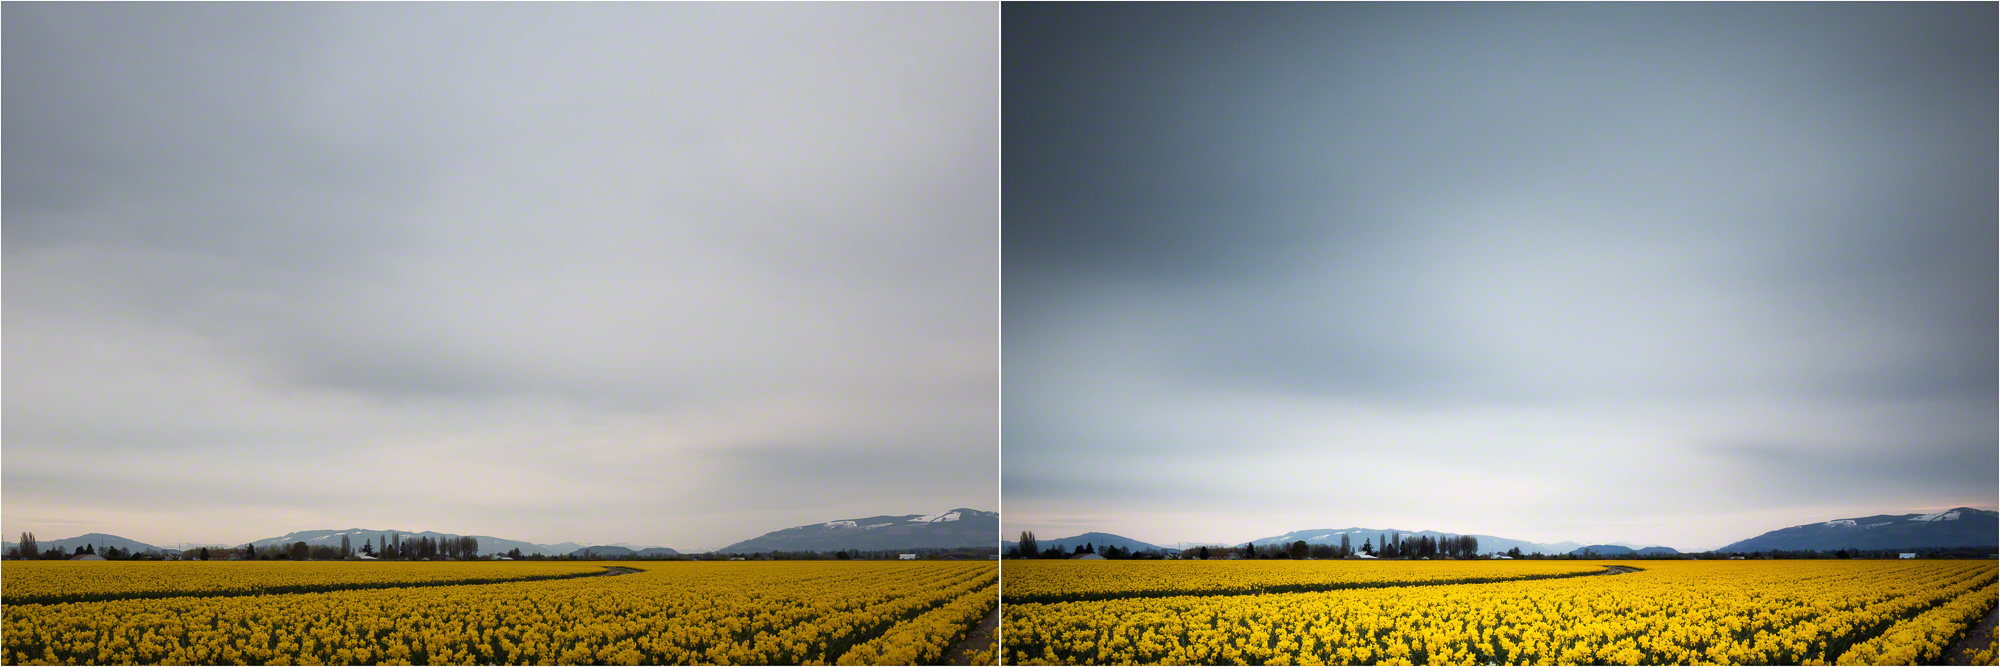
- (Left) 0.7 sec; (Right) 30 sec — © Nicole S. Young (nicolesy.com)
-
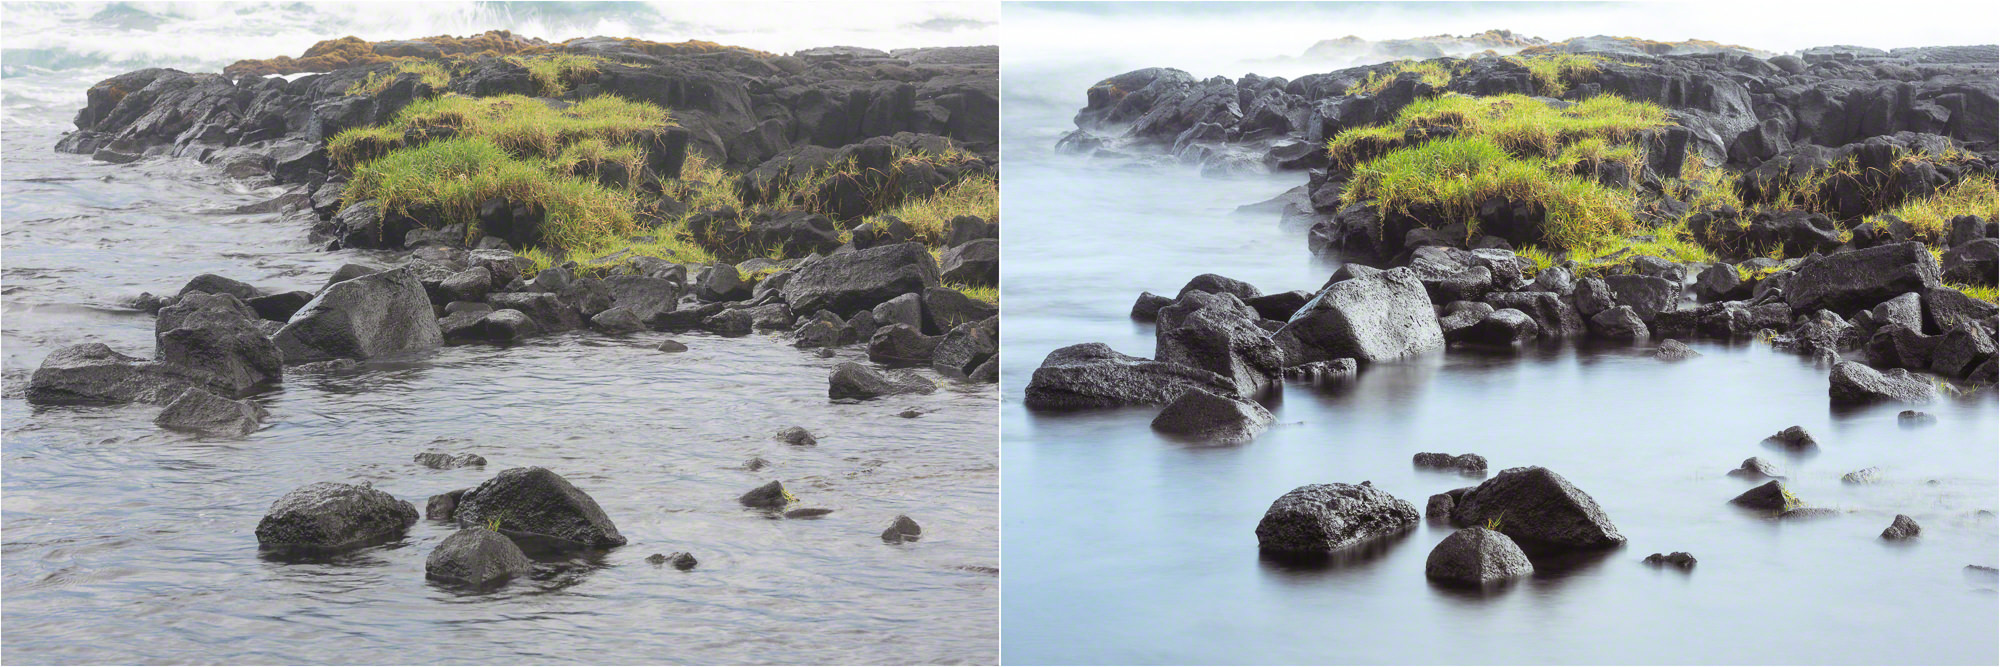
- (Left) 1/180 sec; (Right) 30 sec — © Nicole S. Young (nicolesy.com)

-

- (Left) 1/45 sec; (Right) 30 sec — © Nicole S. Young (nicolesy.com)

-
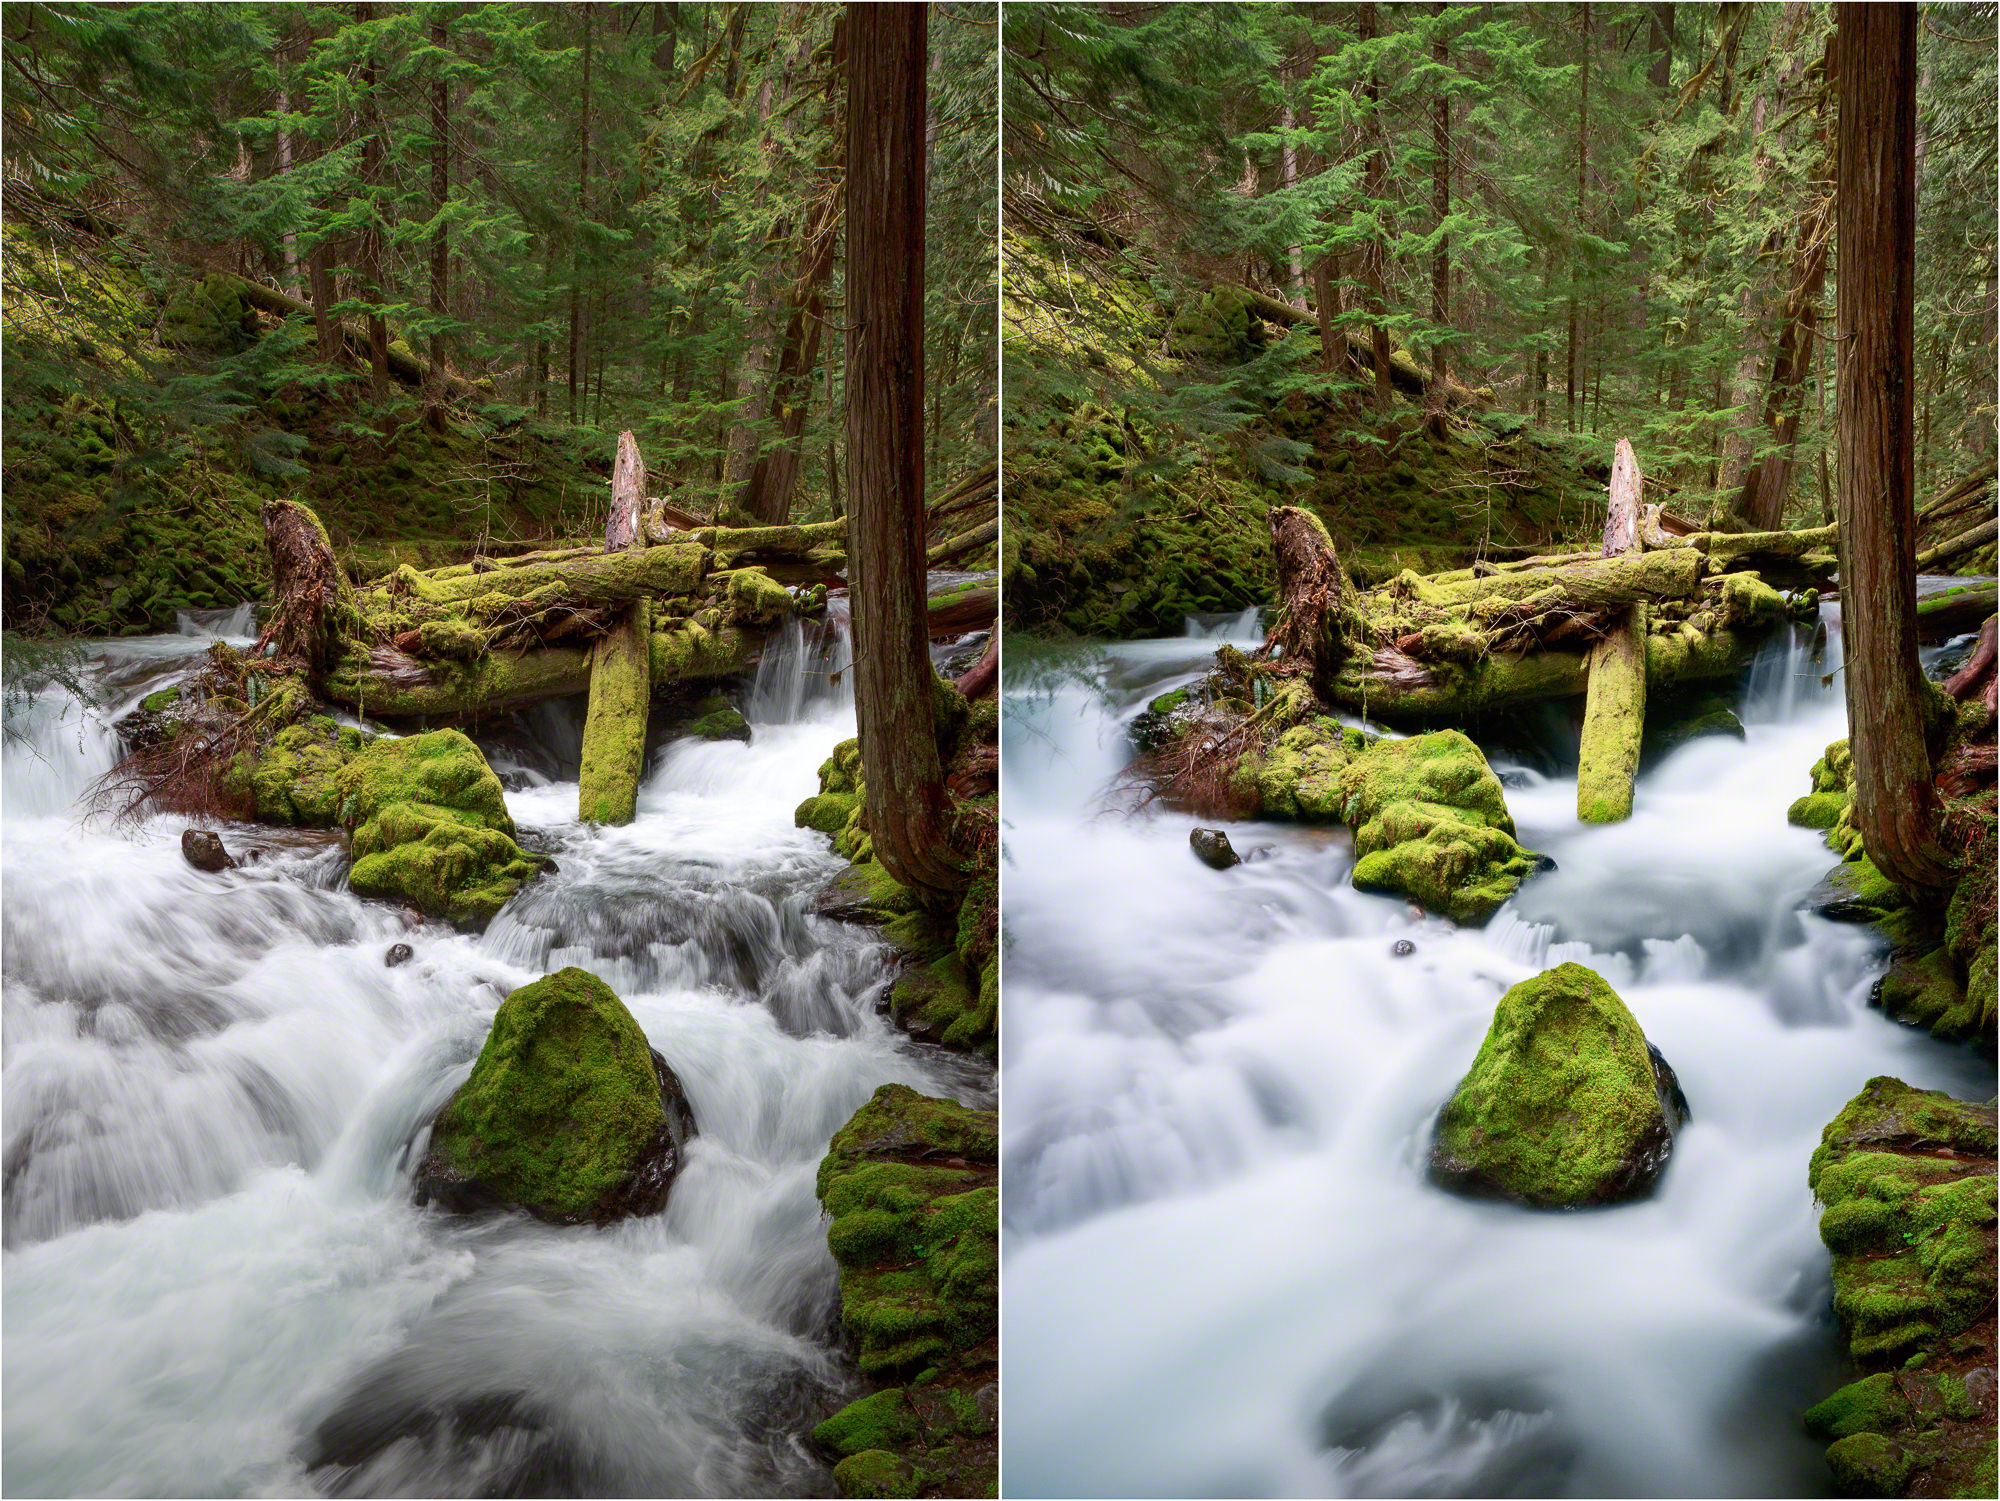
- (Left) 1/30 sec; (Right) 52 sec — © Nicole S. Young (nicolesy.com)

-

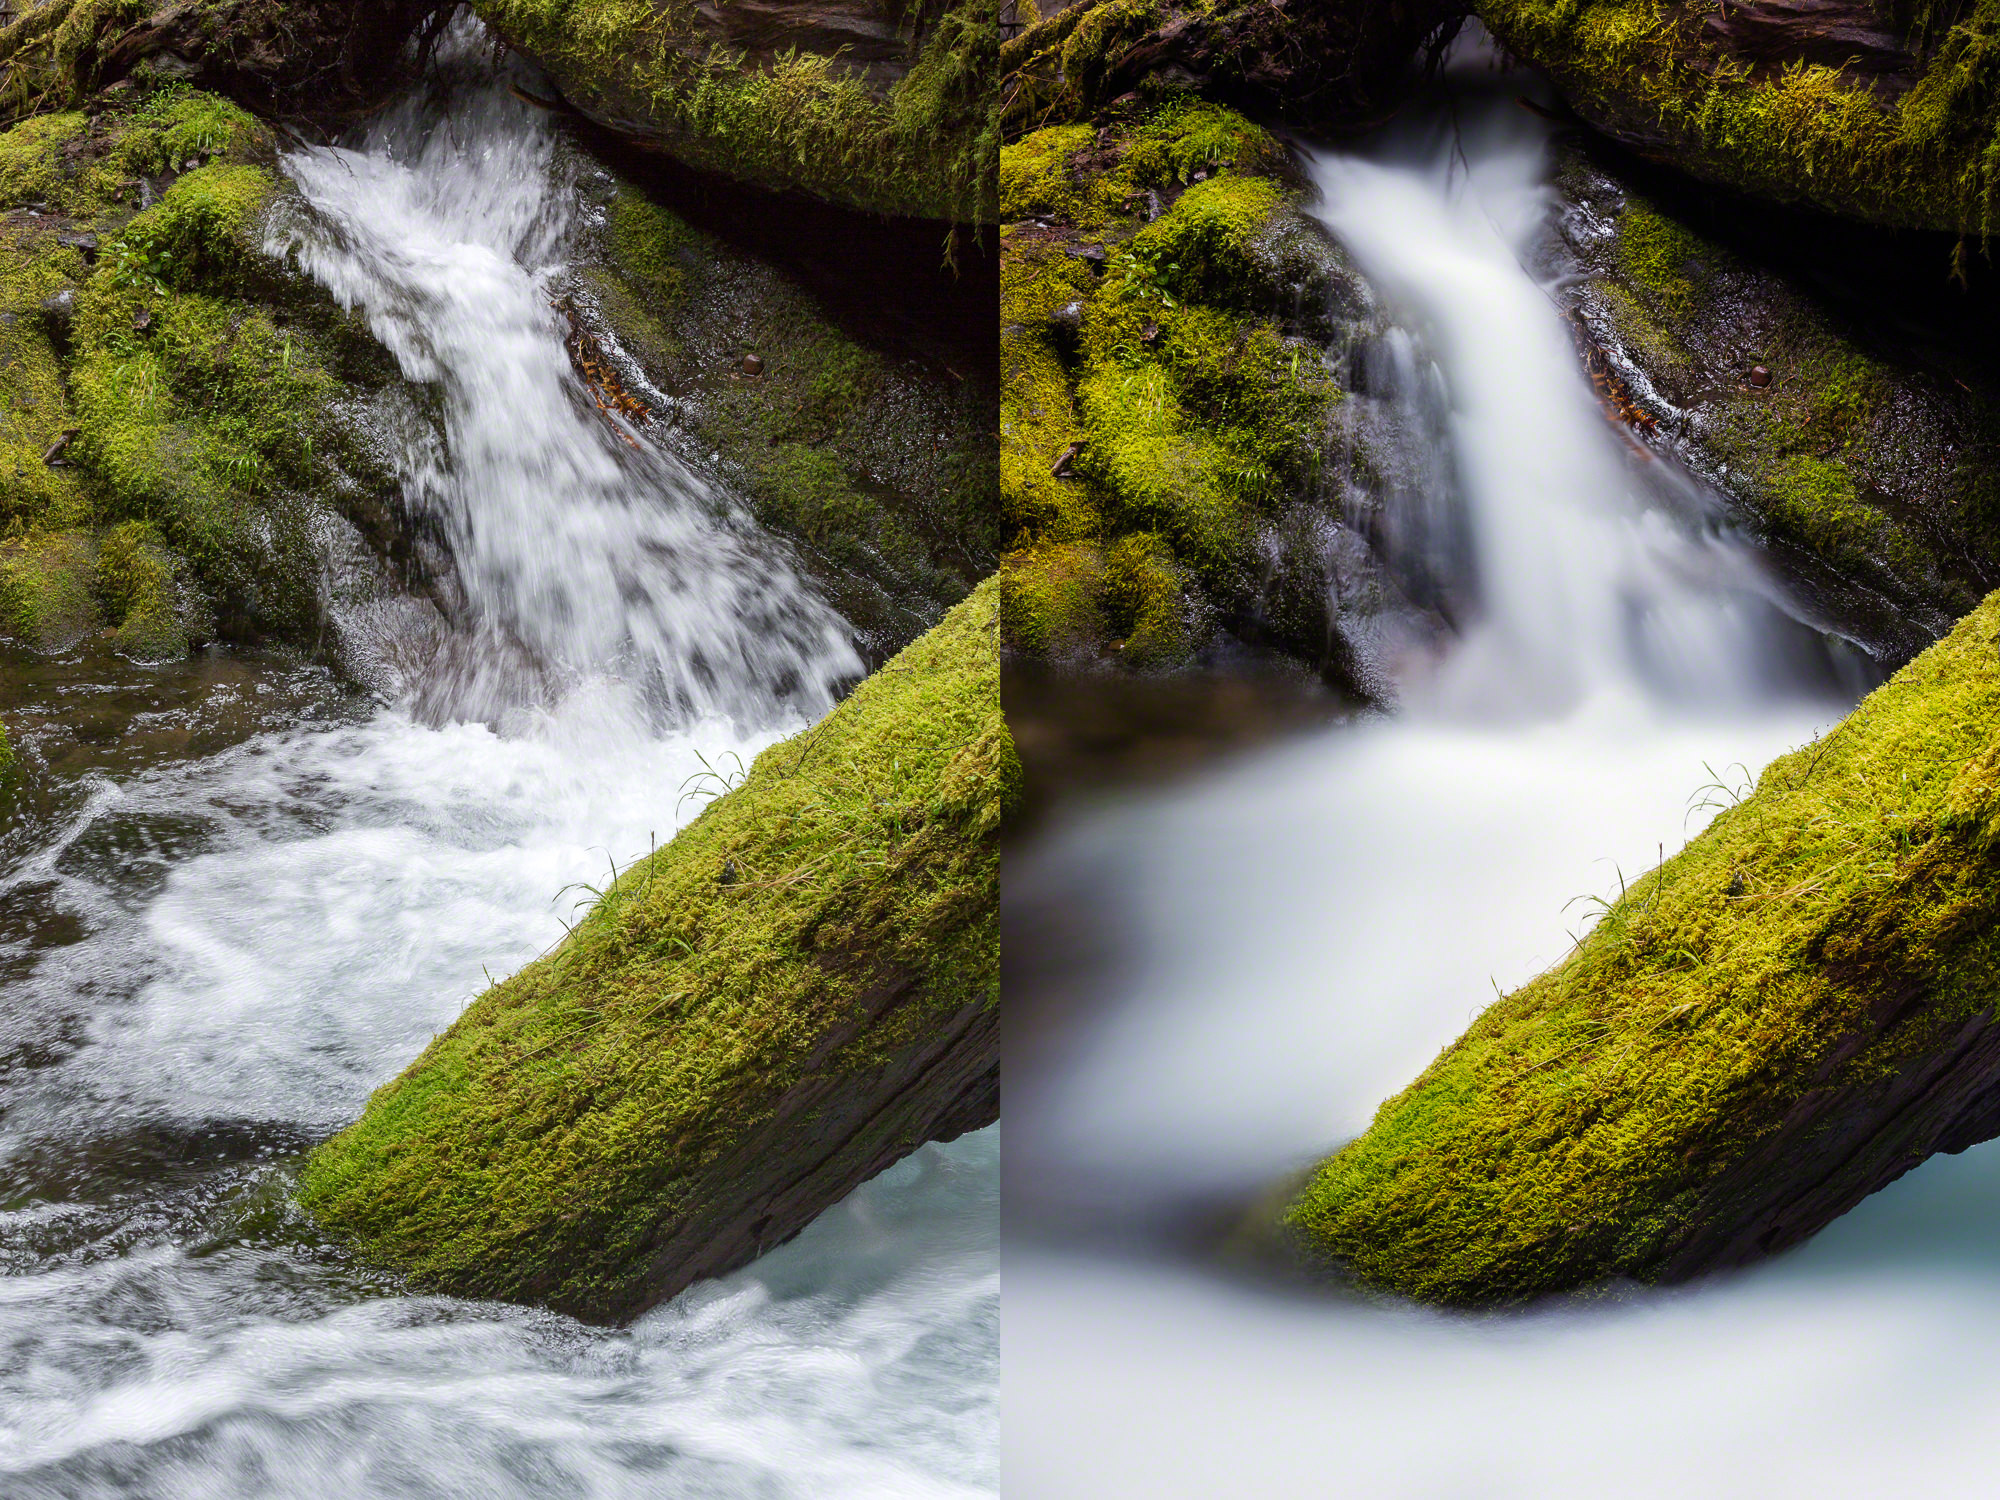
- (Left) 1/10 sec; (Right) 76 sec — © Nicole S. Young (nicolesy.com)
-
- (Left) 1/125 sec; (Right) 54 sec — © Nicole S. Young (nicolesy.com)

-

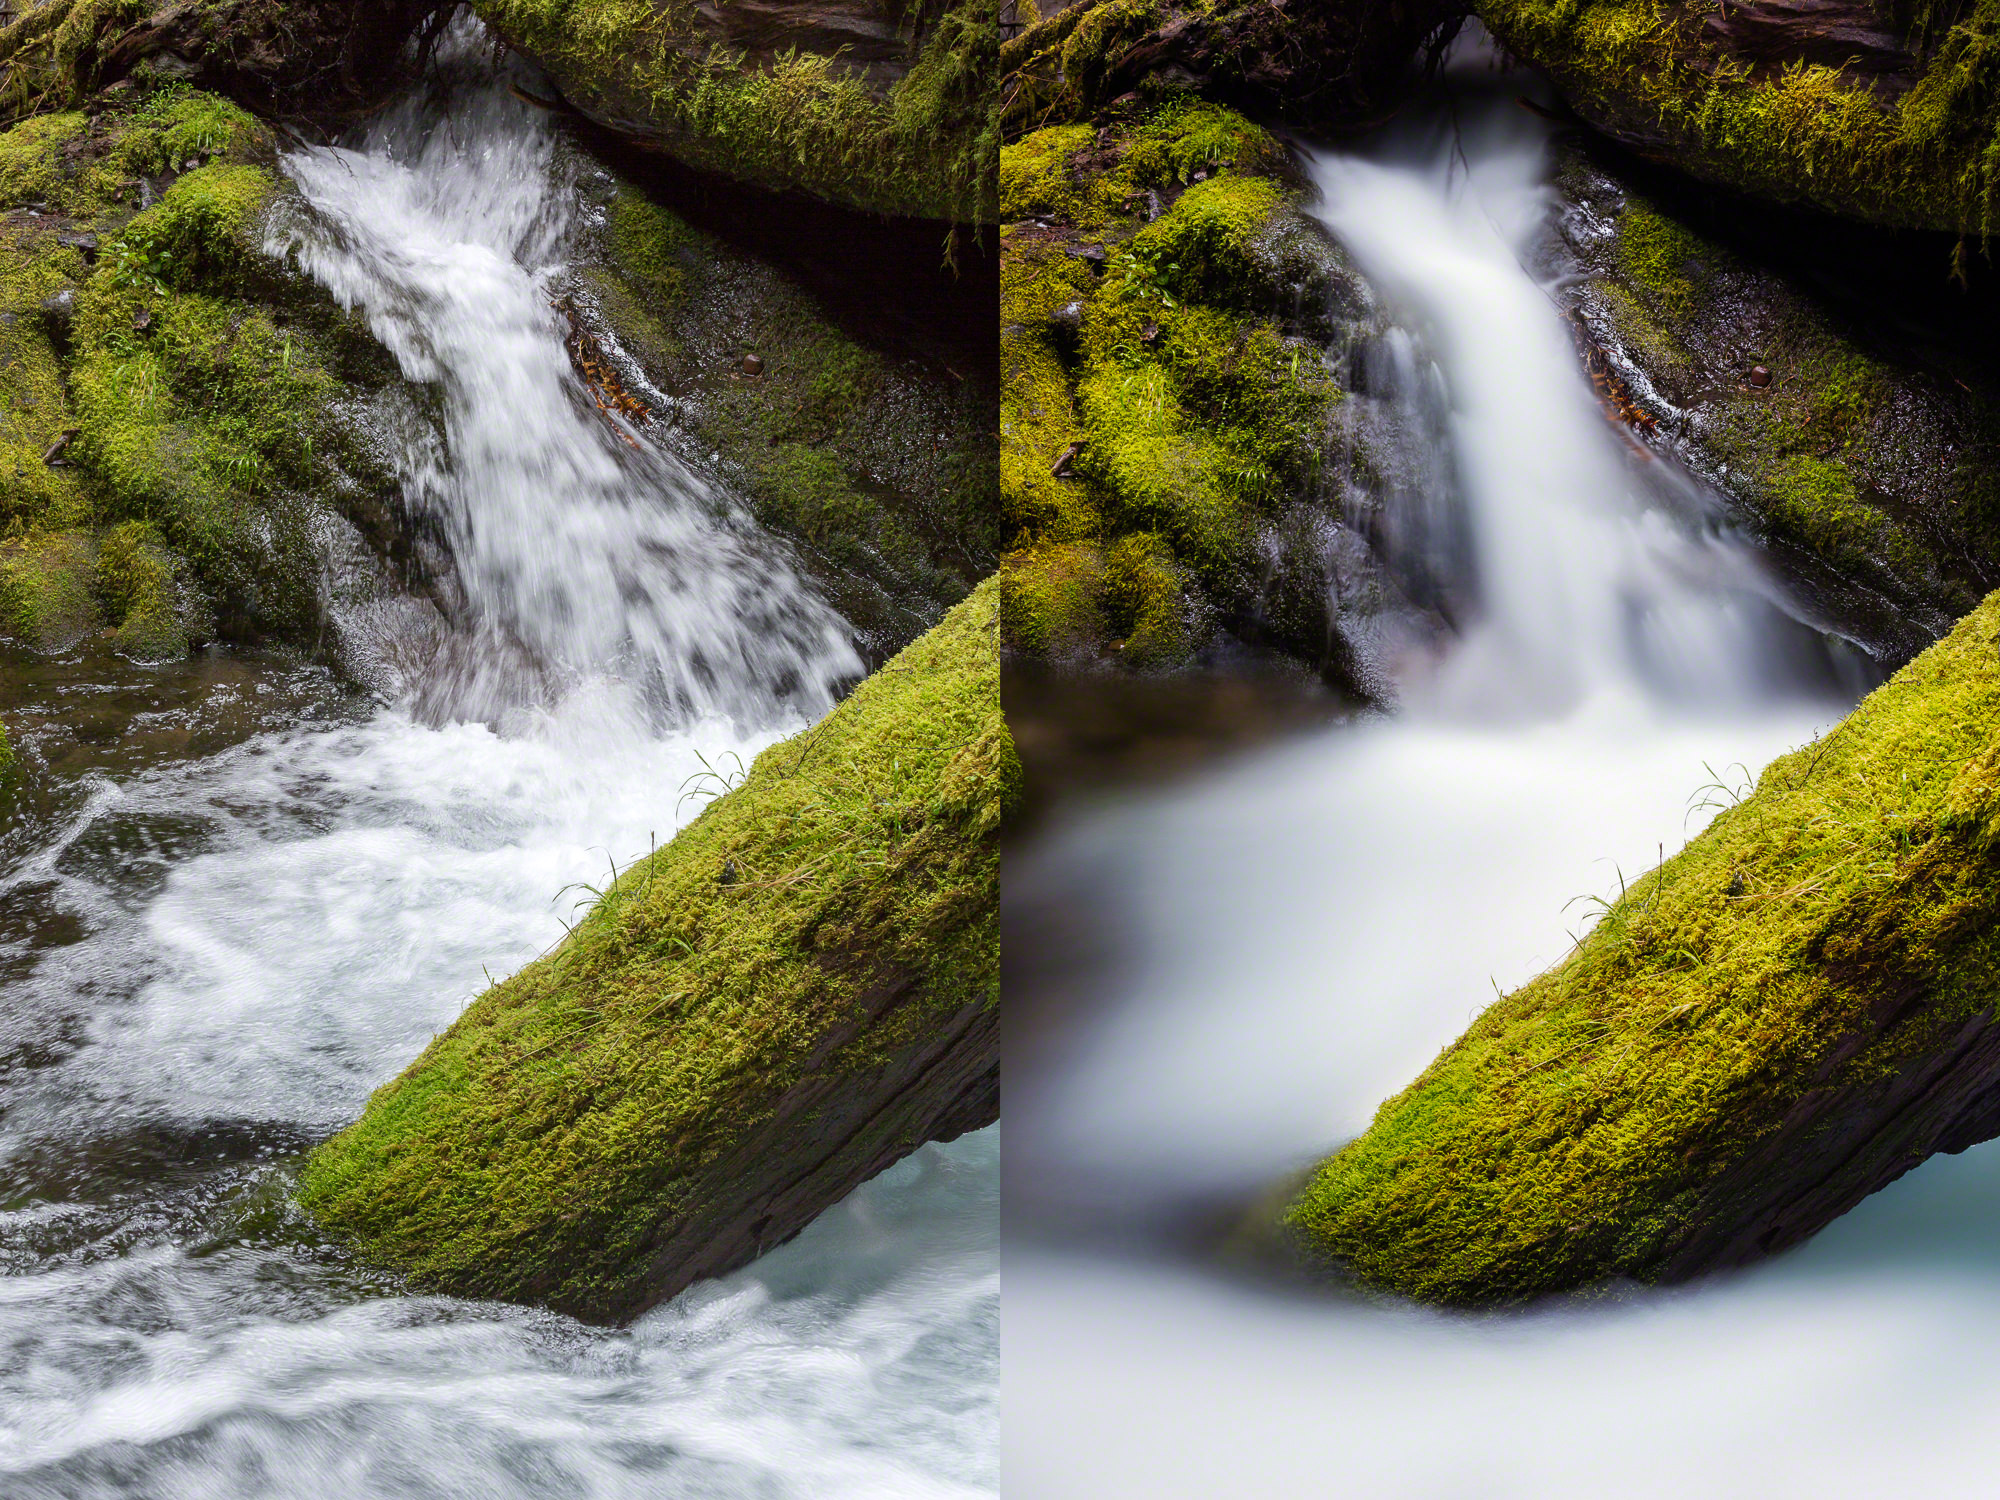
- (Left) 1/10 sec; (Right) 128 sec — © Nicole S. Young (nicolesy.com)
-
- (Left) 1/10 sec; (Right) 130 sec — © Nicole S. Young (nicolesy.com)

Ever since moving to the Pacific Northwest, I definitely have had my fair share of photographing waterfalls. In fact, I became infatuated with landscape photography after realizing that I could, in fact, photograph something that was moving and make it amazingly beautiful! The main thing that pulled me in was blurring water; I was able to transform splashing, fast-moving water into a cotton-candy wonderland.
Creating photographs like these is relatively simple, you just need a few pieces of basic equipment to make it happen. Basically, to create the misty, cotton-candy water effect, you need a very long exposure. Sometimes the light is too bright for the camera to leave the shutter open long enough, so you need to block the light that is coming through the lens so that you can prolong the exposure time and use a slower shutter speed. The best way to do this is with a Neutral Density (ND) filter.
What is a Neutral Density Filter?
This is my basic setup when photographing waterfalls: Canon 5D Mark III, 24-70mm lens, Lee Filter Holder, and ND filter. (© Nicole S. Young — nicolesy.com)
An ND filter is a dark piece of glass in a neutral color that blocks the light coming into your lens. They come in various “stops”, and block light according to the intensity of the filter. Sometimes you can create long-exposures of water without them, but the scene would require a dark, overcast day with very little (to no) sunshine. And on the days when it is bright, ND filters are the key to long exposures.
What scenes work best with long-exposures?
Gear: Canon 5D Mark III, 70-200mm lens, Lee Filter Holder, and ND filter. Also, the object on the top of my camera is a GPS unit. (© Nicole S. Young — nicolesy.com)
The most important thing you will need to get a good long-exposure is something that is moving. Oftentimes this will be water, or even clouds. But you can experiment with the filters and photograph moving people, or cars during the day, and more.What gear do I need for long-exposures?
Regardless of the type of long-exposure photography you are wanting to create, there is some essential gear to ensure success with your photographs:
- Sturdy tripod
- Cable-release
- Camera you can set to BULB
- Neutral Density filters (for blurring water, clouds, etc.)
- A timer or long-exposure app
Which ND Filter setup should I buy?
Gear: Canon 5D Mark III, 70-200mm lens, Lee Filter Holder, and ND filter. Also, the object on the top of my camera is a GPS unit. (© Nicole S. Young — nicolesy.com)
There are two main types of ND filters: Circular and Square/Rectangle (100mm). Each of them has pros and cons, and so I have listed a little bit about them, along with some things to consider when deciding which one you should use with your photography:
Circular Filters
The first type is the CIRCULAR filter. These screw on to the front of your lens, just like any other filter. They come in different size filter rings to fit individual lenses, and come in various ranges of stops. If you are just starting out with long-exposure photography, you’ll probably want to start with one of these and see how you like it before investing in a full 100mm square/rectangle filter system.
PROS:
- Less expensive on an individual basis
- Easier to use and carry (less setup required)
CONS:
- Only good for one type of lens size (you would need to purchase more than one of the same filter if you have different sized filter rings on your lenses)
- Stacking filters can result in lens vignetting (darkening around the edges of your image)
Square or Rectangle Filters (100mm):
Square and rectangular filters are good for photographers who create long-exposures regularly and want to have one filter for all lens sizes. These filters require a filter holder and adapter rings to allow placement on any size lens. This is the type of ND filter setup I use and would recommend to anyone who is serious about long-exposure photography.
What you will need for this setup:
- Filter holder (Formatt Hitech and Lee are two good brands to look into)
- Adapter/step-down rings (these allow you to connect the filter holder to the lens, and come in different sizes)
- 100mm Filters
PROS:
- One filter fits all lenses (requires a universal filter holder)
- Easier to stack filters, including the addition of a circular polarizer on the front
- More options for filter types, including graduated ND filters (clear on top, ND on the bottom)
CONS:
- Needs additional equipment (Filter holder/kit)
- Larger, so they take up more space in your bag
How to calculate a long exposure manually
Gear: Canon 5D Mark III, 24-70mm lens, Lee Filter Holder, and ND filter. Also, the object on the top of my camera is a GPS unit. (© Nicole S. Young — nicolesy.com)
When I use ND filters, sometimes the exposure time exceeds 30 seconds. Because most cameras cannot calculate an exposure time beyond 30 seconds, then you will need a way to do the math and determine your long exposure time. You can do it manually if you like; it’s really not too complicated. Here’s how:
- First, get a base exposure of your image without the filter. Set your camera to the aperture you want, and then use Aperture Priority or Manual Mode and take a photo. Let’s say, for demonstration purposes, your exposure is 1 second.
- Next, put your filter in the front of your lens. (For this example, we will be using a 6-stop ND filter.) Keep your aperture the same, and meter ONLY for the shutter speed.
- At this point, your camera will probably be flashing the 30-seconds in the display. That is telling you that the exposure will be underexposed at that setting. So, switch your camera to BULB (you’ll also need a cable release) and calculate the exposure.
- Here’s how you do the math. You take the original exposure time (1 second), and double it SIX TIMES, as you are using a 6-stop filter. It will look like this:
Start at 1 sec –> 2 sec –> 4 sec –> 8 sec –> 16 sec –> 32 sec –> 1 min 4 seconds
- Then, press the shutter button (using the cable release), and hold the shutter open for 1 minute 4 seconds. You should have a nice, blurry-water effect in your photo!
Using Smartphone Apps to calculate long-exposures
Left to Right: Slower Shutter, ND Timer, and ND Filter Calculator
If you don’t want to do math every-time you create a long-exposure, try using my preferred method of a smart-phone app. There are some pretty good apps on the market that make it really easy to calculate exposures, and I use them almost every-time I photograph running water.
Here are some of long-exposure apps you can check out:
Slower Shutter (iOS, $0.99)
ND Timer (iOS, $0.99)
ND Filter Calculator (Android, Free )
Here is a gallery of some before-and-after long-exposure images to show what types of effects you can get with ND filters. Note that the “before” images are unprocessed and straight out of camera, while the long-exposure photos are mostly full-processed.
-
- (Left) 1/45 sec; (Right) 30 sec — © Nicole S. Young (nicolesy.com)
-
- (Left) 1/45 sec; (Right) 30 sec — © Nicole S. Young (nicolesy.com)
-
- (Left) 1/60 sec; (Right) 20 sec — © Nicole S. Young (nicolesy.com)
-
- (Left) 1/10 sec; (Right) 6 sec — © Nicole S. Young (nicolesy.com)
-
- (Left) 1/8 sec; (Right) 40 sec — © Nicole S. Young (nicolesy.com)
-
- (Left) 1/45 sec; (Right) 133 sec — © Nicole S. Young (nicolesy.com)
-
- (Left) 0.7 sec; (Right) 30 sec — © Nicole S. Young (nicolesy.com)
-
- (Left) 1/180 sec; (Right) 30 sec — © Nicole S. Young (nicolesy.com)
-
- (Left) 1/45 sec; (Right) 30 sec — © Nicole S. Young (nicolesy.com)
-
- (Left) 1/30 sec; (Right) 52 sec — © Nicole S. Young (nicolesy.com)
-
- (Left) 1/10 sec; (Right) 76 sec — © Nicole S. Young (nicolesy.com)
-
- (Left) 1/125 sec; (Right) 54 sec — © Nicole S. Young (nicolesy.com)
-
- (Left) 1/10 sec; (Right) 128 sec — © Nicole S. Young (nicolesy.com)
-
- (Left) 1/10 sec; (Right) 130 sec — © Nicole S. Young (nicolesy.com)

Nicole is a photographer, published author, and educator specializing in Lightroom, Photoshop, and photography. She is best known for her books on food photography but is widely versed in various photographic genres, including landscape, nature, stock, travel, and experimental imagery.


What filters do you use? Do you stay around 4 to 6 stops or use the big 10 stop? What about tripods, If I can’t afford the RRS tripod and head what would be the next stop down for a good fiber tripod and head.
The filer I use depends on how much existing light is in the scene. For a waterfall photo on a cloudy day with lots of tree coverage, the 3-stop ND is usually all I need (and sometimes I don’t even need one at all). For beach-shots in bright-sunlight, the 6 or 10-stop is more likely to be used. Also, RRS are pricey (worth it if you can afford it), but the Induro tripods are also really good and affordable: http://nicolesy.me/1vwQ5he
The line for calculating shutter speed doesn’t look right. Shouldn’t it be like this: Start at 1/60 –> 1/30 –> 1/15 –> 1/8 –> 1/4 –> 1/2 –> 1 second instead of Start at 1/60 –> 1/30 –> 1/15 –> 1/8 –> 1/4 –> 30 sec –> 1 second?
I always wanted to try this. Thanks for the article and inspiration.
Yep! Good catch. Must have typed 30-seconds while thinking “1/2 minute” in my brain. :)
Can one use a polarizing filter for long exposures?
A polarizing filter will increase your exposure slightly, but not nearly as much as an ND filter would. It really depends on how dark your original scene is and how much blur you want to add to the water.